background image

EXCELL PRECISION CO., LTD


02005159                                                                                                                                ZSME300000225                                                                                                             

Pcs

 
This key is a composite key, while totalization is shown and weight returns to net zero, 
press M+ key to erase memory. RS232 will output MC print format (           output). 

 If there is new weight added on platter

it is less than 20 divisions in Brazil version, no 

accumulation 

, a new item will be added to totalization. If this weight is not taken off, 

nothing can be added to totalization.Display will show the totalization numbers for one 
second, then show net weight for one second, then the scale returns to the current 
weight, and prints out the last item for totalization. 

 To clear totalization data, press M+ key to let display shows up totalization numbers, 

then press the 

 M+|PRINT 

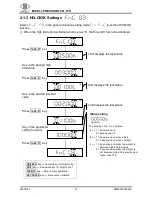
 key again, to clear totalization data. RS232 will print out 

totalization numbers, total weight, etc.  

    P.s.  Weight must return to net zero if to perform clear function. 


  F


  KEY 

Function key (In 


, select    F   key as 

“MC” or “HR”) 


Foot Switch Mode 

This function is optional. Use 


  to select 

 TARE|PT 

 key as 

“ZERO” or “PRINT” key 


If “PRINT” key is set (  

        = 10/11), all totalization data will be printed out, and   

totalization will be cleared. 

 If it is Brazil version and foot switch is set as Print function, it has  totalization function 

and print function. 


Simple Counting Mode 

Use 

 UNIT 

 key to switch unit to Pcs, to go into simple counting mode. 

1. Use 

 NET|GROSS 

 key  to select a 

sample number from “10, 20, 50, 100, or 200”. Display 

will show 


in an sequential order by pressing  


NET|GROSS 

 key. 

2. Select a sampling number, and put appropriate weight on platter, and press 

 UNIT 

 key. 

Display 

will show “           ”. The scale will go into counting mode after weight is 

stable, and display will show the sample number.  

 Unit weight insufficient (      ): Sample unit weight is 

less

 than 0.2d or total sample 

weight is 

less 

than 20d (d=division) 


While sampling, if there is insufficient sample or unit weight insufficient indication “

”, 

the scale is still usable, but there may be slight inaccuracy. 

 After Power-off, the scale automatically memorizes the sampling number, and it is 

available when 

“Pcs” unit is selected next time. 


If the setting is “automatic average unit weight “, if the object on platter > the previous 

sampling number more than 5 pcs, and also < less than 100% the previous sampling 
number, the scale will execute unit weight calibration automatically. 


Summary of Contents for PWH3

Page 1: ...contained herein is the property of Excell Precision Limited and is supplied without liability for errors or omissions No part may be reproduced or used except as authorised by contract or other written permission The copyright and the foregoing restriction on reproduction and use extend to all media in which the information may be embodied ...

Page 2: ...s 12 Configuration Workflow 12 2 1 General Function Setting 13 2 1 1 Auto Backlight Function Setting 14 2 1 2 Auto Power off Timer Setting 15 2 1 3 HI LO OK Settings 16 2 1 4 Restore to the Default Settings 17 2 1 5 Noise Filter Settings 18 2 1 6 Hold Function Settings 19 2 1 7 Auto Unit Weight Averaging Setting 22 2 1 8 Record Last Zero 22 2 1 9 Foot Switch Settings Option 23 2 1 10 F Key Functio...

Page 3: ...o Transmission at Zero 33 2 3 7 Reset Auto Transmission 34 2 3 8 Output Condition Settings 35 2 3 9 RS232 6 7 Digits Setting 36 2 3 10 RTC Adjustment 37 2 3 11 Y M D Print Layout Selection 37 2 3 12 RS485 ID Input Option 38 2 3 13 Line Feed Input 38 Appendix 1 ASCII Code Table 43 Appendix 2 7 Segment Display Characters 44 Appendix 3 Wiring Instructions 45 ...

Page 4: ...g the waterproof ability of this indicator Before opening the housing make sure the indicator is dry if there is any liquid on it please wipe it with a clean cloth HOW TO INSTALL THE HOUSING After installing the load cell power cord hookup or replacing a new rechargeable battery the housing must be screwed by the assigned order as shown below Screw lightly first then screw them tight using a 12 kg...

Page 5: ...ible avoid connecting the scale to ac power outlet sockets which are adjacent to other appliances to minimise the possibility of interference affecting the performance of the scale 5 Remove any weight that might be on the weigh pan before the scale is switched on and avoid leaving weight on the pan for long periods of time 6 All goods weighed should be placed in the centre of the weigh pan for acc...

Page 6: ... 3 Do not short the battery terminals to check whether there is current Please check whether the connection point is firm to guarantee good connection 4 The battery should be replaced by specialized person No reverse battery or the product will be damaged a Anode of battery should be connected with Anode of product battery usually red cable b Cathode of battery should be connected with Cathode of ...

Page 7: ...ication Adjustable gravity value Low power indication and auto power off AC DC power in and rechargeable battery Built in RS 232 Options pressure release valve foot switch 1 2 Specifications Analogue Input Input Sensitivity 0 3 V d Min Input Signal Range 1mV 14mV Input Zero Range 1mV 5mV Load Cell Excitation 5V DC Load Cell Drive Capacity Up to 8 x 350 load cells Non linearity 0 01 of full scale A...

Page 8: ...wt carat M unit indication 0 Zero point indication 7 oz or viss unit indication set as needed or no unit indication Net Net weight indication Low Power indication 1 5 Power Supply Power Supply Selection 6V 4 5Ah rechargeable battery Input 110VAC or 230VAC 15 Output 10VDC 1A adaptor Power Consumption Approximately DC 14 mA Indicator Approximately DC 24 mA Indicator Display backlight Charging Voltag...

Page 9: ...ontainer will show on the display Press TARE PT key again to clear tare value The scale returns to zero and NET indication goes off Tare can be continuously done until tare value full load capacity Continuous Tare Press TARE PT key for continuous weight increase decrease on platter If there is Tare the pre tare cannot be done If there is pre tare first and the tare weight more than pre tare weight...

Page 10: ...11 all totalization data will be printed out and totalization will be cleared If it is Brazil version and foot switch is set as Print function it has totalization function and print function Simple Counting Mode Use UNIT key to switch unit to Pcs to go into simple counting mode 1 Use NET GROSS key to select a sample number from 10 20 50 100 or 200 Display will show in an sequential order by pressi...

Page 11: ...y shows KEYPAD TEST MODE Press TARE PT key to enter display shows Keypad s internal code TARE PT key 06 UNIT key 05 F key 02 1NET GROSS key 04 Press ON ZERO key to back to the last screen the display shows FIRMWARE VERSION DISPLAY MODE Press TARE PT key to enter display shows the firmware version Press TARE PT key again the display shows maintenance number for 2 seconds Press ON ZERO key to back t...

Page 12: ...icator on A D value is unstable The weight of the object is over 9 divisions of the maximum capacity The weight of the object is under 1 6 maximum capacity ADIC value is over the maximum range The scale is not in level status Only available with level detector equipped 1 9 Weight Units kg 1 g 0 001 kg g 1 g 1 g lb 1 g 0 002204623 lb lb oz 1 g 0 03527396 oz oz 1 g 0 03527396 oz GN 1 g 15 432358 GN ...

Page 13: ...ws Overall workflow of the Advanced Function setting mode General Function Setting Mode External Weight Calibration RS232 Bi direction Function Setting Exit the Advanced Function Setting Mode Refer to the following sections for the detailed operation procedures of each function setting Press UNIT key Press ON ZERO key Press UNIT key Press UNIT key Press UNIT key Press ON ZERO key Press ON ZERO key...

Page 14: ...on Setting Mode Menu Automatic Backlight Function Settings Automatic Power off Timer Settings Hi Lo OK Settings Restore the Default Settings Noise Filter Settings Hold Function Settings Auto Unit Weight Averaging Setting Reserved Reserved Record Last Zero Foot switch on off settings Option F key function settings Zero Setting ON ZERO key Upward key 0 9 digit entry 1UNIT key Downward key 0 9 digit ...

Page 15: ...on on or off Press TARE PT key to go back to the advanced function setting menu On backlight function is on Off backlight function is off Auto backlight function When the weight is over 10d the display backlight will be on After the weight is stable for 10 seconds or when the scale returns to zero the display backlight switches off ON ZERO key Upward key 0 9 digit entry 1UNIT key Downward key 0 9 ...

Page 16: ...E PT key Use ON ZERO or UNIT key to key in parameter Press TARE PT key to go back to the Advanced function setting menu Automatic power off timer setting Use ON ZERO or UNIT key to key in parameter 0 No auto power off 1 When the scale is idle for 1 minute the scale automatically switches off 2 When the scale is idle for 2 minutes the scale automatically switches off 9 When the scale is idle for 9 ...

Page 17: ...Press TARE PT key Key in the parameter setting for alarm Press TARE PT key LCD displays the last status LCD displays the last status Alarm setting a b c The definition of a b c positions a 1 beep sound on 0 beep sound off b 1 beep sound on when stable 0 beep sound on when unstable c 1 beep sound on when the weight is between high and low limits 0 beep sound on when the weight is not between high a...

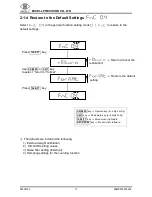
Page 18: ...l weight calibration 2 HI LO OK setting values 3 Noise filter setting External 4 Sampling settings for the counting function Return Cancel the restoration Restore the default setting Press TARE PT key Use ON ZERO or UNIT key to select return or format Press TARE PT key ON ZERO key Upward key 0 9 digit entry 1UNIT key Downward key 0 9 digit entry 1TARE PT key Move cursor rightward 1NET GROSS key Mo...

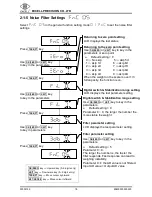
Page 19: ...ays the last status Filter parameter setting Use ON ZERO or UNIT key to key in the parameters Default setting 5 Parameter 0 9 The larger the number is the faster the filter responds Fast response can lead to weighing instability Parameter 9 the AD value is not filtered Input AD value Output AD value Digital switch Stabilization range setting Use ON ZERO or UNIT key to key in the parameters Default...

Page 20: ...hold 2 mode When the weight is stable the LCD shows the current weight value When the weight returns to zero 10d the hold mode is cancelled automatically Animal scale hold 1 mode When no load the display shows After the animal or object is on the platter and the weight is stable the display shows the weight value and hold When the animal or object is off the platter the display shows and the hold ...

Page 21: ...ting Use ON ZERO or UNIT key to key in 4 and pPress TARE PT key to enter the hold function setting mode Hold function setting LCD displays the last parameter setting Error range setting Use ON ZERO or UNIT key to key in the parameters Among 1 100 Default setting 10 Counts averaging setting Use ON ZERO or UNIT key to key in the parameters 1 2 4 8 16 32 64 Default setting 8 ON ZERO key Upward key 0 ...

Page 22: ... function setting Use ON ZERO or UNIT keys to key in 5 Hold function setting LCD displays the last parameter setting Release Hold range setting Use ON ZERO or UNIT keys to key in the parameters 0 full scale Default setting full scale Release Hold range setting LCD displays the last parameter setting ON ZERO key Upward key 0 9 digit entry 1UNIT key Downward key 0 9 digit entry 1TARE PT key Move cur...

Page 23: ...eter setting Record Last Zero Use ON ZERO or UNIT key to select the setting Default setting Record the last zero setting No record LCD displays the last parameter setting Press TARE PT key Use ON ZERO or UNIT key to key in the parameters Press TARE PT key Press TARE PT key Press TARE PT key ON ZERO key Upward key 0 9 digit entry 1UNIT key Downward key 0 9 digit entry 1TARE PT key Move cursor right...

Page 24: ...hows parameter from the previous setup Foot switch on TARE function Foot switch on PRINT function RS232 print out data sent from pressing M key If it is Brazil version and _ the format is format and it has totalization function Press TARE PT key Press TARE PT key ON ZERO key Upward key 0 9 digit entry 1UNIT key Downward key 0 9 digit entry 1TARE PT key Move cursor rightward 1NET GROSS key Move cur...

Page 25: ...resents MC function Display shows parameter from the previous setup F key function represents HR function Press TARE PT key Press TARE PT key F key function represents tare or pre tare value Press TARE PT key Press TARE PT key ON ZERO key Upward key 0 9 digit entry 1UNIT key Downward key 0 9 digit entry 1TARE PT key Move cursor rightward 1NET GROSS key Move cursor leftward ON ZERO key Upward key 0...

Page 26: ...nds later Press NET GROSS key to exit About 2 seconds later 2 2 External Weight Calibration The conditions for external weight calibration The calibration weight value placed on the platter must be over 100e and the standard deviation of the weight must be within 10 Press TARE PT key the display shows the calibration value The right digit keeps flashing The calibration value could be changed Readi...

Page 27: ...ous Transmission Rate Auto Transmission at Zero Reset of Auto Transmission Output Condition Settings RS232 6 7 digits setting RTC adjustment Y M D Print Format Selection RS485 ID Input Option Line Feed Input Press TARE PT key Key in the parameter 00 08 Key in the parameter 00 then press 1TARE PT key to exit ON ZERO key Upward key 0 9 digit entry 1UNIT key Downward key 0 9 digit entry 1TARE PT key ...

Page 28: ...bits sec Baud rate setting Use ON ZERO or UNIT key to select the desired Baud rate 600 1200 2400 4800 9600 19200 bits sec Press TARE PT key Use ON ZERO or UNIT key to select the desired Baud rate Press TARE PT key Key in the parameter 00 Press TARE PT key to exit ON ZERO key Upward key 0 9 digit entry 1UNIT key Downward key 0 9 digit entry 1TARE PT key Move cursor rightward 1NET GROSS key Move cur...

Page 29: ...t setting value Default setting Communication protocol setting Use ON ZERO or UNIT key to select the protocol setting n 8 1 E 7 1 O 7 1 Press TARE PT key Use ON ZERO or UNIT key select the protocol setting Press TARE PT key Key in the parameter 00 Press TARE PT key to exit ON ZERO key Upward key 0 9 digit entry 1UNIT key Downward key 0 9 digit entry 1TARE PT key Move cursor rightward 1NET GROSS ke...

Page 30: ... format Same net data as the scale in simple format Hi Lo OK status Same data as the scale in simple format Hi Lo OK status Simple gross weight Hi Lo OK status Simple net weight Tare value M Transmission 1 note 1 M Transmission 2 note 2 Brazil printing format note 3 Format 12 are only for Brazil Format 10 11 are not available on counting mode Press TARE PT key Use ON ZERO or UNIT key to select the...

Page 31: ...onth year choose 1 out of 2 date formats Time G T N Total Weight This line will only print when data is erased showing gross weight total of every count Note3 If it is not Brazil version it can only print under continuous transmition If it is Brazil version under decimal units mode and _ it can print out It is not available on counting mode For example 70 15Kg print as 51 07000 51 07000 51 07000 5...

Page 32: ...ission setting Use ON ZERO or UNIT key to select the transmission type Command mode Continuous transmission Constantly auto transmission Shut down RS232 _ M Mode Press TARE PT key Use ON ZERO or UNIT key to select the transmission type Press TARE PT key Key in the parameter 00 Press TARE PT key to exit ON ZERO key Upward key 0 9 digit entry 1UNIT key Downward key 0 9 digit entry 1TARE PT key Move ...

Page 33: ...r UNIT key to select the continuous transmission rate 1 time sec 2 times sec 4 times sec 8 times sec 16 times sec More than16 times sec Note Actual output times vary by hardware implements Press TARE PT key Use ON ZERO or UNIT key to select the continuous transmission rate Press TARE PT key Key in the parameter 00 Press TARE PT key to exit ON ZERO key Upward key 0 9 digit entry 1UNIT key Downward ...

Page 34: ...would be the same as Continuous Transmission Press TARE PT key Use ON ZERO or UNIT key to key in the desired parameters Press TARE PT key Key in the parameter 00 Press TARE PT key to exit Auto transmission at zero LCD shows the last setting Default setting Auto transmission at zero Use ON ZERO or UNIT key to key in the desired parameters 00 division of weight value 01 division of weight value 99 d...

Page 35: ...he same as Continuous Transmission Resetting auto transmission Use ON ZERO or UNIT key to key in the desired parameters 00 division of weight value 01 division of weight value 99 divisions of weight value Press TARE PT key Use ON ZERO or UNIT key to key in the desired parameters Press TARE PT key Key in the parameter 00 Press TARE PT key to exit Resetting auto transmission The LCD shows the last s...

Page 36: ... Use ON ZERO or UNIT key to select the desired setting All output Stable output No output when OL or unstable Stable output OL included Press TARE PT key Use ON ZERO or UNIT key to select the desired setting Press TARE PT key Key in the parameter 00 Press TARE PT key to exit RS232 2 way serial interface settings ON ZERO key Upward key 0 9 digit entry 1UNIT key Downward key 0 9 digit entry 1TARE PT...

Page 37: ...tput Condition Restriction Settings Display shows the previous setup Factory Default is 6 places Press TARE PT key Output Condition Restriction Settings Use ON ZERO or UNIT key to select desired setting Output condition 6 digits 7 digits Key in the parameter 00 Press TARE PT key to exit ON ZERO key Upward key 0 9 digit entry 1UNIT key Downward key 0 9 digit entry 1TARE PT key Move cursor rightward...

Page 38: ... move rightward Move cursor to the right end and Press TARE PT key to confirm RTC adjustment is complete Press TARE PT key Display shows the previous setup Use upward and downward key to select and use TARE PT key to confirm If y_m_d printed as Year Month Day If d_m_y printed as Day Month Year Enter the date in YY MM DD Use upward and downward key to select and use TARE PT key to confirm Press TAR...

Page 39: ...rd and downward key to select and use TARE PT key to confirm Factory default 2 Display shows the previous setup Use upward and downward key to select and use TARE PT key to confirm Press TARE PT key Press TARE PT key ON ZERO key Upward key 0 9 digit entry 1UNIT key Downward key 0 9 digit entry 1TARE PT key Move cursor rightward 1NET GROSS key Move cursor leftward ON ZERO key Upward key 0 9 digit e...

Page 40: ... RH Read Gross simple RG Read Gross weight RI Read Net simple RN Read Net weight RJ Read comparison situation current display of weight simple RT Read TARE RK Read comparison situation Gross simple RB Read current display of weight simple RL Read comparison situation Net simple Note a add before the command to read continuously b add before the command to transmit a stable value RJ RK RL Command D...

Page 41: ...Write HI setting value LO Write LO setting value Note Group is various depended on different models 00 The first group 01 The second group 02 The third group EX WS00HI001000 CR LF Write HI setting value ANS WS00HI001000 CR LF Command Format D Host Data Slave Value e g Price Position of decimal point CR LF 1 2 3 4 5 6 1 When the Slave receives this data format it will transfer the data and display ...

Page 42: ...nus OL SP SP SP SP SP SP SP SP Comparison status Simple format Byte0 Byte1 Byte2 1 2 3 4 5 6 CR LF Byte0 HI 30H 31H Byte1 OK 30H 31H Byte2 LO 30H 31H 2 6 places first decimal place not included Weight format Gross S T G S 1 2 3 4 5 6 7 SP SP o z CR LF Net S T N T 2 3 4 5 6 t l g Tare S T T R 1 2 3 4 5 6 SP SP k g Plus OL O L G S SP SP SP SP SP SP SP SP SP SP SP Minus OL O L G S SP SP SP SP SP SP S...

Page 43: ...SION CO LTD 02005159 ZSME300000225 42 Serial Data Transfer Receive Format LSB MSB 1 0 n 8 1 S 8 bit data STOP 1 0 e 7 1 S 7 bit data P STOP 1 0 o 7 1 S 7 bit data P STOP Note S Start bit STOP Stop bit P Parity bit ...

Page 44: ... 42H b 62H 1 31H C 43H c 63H 2 32H D 44H d 64H 3 33H E 45H e 65H 4 34H F 46H f 66H 5 35H G 47H g 67H 6 36H H 48H h 68H 7 37H I 49H i 69H 8 38H J 4AH j 6AH 9 39H K 4BH k 6BH 0DH L 4CH l 6CH M 4DH m 6DH N 4EH n 6EH O 4FH o 6FH P 50H p 70H Q 51H q 71H R 52H r 72H S 53H s 73H T 54H t 74H U 55H u 75H V 56H v 76H W 57H w 77H X 58H x 78H Y 59H y 79H Z 5AH z 7AH ...

Page 45: ...CO LTD 02005159 ZSME300000225 44 Appendix 2 7 Segment Display Characters Digit 7 segment letter Alphabet 7 segment letter Alphabet 7 segment letter 0 A N 1 B O 2 C P 3 D Q 4 E R 5 F S 6 G T 7 H U 8 I V 9 J W K X L Y M Z ...

Page 46: ... 3 Wiring Instructions Load cell wiring method 1 As shown below when a load cell is connected with a 4PIN cable SEN and SEN can be unconnected J11 and J12 on PCB must be tin soldered in short circuit 2 If Load Cell is 6PIN please wire as the following diagram ...

Page 47: ...s using 9PIN and 25PIN as shown below PC PIN Function Female 9 PINS Function PWH3 2 Transmit Data SG 3 Receive Data RxD 5 Signal Ground TxD Printer PIN Function Male 25 PINS Function PWH3 2 Receive Data SG 3 Transmit Data RxD 7 Signal Ground TxD To use other connection methods please identify the signal and following the above principles After it is finished please install the housing by the instr...

Reviews: