5
automatically, since a fire risk exists if the heater
is covered or positioned incorrectly.
- Do not place the appliance close to curtains and
other combustible materials.
ASSEMBLY
Part Description
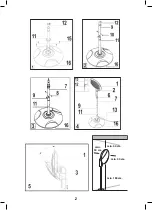
1. Heating element assembly
2. Knob
3. Body
4. Position indication plate
5. Pull switch
6. Tube cover
7. Upper post assembly
8. 3x M5X6mm screw
9. Middle post
10. 3x M5X6mm screw
11. Lower post assembly
12. 2x clamp
13. Power cord
14. Base
15. 4x M6X30mm screw
16. Base assembly
Before installing your appliance, make sure
that the supply plug is not connected to the
main supply plug. Take out all the screws before
assembly.
01
Insert the lower post assembly (11) into the
base assembly (16) and then fix it tightly by
means of 4x M6X30 screws (15). Insert the base
cover (14) and then insert one of the clamps (12)
onto the lower post (11). (fig.1)
02
Join the lower post assembly (11) and the
middle post (9) together with 3x M5X6 screws
(10). Insert one clamp (12) onto the middle post
(9). (fig.2)
03
Join the upper post assembly (7) and the
middle post (9) together with 3x M5X6 screws (8).
(fig.3)
04
Loosen the tube cover (6) and take out the
inner tube from the upper post assembly (7)
and tighten the tube cover (6). Join the heating
element assembly (1) and the upper post
assembly (7) together, then fix them tightly by
rotating the knob (2), and put the power cord
supply (13) into the clamps (12). (fig.4)
05
According to the requested angle the heating
element (1) can be adjusted at an angle of 0°-45°.
(fig.5) The minimum installation height of the
heater is 1.8 meters.
OPERATION
The appliance is switched on by means of the pull
switch (5). The slight vibration noticeable when
the appliance is switched on will stop after a few
seconds.
SWITCH POSITIONS
- Position 0: Stop
- Position 1: 650W (normal power)
- Position 2: 1350W (intermediate power)
- Position 3: 2000W (full power)
MAINTENANCE
Your appliance does not require any particular
maintenance. However, in the event of a
malfunction, please consult a service agent or
similar qualified person.
THE ENVIRONMENT
When this product reaches the end of its useful life,
hand it in at a collection point for the recycling of
electric and electronic equipment. Please refer to
the symbols on the product, the users instructions
or the packaging. Contact your municipality for
the address of the appropriate collection point in
your neighbourhood.
Summary of Contents for YT2-000060
Page 2: ...2 min 180 cm min 50 cm min 50 cm min 50 cm...
Page 36: ...36 GR 15 OFF Service 1 2...
Page 46: ...46 05 1 0 45 1 8 5 0 1 650W 2 1350W 3 2000W...
Page 47: ...47...
Page 48: ...48...


