background image

27

Maintenance

w w w . t e c n a r e . c o m

T Series | rev.:1.1

TANIT

5.2.  TANIT SUB


Procedure.

Place protective material between the enclosure and the surface to avoid scratching the fins

5.2.1. 

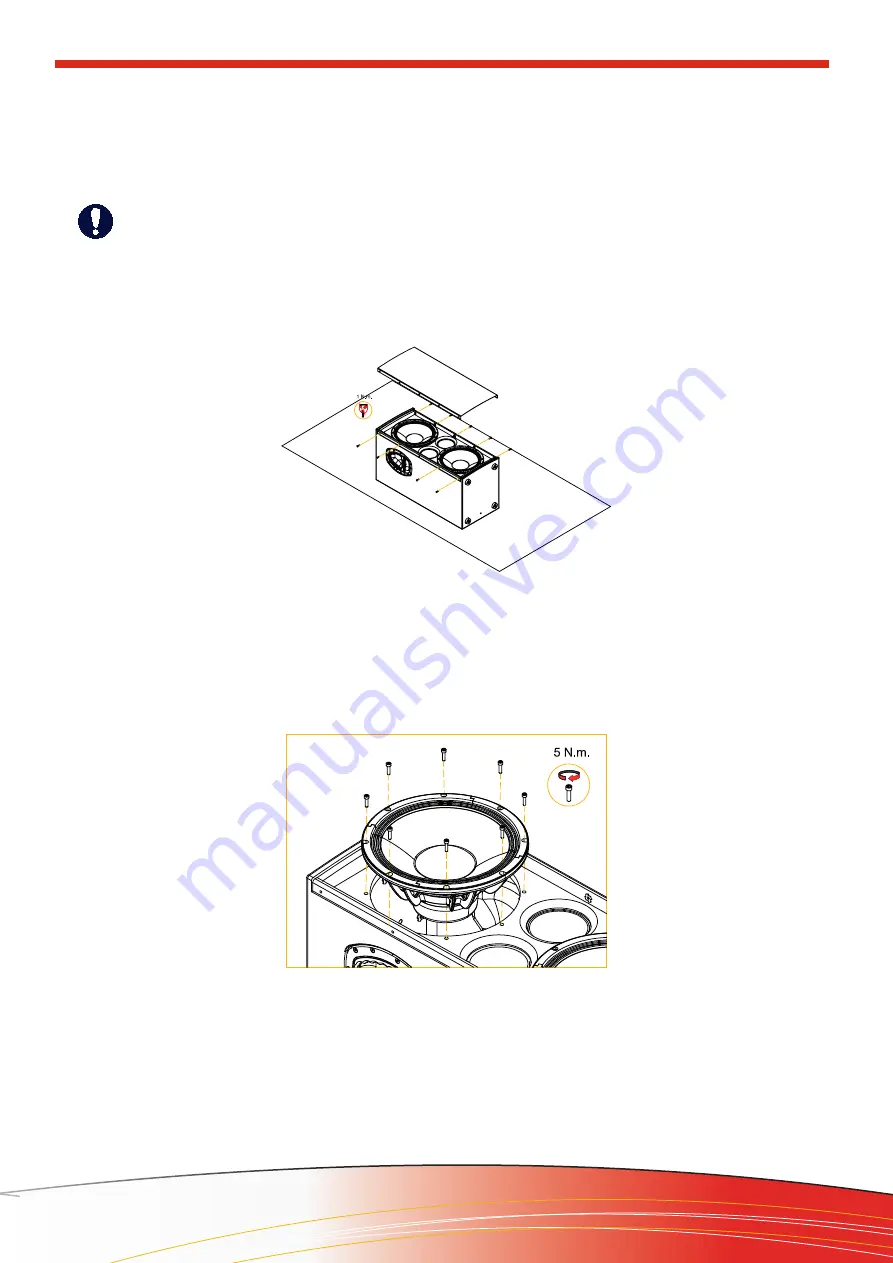
Accesing to the woofer chamber 

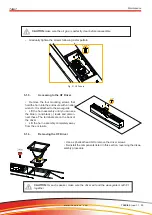
•  Remove the grille and grille foam using a 3mm allen wrench. During the removal, hold the grille and 
grille foam in place. This prevents the grille foam from tearing

Fig.24 Accesing to the TANIT SUB woofer chamber

5.2.2. 

Removing the woofer

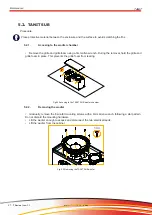
•  Gradually, remove the 8 woofer mounting screws with a 4mm allen wrench, following a star pattern. 
Do not discard the mounting hardware
•  Lift the woofer enough to access and disconnect the two electrical leads
•  Lift the woofer from the cabinet

Fig. 25 Removing the TANIT SUB woofer

Summary of Contents for Tecnare TANIT

Page 1: ...Keep these important operating instructions Check www tecnare com for updates Operation Manual Arcuate Line Source Column TANIT T Series V 1 1 ...

Page 2: ......

Page 3: ...y errors or inaccuracies that may appear in this manual or the products and software described in it Technical specifications dimen sions weights and properties do not represent guaranteed qualities As manufacturers we reserve the right to make alterations and modifications within the framework of legal provisions as well as changes aimed at improving quality EXEL ACOUSTICS SL CL Encinar 282 Pol I...

Page 4: ...g Manual before installing the system Use the rigging accessories described in the rigging manual a follow the associated procedures 10 This speaker enclosure is capable of creating a strong mag netic field Please use caution around the enclosure with data storage devices such as phones computers or hard drives 11 Handles are for moving the system only 12 Beware of sound levels Never stand in the ...

Page 5: ...ortant Instructions Information complé mentaire Obligation Cela doit être strictement instructions Suivi Wichtige Betrieb sanweisung oder Gebrauchsan leitung sanleitung Informationen Zusätzliche Infor mationen Pflicht Diese Anweisungen müs sen strikt befolgt Importantes instruc ciones operativas Información com plementaria Obligación Estas instrucciones deben ser estrictamente seguidas ...

Page 6: ... Directivas Declare under our sole responsibility that devices in the TANIT range of products comply with relating Di rectives 1 Directiva de Baja Tensión 2006 95 CE 2 Directiva de Compatibilidad Electromagnética 2004 108 CE 3 Directiva RoHS 2011 65 UE 4 Directiva RAEE 2012 19 UE 1 Low Voltage Directive 2006 95 CE 2 EMC 2004 108 CE 3 RoHS Directive 2011 65 UE 4 WEEE Directive 2012 19 UE DECLARACIÓ...

Page 7: ...p ____________________________________ 15 2 1 Standalone System ____________________________ 15 2 2 TANIT TANIT SUB ___________________________ 16 2 3 TANIT TANIT SUB and Subwoofer Extension _______ 17 3 POWER AMPLIFIER SELECTION FOR USE WITH TANIT _____ 18 3 1 Recommended Amplifier Power __________________ 18 4 LOUDSPEAKER CONNECTION DIAGRAMS _______________ 19 4 1 Connection to PA3000___________...

Page 8: ... Tecnare product please contact us We look forward to helping you in the near future As part of a continuous evolution of techniques and standards Exel Acoustics SL as manufacturer of Tecnare products reserve the right to change the specifications of its products and the content of its docu ments without prior notice Updates and supplementary information are available on the Tecnare website http w...

Page 9: ...l 8Ω impedance The low frequency limit is 35 Hz The subwoofer is connected via 4 point speakON connector The Powering mode can be switched for passive operation using the internal passive crossover network or ac tive through a dedicate preset Self powered version is also available Tanit SUB features an Autoconnect panel on top for stacking and connecting the companion TANIT Line Source Column encl...

Page 10: ...ontroller Touring Rack containing 1xTSeries amplifier and power audio distri bution Touring Rack containing 2xTSeries amplirier TPD32 power distributor and TPB2U connection panel for audio network distribution Loudspeaker cable 4x4mm2 assembled with Neutrik Available sizes 1m 5m 10m 25m 3 2ft 16 4ft 32 4ft 82ft Loudspeaker cable 8x2 4mm2 assembled with Neutrik Available size 10m 32 4ft Loudspeaker...

Page 11: ... to pin to all the other connectors on the cabinet Remember that parallel connection reduces the total impedance Ω seen by the amplifier The following subsections describe the electrical connections CAUTION The total impedance of the loudspeaker connected in parallel must not drop below the minimum operating impedance of the amplifier This will result in unsatisfac tory performance and may cause d...

Page 12: ...r connectors on the cabinet Remember that parallel connection reduces the total impedance Ω seen by the amplifier Serial No Designed by Made in Spain C Encinar 282 P I Monte Boyal 45950 Casarrubios del Monte Toledo TEL 34 91 8170110 EXEL ACOUSTICS SL www tecnare com e mail support tecnare com a c o u s t i c s Read manual and safety instructions before use We recommend operate only with Tecnare T ...

Page 13: ...gured Tecnare amplifier otherwise there is a risk of damaging the loudspeaker components PIN ASSIGNMENT IN TANIT SUB As we have described in the previous section if you run the subwoofer in bi amp mode the subwoofer signal will drive to pins 2 Pins 1 of the input are connected to pins 1 of the link connector and can be used to loop the signal through to TANIT Moreover in this way with TANIT on top...

Page 14: ...m website 1 6 2 Amplification To power TANIT Loudspeakers Tecnare recommends amplifiers with the power ratings enough to feed the loudspeakers For high power or live applications it is recommended to oversize the amplifiers on to the nominal AES output of the loudspeaker In certain specific cases it is possible to slightly under pow er the loudspeakers as long as the amplifier will not be driven t...

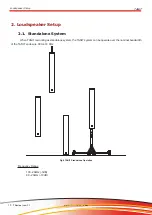
Page 15: ...1 TANIT 2 Loudspeaker Setup 2 1 Standalone System When TANIT is working as standalone system the TANIT system can be operate over the nominal bandwidth of the TANIT enclosure 90 Hz 18 KHz Fig 6 TANIT Standalone Operation Frequency Range 100 20kHz 3dB 90 20kHz 10dB ...

Page 16: ...all acoustic power In a composite configuration with TANIT SUB the TANIT system bandwidth is extended down to 40Hz and the system contour is reinforced around 8 dB The TANIT_SUB preset is the setup available for combinations of TANIT on top of TANIT SUB Using Autoconnect connexion or when up to 60cm 24in separation distance If this distance is more than 60cm 24in do not forget add its correspondin...

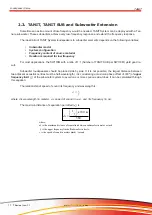
Page 17: ...UB per SW118M yield good re sult Subwoofer loudspeakers should be placed side by side If it is not possible the largest distance between two adjacent acoustics centres must be half wavelength it is considering a maximun phase offset of 180º of upper frequency limit fr of the subwoofer system to avoid one or more spurious side lobes It can be calculated through this equation The relationship of spe...

Page 18: ...TANIT loudspeaker needs to be connected in parallel as these amplifiers can comfortably drive 2 ohm loads 3 1 1 Maximun drive capability When using TANIT in STANDALONE each PA Series amplifiers can drive a maximum of ONE en closure by channel and two enclosures by channel if you use a T44 Series When using TANIT SUB in BI AMP each PA Series amplifiers can drive a maximum of ONE enclo sure by chann...

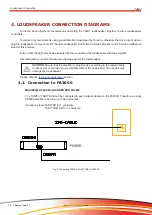
Page 19: ... selected before connecting the loudspeaker with the amplifier Operating with an incorrect preset can damage part of the loudspeaker Please note the technical specification section 4 1 Connection to PA3000 MAXIMUM OF 04 ENCLOSURES PER PA3000 01 x TANIT or TANIT SUB can be connected to each output channel on the PA3000 Therefore a single PA3000 amplifier can drive up to 02 enclosures Impedance load...

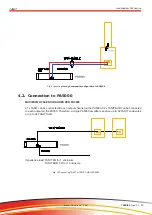
Page 20: ...UM OF 04 ENCLOSURES PER PA3000 01 x TANIT can be connected to each output channel on the PA5000 02 x TANIT SUB can be connected to each output on the PA500 Therefore a single PA5000 amplifier can drive up to 02 TANIT enclosures or up to 04 TANIT SUB Impedance load TANIT 6Ω for 1 enclosure TANIT SUB 8Ω for 1 enclosure Fig 10 Connecting TANIT or TANIT SUB to PA5000 ...

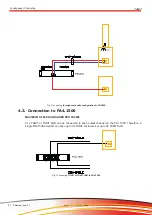
Page 21: ... configuration to PA5000 4 3 Connection to PA4 1500 MAXIMUM OF 04 ENCLOSURES PER PA3000 01 x TANIT or TANIT SUB can be connected to each output channel on the PA1 1500 Therefore a single PA4 1500 amplifier can drive up to 04 TANIT enclosures or up to 04 TANIT SUB Fig 12 conecting TANIT or TANIT SUB to PA4 1500 ...

Page 22: ... 48 T10 48 T06 48 T03 48 T20 44 T10 44 T06 44 T20 48 T10 48 T06 48 T03 48 TANIT 2 1 1 2 1 NR NR 8 4 4 8 4 NR NR TANIT SUB 2 1 1 2 1 NR NR 16 4 4 8 4 NR NR TANIT PASSIVE 1 NR NR NR NR NR NR 4 NR NR NR NR NR NR Table 3 Maximun number of enclosures on TSeries Amplifiers Impedance load TANIT 1 Enclosure 6Ω 2 Enclosures 3Ω TANITSUB 1 Enclosure 4Ω 2 Enclosures 2Ω TANIT PASSIVE MODE 1 System 2 4Ω Make su...

Page 23: ...3 Loudspeaker Connection w w w t e c n a r e c o m T Series rev 1 1 TANIT Fig 14 conecting TANIT or TANIT SUB to TSeries Amplifiers Fig 15 conecting through composite configuration to TSeries amplifiers ...

Page 24: ...e surface to avoid scratching the fins 5 1 1 Accessing to the woofer chamber Remove the grille and grille foam using a 3 mm allen wrench During the removal hold the grille and grille foam in place This prevents the grille foam from tearing Fig 16 Accesign to the woofer chamber 5 1 2 Removing the woofer Gradually remove the 4 woofer mounting screws with a Philips screwdriver following a star patter...

Page 25: ...ng up Remove the rear metal plate with a Phillips screwdriver and using a lever Fig 20 Accesing to the HF Diaphragm 5 1 4 Replacing the Diaphragm Remove the four M4 allen diaphragm s screws Disconnect the black lead and blue lead from the diaphragm connectors Lift the diaphragm from the magnet Use a blower or double face adhesive to remove any particle Position the new diaphragm assembly Fig 17 Re...

Page 26: ...horn assembly until you can see the blue and black leads and discon nect these The terminals are on the back of the driver Lift the horn assembly completely away from the enclosure 5 1 6 Removing the HF Driver Use a spherical head bit to remove the driver screws Reinstall the components listed in this section reversing the disas sembly procedure CAUTION make sure the air gap is perfectly clear bef...

Page 27: ... allen wrench During the removal hold the grille and grille foam in place This prevents the grille foam from tearing Fig 24 Accesing to the TANIT SUB woofer chamber 5 2 2 Removing the woofer Gradually remove the 8 woofer mounting screws with a 4mm allen wrench following a star pattern Do not discard the mounting hardware Lift the woofer enough to access and disconnect the two electrical leads Lift...
Page 28: ...ont grille will no longer adequately protect the sensitive speaker membranes In addition appreciable dust deposits may considerably impair the functionality of a loudspeaker membrane For this reason the loudspeakers should be transported and stored in a safe careful dry and largely dust free way FUND TANIT protective soft cover for two TANIT FUND TANIT SUB protective soft cover for one TANIT SUB F...

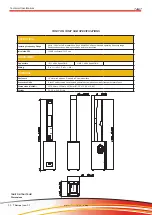
Page 29: ...0 W continuous loudspeaker Note Power Handling measured using AES Standards 2 hours test made with continuous pink noise signal 6 db crest factor from the recommended xover point Power on Continuous Program is defined as 3 dB greater than the Nominal rating High Frequency 2 x 1 inch neodimium magnets motor compression driver Nominal impedance 16Ω driver Voice coil size 38 mm 1 5 inch keton polymer...

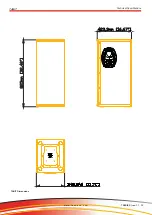
Page 30: ...30 Technical Specifications w w w t e c n a r e c o m T SERIES rev 1 1 TANIT TANIT SUB Dimensions ...

Page 31: ... 8 ohm COMPONENT Low Frequency 2 x 12 inch cone drivers neodymium magnets direct radiation bass reflex Nominal impedance 16Ω loudspeaker Voice coil size 88 mm 3 5 inch Power Handling Capability 900 W AES 1800 W continuous loudspeaker Note Power Handling measured using AES Standards 2 hours test made with continuous pink noise signal 6 db crest factor from the recommended xover point Power on Conti...

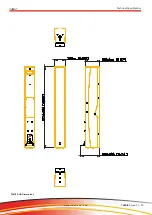
Page 32: ...32 Technical Specifications w w w t e c n a r e c o m T SERIES rev 1 1 TANIT TANIT Dimensions ...

Page 33: ...e Response depends on loading conditions and room acoustics Calculated SPL 135 dB continuous 141 Peak AUDIO INPUT Connectors IN 1 x NL4 SpeakON LINK 1 x NL4 SpeakON Wiring Pin 1 LF Pin 2 N A PHYSICAL Enclosure 16 mm birch plywood Finished in Polyurea surface Protective Grille Black Powder coated hex stamped perforated steel with acoustically transparent black fabric Dimensions HxWxD 2078 8mm x 355...

Page 34: ...assumes no responsibility or liability for any errors or inaccuracies that may appear in this manual Except as permitted by applicable copyright law no part of this publication may be reproduced stored in a retrieval system or transmitted in any form or by any means electronic mechanical recording or otherwise without prior written permission from Exel Acoustics Tecnare and PCC Net are trademarks ...

Page 35: ... 1 2019 EXEL ACOUSTICS SL CL Encinar 282 Pol Ind Monte Boyal 45950 Casarrubios del Monte To Spain support tecnare com www tecnare com www facebok com tecnare T 34 918 170 110 34 918 171 001 F 34 918 183 053 ...

Reviews: