background image

how to take care of your cycle

Storage

Keep the equipment in a dry place with as little temperature variation 
as possible.  Try to protect from dust and always unplug when not in 
use (if applicable).

Cleaning

Use a warm, damp cloth to wipe the surfaces.  Mild detergent may be 
used if necessary.

Never remove the 
protective casing.

!

 If you have a problem with your equipment, before you do anything else please check that all 

the cables have been connected correctly.  Loose cables are very common and many problems 

can be solved by making sure the cables are properly connected

!

16

Transporting your cycle

Your cycle has 2 transport wheels to help you move it around.  To engage 
the wheels, tilt the cycle towards you with the handle bars and then us-
ing the handlebars push the cycle to your desired location.

Maintenance

Ensure you regularly check components for wear and make sure 
all the nuts and bolts are tightened before each exercise session.

The resistance level is electronically measured and shown as 
‘watts’ on the display.  It’s calibrated at the factory and as such 
does not need to be re-calibrated when assembled, serviced and 
operated according to this owner’s manual.

Monitoring your heart rate

This cycle has 2 ways of monitoring pulse rates:

Hand Pulse Sensors

This cycle  is fitted with 2 hand pulse sensors.  To obtain a pulse reading you 
must have both your left and right hands on the sensors at the same time.  Do 
not grip the hand sensors too tight and allow the computer a few seconds to 
display the reading.

Some people may not be able to obtain an 

accurate hand pulse reading due to variations in 

circulation.

!

If you are having problems with your heart rate reading please note that some fibres used in clothes eg) polyester, create static electricity that 
may prevent a reliable heart rate reading.  Mobile phones, TV’s, microwaves and other electrical appliances that generate an electromagnetic 
field may also interfere with heart rate measurement.

If you are still having problems with your equipment, please get in touch with your local York distributor using the details found in the Customer 
Support section on page 5.

Troubleshooting

Wireless heart rate receiver

This cycle features a built in receiver meaning it will pick up the 
signal from a chest strap.  A chest strap will give a heart rate 
reading to ECG accuracy.  We recommend a chest strap is worn 
when using HRC programs.  To purchase one, please see the 
‘Contact Us’ section at the start of this manual or visit www.york      

Summary of Contents for AchieveHRC

Page 1: ...owner s manual 01 03 2008...

Page 2: ...tive piece of equipment as your training partner and we are certain it will keep you motivated on the way to achieving your personal fitness goals Please take the time to read this owner s manual as i...

Page 3: ...06 user instructions 11 quick start console display and feedback button functions using workout programs exercising with your cycle 14 cycle features explained 15 how to take care of your cycle 16 tr...

Page 4: ...nsure you warm up well before using the equipment as this will help to prevent muscle strain After eating allow 1 2 hours before exercising as this will help to prevent muscle strain Never overload th...

Page 5: ...n be maintained only if it is regularly examined for damage and wear This includes any ropes pulleys nuts bolts moving parts bushes chains wheels bearings connection points etc Ensure that you inspect...

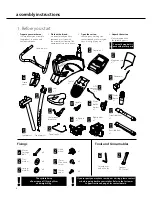
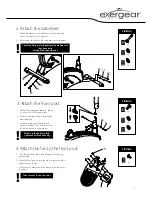
Page 6: ...he right way up 4 Unpack the carton Make sure you have the following parts Console x 1 Handle bar x 1 Seat post x 1 Towel rack x 1 Fixings Tools and Consumables Part No 10 Part No 11 Part No 37 Part N...

Page 7: ...ure in place using the bolts and washers as shown be sure to fit them in the same order as the diagram Make sure the bolts are fully tightened with the allen key FIXINGS FIXINGS x 4 Part No 37 x 4 Par...

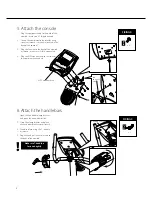
Page 8: ...ted 4 Plug the MP3 connect wire to the front of the console when needed 8 6 Attach the handlebars 1 Open the handlebar clamp bracket and place the handlebar inside 2 Close the clamp bracket and place...

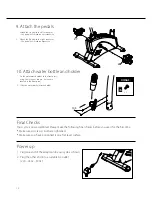
Page 9: ...mount to the bottom of the seat as shown nuts and washers located in the back of seat 2 Fix the seat to the top of the seat post using the spanner to tighten both sides 3 Slide the seat post into the...

Page 10: ...e it for the first time Make sure all screws bolts are tightened Make sure you have positioned it on a flat level surface Power up 1 Plug one end of the adaptor into your cycle as shown 2 Plug the oth...

Page 11: ...urrent heart rate in beats per minute bpm Load Current resistance level Watt Current level of effort being used expressed in watts Screen Display fitness test reset Use this mode if you just want a qu...

Page 12: ...ance level L1 to L16 15 Press start stop to begin your workout HRC Heart Rate Control HRC programs work by automatically adjusting the resistance to keep you working out at your target heart rate To d...

Page 13: ...13 Scroll the wheel up down to set your target time 14 Press enter to confirm 15 The value of 25 will be flashing in the WATT window 16 Scroll the wheel up and down to set your level of effort watts 1...

Page 14: ...tes and can be done on most days of the week Weight loss To see a significant reduction in body fat your sessions must be a little more intense between 60 and 70 of your estimated maximum heart rate T...

Page 15: ...e resistance is controlled by a magnet which is moved closer or further away from the flywheel the closer the magnet is to the flywheel the higher the resistance The magnet is computer controlled to a...

Page 16: ...ing to this owner s manual Monitoring your heart rate This cycle has 2 ways of monitoring pulse rates Hand Pulse Sensors This cycle is fitted with 2 hand pulse sensors To obtain a pulse reading you mu...

Page 17: ...ption if it becomes defective malfunctions or otherwise fails to conform with this warranty under normal non commercial personal family or household use In repairing the product York Barbell may repla...

Page 18: ...exploded diagram 18...

Page 19: ...19...

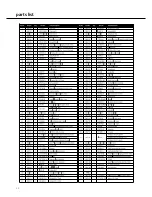
Page 20: ...parts list 20...

Reviews: