background image


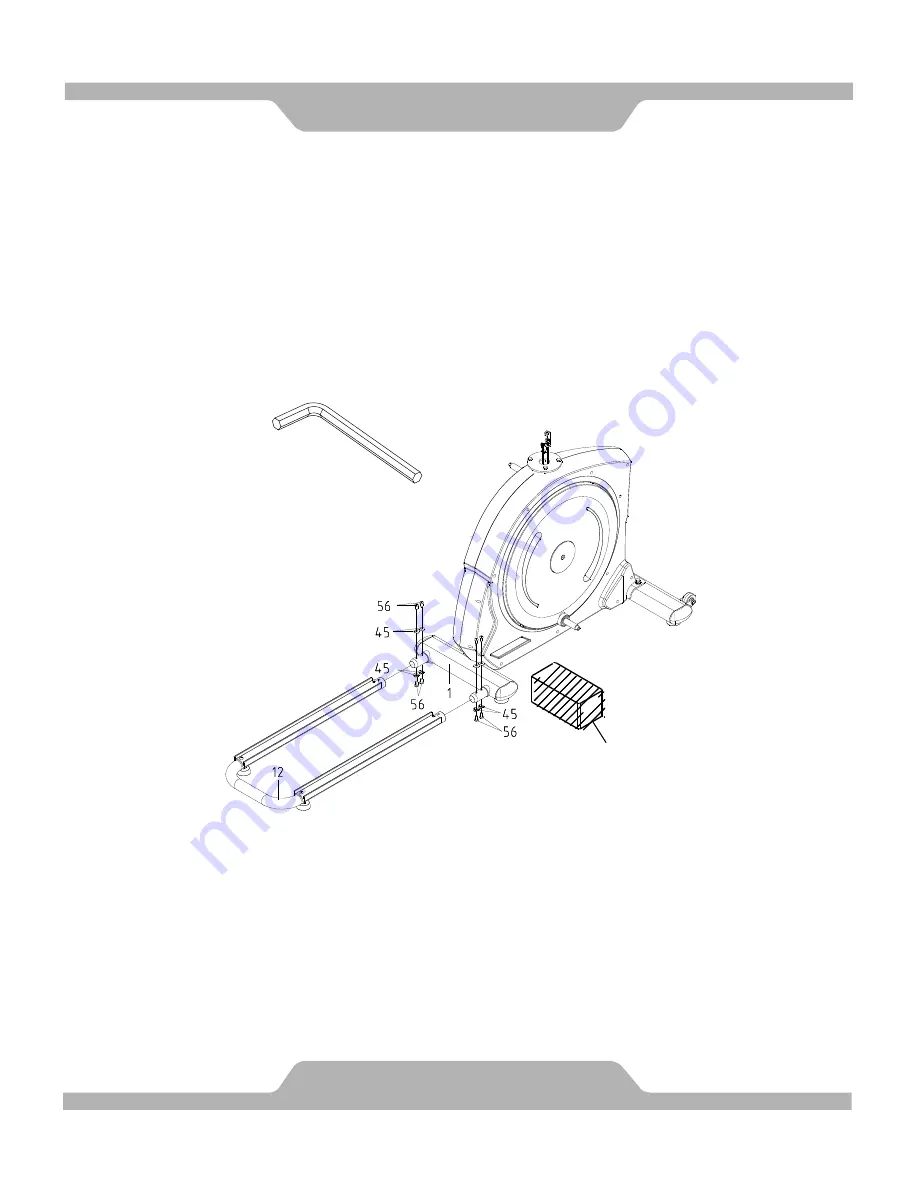
2. U Shape Rail Installation


Place a block of wood to raise the main body for easier to install the U Shape 
Rail (12). 
Remove eight M8x20x1.5T Curve Washers (45) and eight M8x16mm Bolts (56) 
from the Main Frame (1).    Remove bolts with the M5 Allen Wrench provided.   
Attach the U Shape Rail (12) onto the tubes of the Main Frame (1) with eight 
M8x20x1.5T Curve Washers (45) and eight M8x16mm Bolts (56) that were 
removed.    Tighten bolts with the M5 Allen Wrench provided.     


ASSEMBLY


11 

Allen Wrench (M5)   

Tool: 

Block of Wood 

Summary of Contents for Pro Stride 21

Page 1: ...Read all instructions carefully before using this product Retain this owner s manual for future reference The specifications of this product may vary from this photo subject to change without notice I...

Page 2: ...2 IMPORTANT LABELS 3 PRODUCT SAFETY 4 PART DRAWING 5 BOX CONTENTS 6 PART LIST 8 ASSEMBLY 10 COMPUTER 24 ADJUSTMENTS 27 TROUBLE SHOOTING MAINTENANCE 28 WARM UP 29 WARRANTY 30 FAX FORM 31 TABLE OF CONT...

Page 3: ...ail us at service paradigmhw com Please visit our website at www paradigmhw com Please have the following information ready when requesting for service Your name Phone number Model number Serial numbe...

Page 4: ...IMPORTANT LABELS 3...

Page 5: ...west position Step on the pedal and stride over the main frame then step on the other pedal When using please hold onto the handlebars To ensure the pedals run smoothly push or pull on the handlebars...

Page 6: ...PART DRAWING 5...

Page 7: ...7 Handrails 1 SET 68 69 Right Left Front Post Decorative Covers 1 SET 78 79 Handrail Arm Decorative Covers A B 2 SETS 88 Bottle Holder 1 PC 72 Nut Cap M8x45 6 PCS Lubricant 1 PC B4 Right Handrail Arm...

Page 8: ...Nut 3 8 x17T 2 PCS 43 Bolt M8x50mm 4 PCS 44 Nylon Nut M8x7 7T 4 PCS 45 Curve Washer M8x20x1 5T 4 PCS 47 Hexagon Head Bolt M8x16mm 4 PCS 48 Washer 5 16 x20x2 0T 4 PCS 55 Bolt M5x16mm 10 PCS 106 Bolt M...

Page 9: ...7 1 014 Right Handrail 1 043 Bolt M8x50mm 4 015 Hand Pulse Handlebar 1 044 Nylon Nut M8x7 7T 10 016 Idle Wheel Bracket 1 045 Curve Washer M8x20x1 5T 12 017 Bolt 1 4 x1 3 4 44mm 2 046 Handrail Arm Axle...

Page 10: ...Knob 1 070 Oval End Cap 30x 70x2 0mm 6 096 Tension Cable 1 071 Belt 520xJ7 1 097 Hand Pulse Sensor Wire 2 072 Nut Cap M8x45 6 098 Hand Pulse Sensor 9B 2 073 Foot Pedal 2 099 Computer ST7655 1 074 Hand...

Page 11: ...lt holes Attach the Front Stabilizer 9 onto the front curve of the Main Frame 1 with two 3 8 x64mm Bolts 35 four 3 8 x20x2 0T Washers 36 and two 3 8 x17T Cap Nuts 37 Tighten bolts with the Hex Tool wi...

Page 12: ...ashers 45 and eight M8x16mm Bolts 56 from the Main Frame 1 Remove bolts with the M5 Allen Wrench provided Attach the U Shape Rail 12 onto the tubes of the Main Frame 1 with eight M8x20x1 5T Curve Wash...

Page 13: ...n the Adjustable Levelers 66 91 on the Front Stabilizer 9 Main Frame 1 or U Shape Rail 12 as needed to level the elliptical trainer The elliptical trainer has to be leveled to prevent from wobble or s...

Page 14: ...e II 94 from the Main Frame 1 to the Sensor Wire I 93 from the Front Post 2 and carefully tuck the wires into the Main Frame 1 before attaching the Front Post 2 onto the Main Frame 1 Attach the Front...

Page 15: ...ut some lubricants onto both horizontal axles of the Front Post 2 and both axles of the Crank 11 Remark Gently apply lubricant evenly on Front Post 2 Brush tool is recommended ASSEMBLY 14 Lubricant 1...

Page 16: ...uminum Plate 105 Secure the Right Rotate Bar 8 in position with one M8x16mm Hexagon Head Bolt 47 and one 5 16 x20x2 0T Washer 48 Tighten bolt with the Hex Tool with Phillips Screwdriver provided Untie...

Page 17: ...7 7T Nylon Nut 44 and one 5 16 x20x2 0T Washer 48 that were removed Tighten bolt and nylon nut with the Hex Tool with Phillips Screwdriver and M5 Allen wrench provided Install three M8x45 Nut Caps 72...

Page 18: ...ASSEMBLY 17 INCORRECT CORRECT Hex Tool with Phillips Screwdriver 13mm Tool Allen Wrench M5...

Page 19: ...4 with four M8x50mm Bolts 43 four M8x7 7T Nylon Nuts 44 and four M8x20x1 5T Curve Washers 45 Tighten nylon nuts with the Hex Tool with Phillips Screwdriver provided Hardware ASSEMBLY 18 43 Bolt M8x50...

Page 20: ...the hole on the Hand Pulse Handlebar 15 and then pull it out from the Hand Pulse Handlebar 15 Attach the Hand Pulse Handlebar 15 onto the Front Post 2 with two M8x25mm Bolts 106 Tighten bolts with the...

Page 21: ...Attach the Left Right Front Post Decorative Covers 68 69 onto the Front Post 2 with two M5x16mm Bolts 55 Tighten bolts with the Hex Tool with Phillips Screwdriver provided Hardware ASSEMBLY 20 55 Bolt...

Page 22: ...M5x16mm Bolts 55 Tighten bolts with the Hex Tool with Phillips Screwdriver provided Attach the Handrail Arm Decorative Cover A 78 and Handrail Arm Decorative Cover B 79 onto the Right Handrail Arm 4 w...

Page 23: ...lts 60 from the Front Post 2 Remove bolts with the M4 Allen Wrench provided Attach the Bottle Holder 88 onto the Front Post 2 with two M5x12mm Bolts 60 that were removed Tighten bolts with the M4 Alle...

Page 24: ...ed Connect the Sensor Wire I 93 and Hand Pulse Sensor Wires 97 to the wires that come from the Computer 99 and then attach the Computer 99 onto the top end of the Hand Pulse Handlebar 15 with four M5x...

Page 25: ...arting to exercise SPEED Displays current speed TIME Count up Without a preset time time will count up from 00 00 to a maximum of 99 59 TIME can be preset in 1 minute increments between 01 00 and 99 0...

Page 26: ...u access the setup mode for TIME DISTANCE CALORIES and TARGET PULSE When you are in each setup mode for instance the time setup when the time value is blinking you can press the SET button to adjust t...

Page 27: ...wn from 00 60 and the pulse reading will blink With the users current pulse When the countdown reaches 0 it will show F6 and display nothing else until you push another button This is the end of the w...

Page 28: ...control knob in a counterclockwise direction Adjusting the Adjustable Leveler Turn the adjustable leveler on the front stabilizer main frame or U shape rail as needed to level the elliptical trainer T...

Page 29: ...connections for the hand pulse sensors are secure No tension adjustment There are 15 tension adjustment levels If the tension remains the same for all levels that means the Tension Cable 96 did not in...

Page 30: ...ard Pull your feet as close into your groin as possible Gently push your knees towards the floor Hold for 10 counts Toe Touches Slowly bend forward from your waist letting you back and shoulders relax...

Page 31: ...rame welding and brake system of this product is warranted to be free from defects for 3 three years All other parts and workmanship including electrics upholstery foam ball bearings pulleys cables sh...

Page 32: ..._ Night ____________________________________________ Email Address ____________________________________ SERIAL __________________________________________ MODEL ________________________________________...

Reviews: