background image

Setting up and Using Your intelligent Optical Channel Checker

12

iOCC

Setting up Your Unit

Setting up Your Unit

You can set up your iOCC easily in a few steps. This includes the pass/fail 
thresholds, analysis parameters, spectral unit and default view for your 
tests.

If you set power offset and detection level values, they will pertain to each 
channel. The power offset value will let you detect a wider array of 
channels. So for example, if a channel has a value of –12 dBm and the 
detection level is at –10 dBm with no power offset, the channel will not be 
detected, whereas an offset value of 5 dBm will let you detect the channel 
even if the value is slightly different.

To select the spectral unit to display:
1.

From the main window, tap 

User Preferences

.

2.

Under 

Display

, select the units, either none, the wavelength or the 

frequency. This will reflect both in the detailed view in the upper part of 
the display and in the table view. 

3.

Once you are done, tap 

OK

.

Summary of Contents for FTB- MAX-740C DWOCC Series

Page 1: ...User Guide intelligent Optical Channel Checker iOCC www EXFO com ...

Page 2: ... under any patent rights of EXFO EXFO s Commerce And Government Entities CAGE code under the North Atlantic Treaty Organization NATO is 0L8C3 The information contained in this publication is subject to change without notice Trademarks EXFO s trademarks have been identified as such However the presence or absence of such identification does not affect the legal status of any trademark Units of Meas...

Page 3: ...ligent Optical Channel Checker 9 Installing the EXFO Universal Interface EUI 9 Cleaning and Connecting Optical Fibers 10 Setting up Your Unit 12 Performing an Acquisition 16 Changing the Viewing Mode 18 Analyzing Results 21 Generating Reports 22 Saving Acquisitions 25 Opening Acquisition Files 26 4 Maintenance 27 Cleaning EUI Connectors 28 Recalibrating the Unit 30 Recycling and Disposal 31 5 Trou...

Page 4: ...Contents iv iOCC 6 Warranty 37 General Information 37 Liability 38 Exclusions 38 Certification 38 Service and Repairs 39 EXFO Service Centers Worldwide 40 Index 41 ...

Page 5: ...ulatory Information For Electromagnetic Interference and Compatibility Regulatory information on your product refer to the user documentation of your platform European Declaration of Conformity The full text of the EU declaration of conformity is available at the following Internet address www exfo com en resources legal documentation ...

Page 6: ......

Page 7: ...e expected channels at the transmitter location are present and that they meet the minimum power per channel requirements You can indicate a power offset value to help correct values related to tap ratios When your scans show a failed result you can switch to the OTDR application included in your module to troubleshoot and analyze the faulty channel Available Models The following iOCC models are a...

Page 8: ...Introducing the intelligent Optical Channel Checker 2 iOCC Module Overview Module Overview Input port FTBx 740C DWOCC MAX 740C DWOCC MAX 5205 DWOCC ...

Page 9: ...rious injury Do not proceed unless you understand and meet the required conditions CAUTION Indicates a potentially hazardous situation which if not avoided may result in minor or moderate injury Do not proceed unless you understand and meet the required conditions CAUTION Indicates a potentially hazardous situation which if not avoided may result in component damage Do not proceed unless you under...

Page 10: ......

Page 11: ...d procedures namely for operation and maintenance other than those specified herein may result in hazardous radiation exposure or impair the protection provided by this unit WARNING If the equipment is used in a manner not specified by the manufacturer the protection provided by the equipment may be impaired WARNING Use only accessories designed for your unit and approved by EXFO For a complete li...

Page 12: ...PORTANT When you see the following symbol on your unit make sure that you refer to the instructions provided in your user documentation Ensure that you understand and meet the required conditions before using your product IMPORTANT When you see the following symbol on your unit it indicates that the unit is equipped with a laser source or that it can be used with instruments equipped with a laser ...

Page 13: ... 20 μs Max peak power Puissance crête maximum 600 mW Complies with FDA performance standards for laser products except for conformance with IEC 60825 1 Ed 3 as described in Laser Notice No 56 dated May 8 2019 WARNING Viewing the laser output with telescopic optical instruments for example telescopes and binoculars may pose an eye hazard and thus the user should not direct the beam into an area whe...

Page 14: ...Safety Information Electrical Safety Information For more information on product safety and equipment ratings refer to the user documentation of your platform All intelligent Optical Channel Checker modules power consumption is below 10 W ...

Page 15: ... is for APC type connectors To install an EUI connector adapter onto the EUI baseplate 1 Hold the EUI connector adapter so the dust cap opens downwards 2 Close the dust cap in order to hold the connector adapter more firmly 3 Insert the connector adapter into the baseplate 4 While pushing firmly turn the connector adapter clockwise on the baseplate to lock it in place IMPORTANT EXFO strongly recom...

Page 16: ...ollows 2a Gently wipe the fiber end with a lint free swab dipped in optical grade liquid cleaner 2b Use a dry swab to dry the connector completely 2c Visually inspect the fiber end to ensure its cleanliness IMPORTANT To ensure maximum power and to avoid erroneous readings Always inspect fiber ends and make sure that they are clean as explained below before inserting them into the port EXFO is not ...

Page 17: ...y in place thus ensuring adequate contact If your connector features a screw sleeve tighten the connector enough to firmly maintain the fiber in place Do not overtighten as this will damage the fiber and the port Note If your fiber optic cable is not properly aligned and or connected you will notice heavy loss and reflection EXFO uses good quality connectors in compliance with EIA 455 21A standard...

Page 18: ...ll let you detect a wider array of channels So for example if a channel has a value of 12 dBm and the detection level is at 10 dBm with no power offset the channel will not be detected whereas an offset value of 5 dBm will let you detect the channel even if the value is slightly different To select the spectral unit to display 1 From the main window tap User Preferences 2 Under Display select the ...

Page 19: ...der Display select the desired view Keep current use the view type currently displayed Graph All channels Displays all of the channels without zooming Graph Auto zoom The zoom is done on the first detected channel on the left unless there is a failed result in that case the zoom will be centered on that failed channel Result table Displays the results in table format rather than graph format 3 Onc...

Page 20: ...tical Channel Checker 14 iOCC Setting up Your Unit To set the analysis parameters 1 From the main window tap User Preferences 2 Under Analysis Parameters enter the values to use for detection level and power offset 3 Once you are done tap OK ...

Page 21: ...the power threshold value 1 From the main window tap User Preferences 2 Under Pass Fail Threshold enable the option then enter the value that will set your pass fail threshold 3 Once you are done tap OK To revert to the factory settings 1 From the main window tap User Preferences 2 Tap the corresponding button 3 Once you are done tap OK ...

Page 22: ...us or live scan The live scan is particularly useful if you want to have instant and dynamic retroaction on your tests as you repair a network For example it can help you see how the quality of a signal is improved in real time or see the variation in the signal when enabling or disabling a transmitter To do a single acquisition From the main window tap Scan The results appear once the scan is com...

Page 23: ...ting up and Using Your intelligent Optical Channel Checker intelligent Optical Channel Checker 17 Performing an Acquisition To run a continuous scan From the main window tap Live To stop the scan tap Stop ...

Page 24: ... Viewing Mode Changing the Viewing Mode You can view the results as a graph or as a table which is split into two columns for a quicker view When in the graph mode you can zoom in for a more precise view of the results To view results in graph mode From the main window tap Graph View ...

Page 25: ...To use the zoom feature When the graph window is shown on screen tap once in the graph to zoom in then tap again to zoom out To move on the graph drag your finger or stylus on the screen to move it to the desired location You can also use the blue arrow buttons at the bottom of the screen to move within the zoomed channel view ...

Page 26: ...Optical Channel Checker 20 iOCC Changing the Viewing Mode To view results in table mode From the main window tap Table View To view only the channels where power was detected use the button To revert to the full channel view use the button ...

Page 27: ...lts Analyzing Results When you have performed the scan you can quickly view the results for your test Channels with the minimum and maximum power values in the scan Global verdict of scan View of the detected channels graph or table Number of detected channels Difference between the maximum and minimum power values ...

Page 28: ...u create one or you can set it up as needed To set up reports 1 From the main window tap User Preferences 2 Under Report select the format you want to use and whether the application will prompt you to validate the information prior to creating a report These are default values that might help you work faster if you always use the same format and information but you can always change them later wh...

Page 29: ...sing Your intelligent Optical Channel Checker intelligent Optical Channel Checker 23 Generating Reports To modify report details 1 From the main window tap Report Info 2 Change the report details as needed then tap OK ...

Page 30: ...ain window tap Report 2 Confirm the report details or change them as needed then tap Generate 3 By default the name of the report will be the date and time of the acquisition in your current language format but you can change it as needed If you want to change the report type you can do so as well When you are done tap OK ...

Page 31: ...ntelligent Optical Channel Checker 25 Saving Acquisitions Saving Acquisitions You can save the current acquisition for future consultation To save an acquisition file 1 From the main window tap Save 2 Select a location and change the file name as needed then tap OK ...

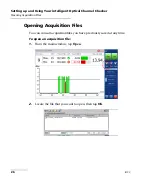
Page 32: ...l Checker 26 iOCC Opening Acquisition Files Opening Acquisition Files You can consult acquisition files you have previously saved at any time To open an acquisition file 1 From the main window tap Open 2 Locate the file that you want to open then tap OK ...

Page 33: ...dry area Keep the unit out of direct sunlight Avoid high humidity or significant temperature fluctuations Avoid unnecessary shocks and vibrations If any liquids are spilled on or into the unit turn off the power immediately disconnect from any external power source remove the batteries and let the unit dry completely WARNING The use of controls adjustments and procedures namely for operation and m...

Page 34: ...onnector baseplate and ferrule 2 Moisten a 2 5 mm cleaning tip with one drop of optical grade liquid cleaner IMPORTANT If any damage occurs to internal connectors the module casing will have to be opened and a new calibration will be required WARNING Looking into the optical connector while the light source is active WILL result in permanent eye damage EXFO strongly recommends to TURN OFF the unit...

Page 35: ... Clean the ferrule in the connector port as follows 6a Deposit one drop of optical grade liquid cleaner on a lint free wiping cloth 6b Gently wipe the connector and ferrule 6c With a dry lint free wiping cloth gently wipe the same surfaces to ensure that the connector and ferrule are perfectly dry 6d Verify connector surface with a fiber inspection probe for example EXFO s FIP 7 Put the EUI back o...

Page 36: ...of specifications depends on operating conditions For example the calibration validity period can be longer or shorter depending on the intensity of use environmental conditions and unit maintenance as well as the specific requirements for your application All of these elements must be taken into consideration when determining the appropriate calibration interval of this particular EXFO unit Under...

Page 37: ... the published specifications calibration may be carried out at an EXFO service center or depending on the product at one of EXFO s certified service centers Calibrations at EXFO are performed using standards traceable to national metrology institutes Note You may have purchased a FlexCare plan that covers calibrations See the Service and Repairs section of this user documentation for more informa...

Page 38: ......

Page 39: ... see that a channel is missing or the power level detected is much lower than expected you can switch to the OTDR application on your module or an iOLM to troubleshoot the situation However troubleshooting a live network is a delicate task regardless of the method used and you must pay attention to the following instructions before proceeding The signal that the OTDR or iOLM will receive must be b...

Page 40: ...lls from Monday to Friday 8 00 a m to 7 00 p m Eastern Time in North America For detailed information about technical support and for a list of other worldwide locations visit the EXFO Web site at www exfo com If you have comments or suggestions about this user documentation you can send them to customer feedback manual exfo com To accelerate the process please have information such as the name an...

Page 41: ...To view iOCC information From the main window tap Transportation Maintain a temperature range within specifications when transporting the unit Transportation damage can occur from improper handling The following steps are recommended to minimize the possibility of damage Pack the unit in its original packing material when shipping Avoid high humidity or large temperature fluctuations Keep the unit...

Page 42: ......

Page 43: ...tion during the warranty period and found to meet all published specifications EXFO will charge standard calibration fees THIS WARRANTY IS IN LIEU OF ALL OTHER WARRANTIES EXPRESSED IMPLIED OR STATUTORY INCLUDING BUT NOT LIMITED TO THE IMPLIED WARRANTIES OF MERCHANTABILITY AND FITNESS FOR A PARTICULAR PURPOSE IN NO EVENT SHALL EXFO BE LIABLE FOR SPECIAL INCIDENTAL OR CONSEQUENTIAL DAMAGES IMPORTANT...

Page 44: ...without incurring obligation to make any changes whatsoever on units purchased Accessories including but not limited to fuses pilot lamps batteries and universal interfaces EUI used with EXFO products are not covered by this warranty This warranty excludes failure resulting from improper use or installation normal wear and tear accident abuse neglect fire water lightning or other acts of nature ca...

Page 45: ...ct and the conditions under which it was observed 5 Return the equipment prepaid to the address given to you by support personnel Be sure to write the RMA number on the shipping slip EXFO will refuse and return any package that does not bear an RMA number Note A test setup fee will apply to any returned unit that after test is found to meet the applicable specifications After repair the equipment ...

Page 46: ...services exfo service centers EXFO Headquarters Service Center 400 Godin Avenue Quebec Quebec G1M 2K2 CANADA 1 866 683 0155 USA and Canada Tel 1 418 683 5498 Fax 1 418 683 9224 support exfo com EXFO Europe Service Center Winchester House School Lane Chandlers Ford Hampshire S053 4DG ENGLAND Tel 44 2380 246800 Fax 44 2380 246801 support europe exfo com EXFO Telecom Equipment Shenzhen Ltd 3rd Floor ...

Page 47: ... detection level 14 E equipment returns 39 EUI connector adapter 9 connectors cleaning 28 dust cap 9 F factory settings 15 fiber ends cleaning 10 front panel cleaning 27 FTBx 740 DWOCC 1 2 G graph view 13 18 zoom 19 H help see online user guide I identification label 34 L label identification 34 level of detection 14 M maintenance EUI connectors 28 front panel 27 general information 27 MAX 5205 1 ...

Page 48: ... 12 service and repairs 39 service centers 40 setting power threshold 15 shipping to EXFO 39 single scan starting 16 sorting table 20 spectral unit 12 starting acquisition 16 continuous scan 17 stopping scan 17 storage requirements 27 symbols safety 3 T table view 13 20 technical support 34 temperature for storage 27 threshold power 15 transportation requirements 27 35 U user guide see online user...

Page 49: ...㜡㢗享ờ D K K K K K K 1RWH 7KLV WDEOH LV SUHSDUHG LQ DFFRUGDQFH ZLWK WKH SURYLVLRQV RI 6 7 ᵜ㺘 ᦞ d ϭϭϯϲϰ Ⲵ㿴ᇊ㕆ࡦDŽ 2 QGLFDWHV WKDW VDLG KD DUGRXV VXEVWDQFH FRQWDLQHG LQ DOO RI WKH KRPRJHQHRXV PDWHULDOV IRU WKLV SDUW LV EHORZ WKH OLPLW UHTXLUHPHQW RI 7 K 㺘 䈕ᴹᇣ 䍘 䈕䜘Ԧᡰᴹ 䍘ᶀᯉѝⲴਜ਼䟿 d ϮϲϱϳϮ ḷ 㿴ᇊⲴ䲀䟿㾱 ԕлDŽ LQGLFDWHV WKDW VDLG KD DUGRXV VXEVWDQFH FRQWDLQHG LQ DW OHDVW RQH RI WKH KRPRJHQHRXV PDWHULDOV XVHG IRU WKLV S...

Page 50: ...0 5 1 5 48 5 0 176 ḷ 㾱 Ă Ĩ ĂƉƉůŝĐĂďůĞ ྲ 䘲 DŽ WƌŽĚƵĐƚ ӗ ŶǀŝƌŽŶŵĞŶƚĂů ƉƌŽƚĞĐƚŝŽŶ ƵƐĞ ƉĞƌŝŽĚ LJĞĂƌƐͿ ຳ ᣔ ᵏ䲀 ᒤ ŽŐŽ ḷᘇ dŚŝƐ y K ƉƌŽĚƵĐƚ ᵜ y K ӗ ϭϬ ĂƚƚĞƌLJD ϱ ...

Page 51: ...O com P N 1079289 CORPORATE HEADQUARTERS 400 Godin Avenue Quebec Quebec G1M 2K2 CANADA Tel 1 418 683 0211 Fax 1 418 683 2170 TOLL FREE USA and Canada 1 800 663 3936 2020 EXFO Inc All rights reserved Printed in Canada 2020 01 ...

Reviews: