background image

Page 2 of 5 

109-4291 Rev. A 


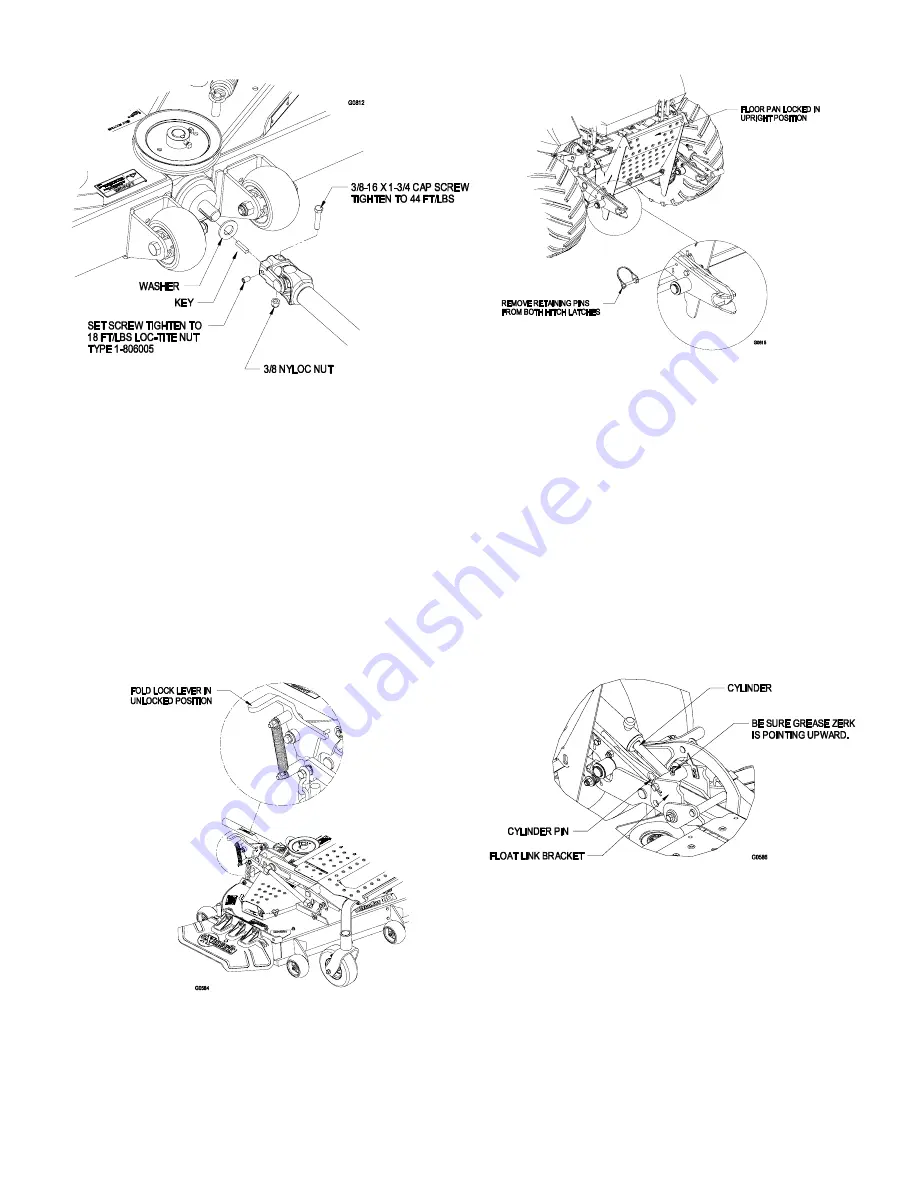
FIGURE 2 

4.  Insert bolt through yoke and secure with nyloc 

nut.  Bolt should be tightened to 44 ft/lbs. 

5.  Add loc-tite to setscrew.  Insert set screw into 

yoke and tighten to 18 ft/lbs. 

Installing the Deck 

IMPORTANT:

  Do not transport FrontRunner tractor 

without and approved Exmark front mount 
attachment. 

1.  Stop engine, wait for all moving parts to stop, 

engage parking brake, and remove key. 

2.  Rotate the fold lock lever, located on the deck, in 

the unlocked position.  (See Figure 3) 


FIGURE 3 

3.  On the tractor, release the two retaining pins on 

hitch latches so the latches can actuate freely. 
Raise the floor pan and lock in upright position. 
(See Figure 4). 


FIGURE 4 

4.  Align the front frame of the mower deck to the 

Front Runner tractor lift cylinder section.   

5.  Manually lift up on the hitch to get the front 

frame started.   

6.  Push the front frame towards the tractor until the 

two hitch latches seat into the “secure” position.  

7.  Insert the hitch latch retaining pins into the hitch 

pin lock.  The deck is now locked onto the 
tractor. 

8.  Reinstall key and turn switch to the “run” 

position.  Do not start the engine. 

9.  Align the cylinder rod end to the top hole of the 

float link bracket and insert pin as shown in 
Figure 5.  Insert cotter hairpin to lock cylinder 
pin into place. 


FIGURE 5 

10.  Retract the cylinder to fold the deck upward.  

Reattach weight transfer chains.  It is very 
important not to twist the chains.  Lock the 
chains onto the pin by inserting the cotter 
hairpin.  (See Figure 6) 


Summary of Contents for FRONTRUNNER 52

Page 1: ...ved Exmark front mount attachment observe the following 9 Limit operation to minimum required to install a different front mount attachment 9 Minimize speed and use extreme caution 9 Only operate on a flat level surface 9 Do not operate up or down a trailer ramp 9 Avoid sudden acceleration or deceleration Uncrate Deck 1 Remove top and sides of crate from base 2 Remove straps securing front frame a...

Page 2: ...ight position See Figure 4 FIGURE 4 4 Align the front frame of the mower deck to the Front Runner tractor lift cylinder section 5 Manually lift up on the hitch to get the front frame started 6 Push the front frame towards the tractor until the two hitch latches seat into the secure position 7 Insert the hitch latch retaining pins into the hitch pin lock The deck is now locked onto the tractor 8 Re...

Page 3: ...ing parts to stop and turn key to run position Do not start the engine 2 Fully extend the cylinder to unload the fold lock levers 3 Rotate the fold lock levers located on each side of the deck to the unlocked position See Figure 3 4 Retract the cylinder and the deck will fold to approximately 50 degrees WARNING POTENTIAL HAZARD Operating the mower deck in the raised service position can be dangero...

Page 4: ...OW TO AVOID THE HAZARD Always operate mower with fold lock levers securely latched Removing the Deck 1 Stop engine wait for all moving parts to stop engage parking brake and remove key 2 Disconnect the drive shaft by pulling back on the spring loaded collar and pulling away from the splined shaft See Figure 7 Lay the drive shaft on the ground 3 Insert key and turn to the run position Do not start ...

Page 5: ... flat surface 2 Stop engine wait for all moving parts to stop engage parking brake and remove key 3 Install the four 4 socket head 5 16 18 x 1 1 4 screws provided in the customer literature pack into the deck lift arms see Figure 10 and level the deck as outlined in the Operator s Manual in Section 4 3 2 FIGURE 10 4 Return these screws to the customer literature pack after unit is set up Note If t...

Reviews: