24
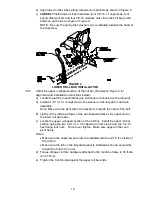
c) Clean area around dipstick. Remove dipstick and wipe oil off. Reinsert the
dipstick. Screw dipstick into place. Remove the dipstick and read the oil level.
d) If the oil level is low, wipe off the area around the oil fill cap, remove cap,
and fill to the “FULL” mark on the dipstick. Use oil as specified in the
Engine Owner’s Manual.
DO NOT
overfill.
IMPORTANT
:
DO NOT
operate the engine with the oil level below the
“LOW” (or “ADD”) mark on the dipstick, or over the “FULL” mark.
5.1.2
Clean engine air cooling system:
Service Interval: Daily or more often in dry conditions
CAUTION
POTENTIAL HAZARD
♦
Excessive debris can cause the engine and hydraulic
system to overheat.
WHAT CAN HAPPEN
♦
Excessive debris around the engine cooling air intake
and inside of the pump compartment can create a fire
hazard.
HOW TO AVOID THE HAZARD
♦
Clean all debris from around the engine and hydraulic
pumps daily.
a) Stop engine, wait for all moving parts to stop, and remove key.
b) Clean all debris from rotating engine air intake screen and from around
engine shrouding.
5.1.3
Check battery charge:
Service Interval: Monthly
Allowing batteries to stand for an extended period without recharging them will
result in reduced performance and service life. To preserve optimum battery
performance and life, recharge batteries in storage when the open circuit voltage
drops to 12.4 volts.
Note: To prevent damage due to freezing, battery should be fully charged before
putting away for winter storage.
a)
Check the voltage of the battery with a digital voltmeter. Locate the voltage
reading of the battery in the table below and charge the battery for the
recommended time interval to bring the charge up to a full charge of 12.6
volts or greater.
IMPORTANT:
Make sure the negative battery cables are disconnected
and the battery charger used for charging the battery has an output of 16
volts and 7 amps or less to avoid damaging the battery (see chart below for
recommended charger settings).
Voltage
Reading
Percent
Charge
Maximum
Charger Settings
Charging Interval
12.6 or greater 100%
16 volts/7 amps
No Charging Required
12.4 – 12.6
75 – 100%
16 volts/7 amps
30 Minutes
12.2 – 12.4
50 – 75%
16 volts/7 amps
1 Hour
12.0 – 12.2
25 – 50%
14.4 volts/4 amps
2 Hours
11.7 – 12.0
0 – 25%
14.4 volts/4 amps
3 Hours
11.7 or less
0%
14.4 volts/2 amps
6 Hours or More
Summary of Contents for Laser Z CT
Page 1: ...For Serial Nos 540 000 Higher Part No 103 9180 ...
Page 45: ...40 8 BRIGGS STRATTON ELECTRICAL DIAGRAM ...
Page 46: ...41 9 HYDRAULIC DIAGRAM ...
Page 48: ... 43 NOTES ...
Page 49: ... 44 NOTES ...
Page 50: ... 45 SERVICE RECORD Date Description of Work Done Service Done By ...
Page 51: ... 46 ...


