Maintenance
g332166
Figure 78
1.
Rod
4.
Deck brackets
2.
Spring
5.
Spring installed over the
rod
3.
Deflector
3.
Remove the damaged or worn discharge
deflector.
4.
Position the new discharge deflector with the
bracket ends between the welded brackets
on the deck and install the rod and spring as
shown in Figure 78.
Note:
Position the spring on the rod as
shown so that the shorter spring end comes
from under the rod before the bend and goes
over the rod as it returns from the bend.
5.
Place the end of the rod in the notch of the
bracket (Figure 78).
Important:
The discharge deflector must
be spring loaded in the down position.
Lift the deflector up to test that it snaps to
the full down position.
•
For 42, 50, and 54 Inch Models:
1.
Park machine on level ground, move the
motion control levers out to engage the
parking brake, disengage the blade control
switch, stop engine, and remove key and wait
for all moving parts to stop before leaving the
operating position.
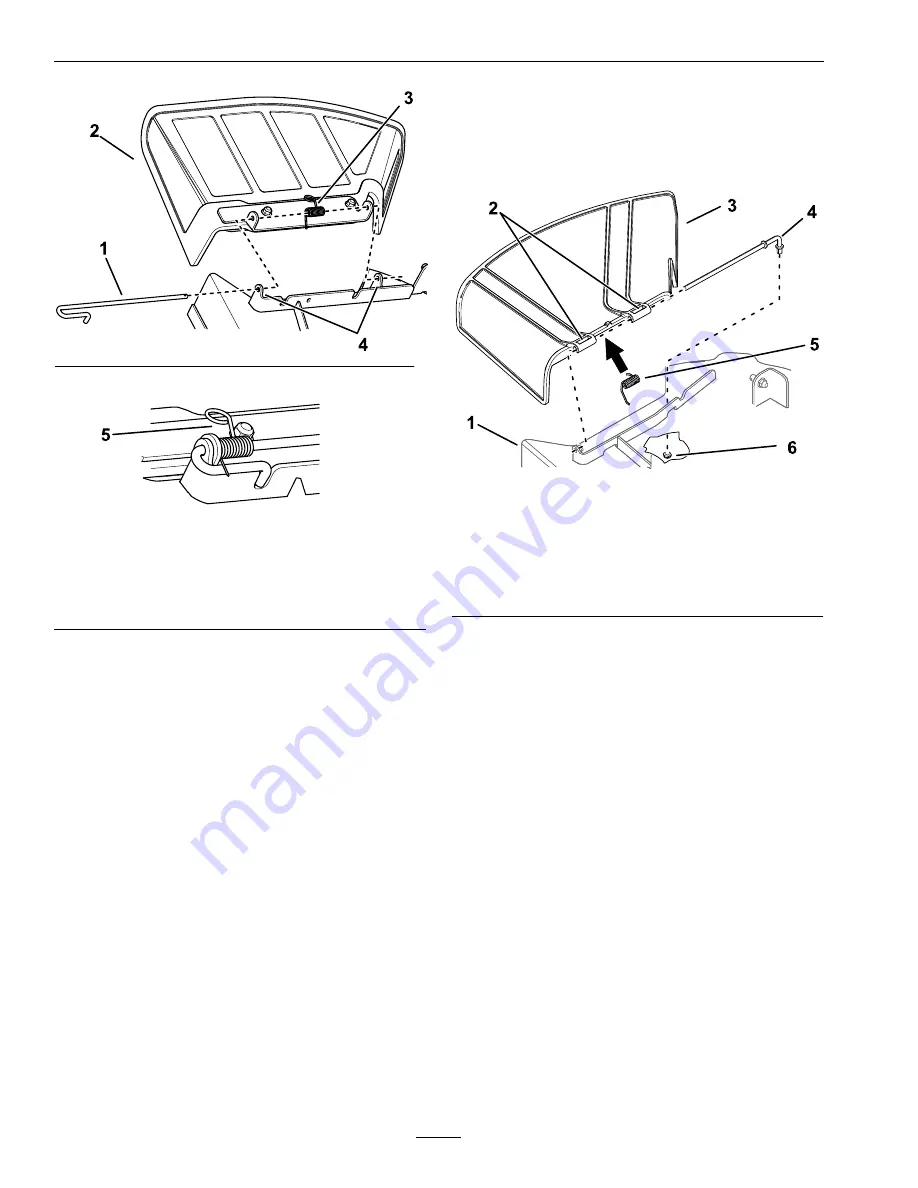
2.
Remove the nut (3/8 inch) from the rod under
the mower (Figure 79).
g296957
Figure 79
1.
Mower deck
5.
Rod
2.
Short standoff
6.
Spring
3.
Discharge deflector
bracket
7.
Nut (3/8 inch)
4.
Discharge deflector
3.
Slide the rod out of the short standoff, spring,
and discharge deflector.
4.
Remove the damaged or worn discharge
deflector.
5.
Install the new discharge deflector.
6.
Slide the straight end of the rod through the
rear discharge deflector bracket.
7.
Place the spring on the rod, with end wires
down, and between the discharge deflector
brackets.
8.
Slide the rod through the second discharge
deflector bracket.
9.
Insert the rod at the front of the discharge
deflector into the short standoff on the deck.
10.
Secure the rear end of the rod into the mower
with a nut (3/8 inch) as shown in Figure 79.
Important:
The discharge deflector must
be spring loaded in the down position.
Lift the deflector up to test that it snaps to
the full down position.
60
Summary of Contents for QUEST 346
Page 1: ...QUEST For Serial Nos 408 644 346 Higher Part No 4505 333 Rev A ...
Page 65: ...Schematics Schematics Electrical Logic Schematic g330623 65 ...
Page 67: ...Notes 67 ...
Page 68: ...Notes 68 ...
Page 69: ...Service Record Date Description of Work Done Service Done By 69 ...
Page 70: ...70 ...

