Maintenance
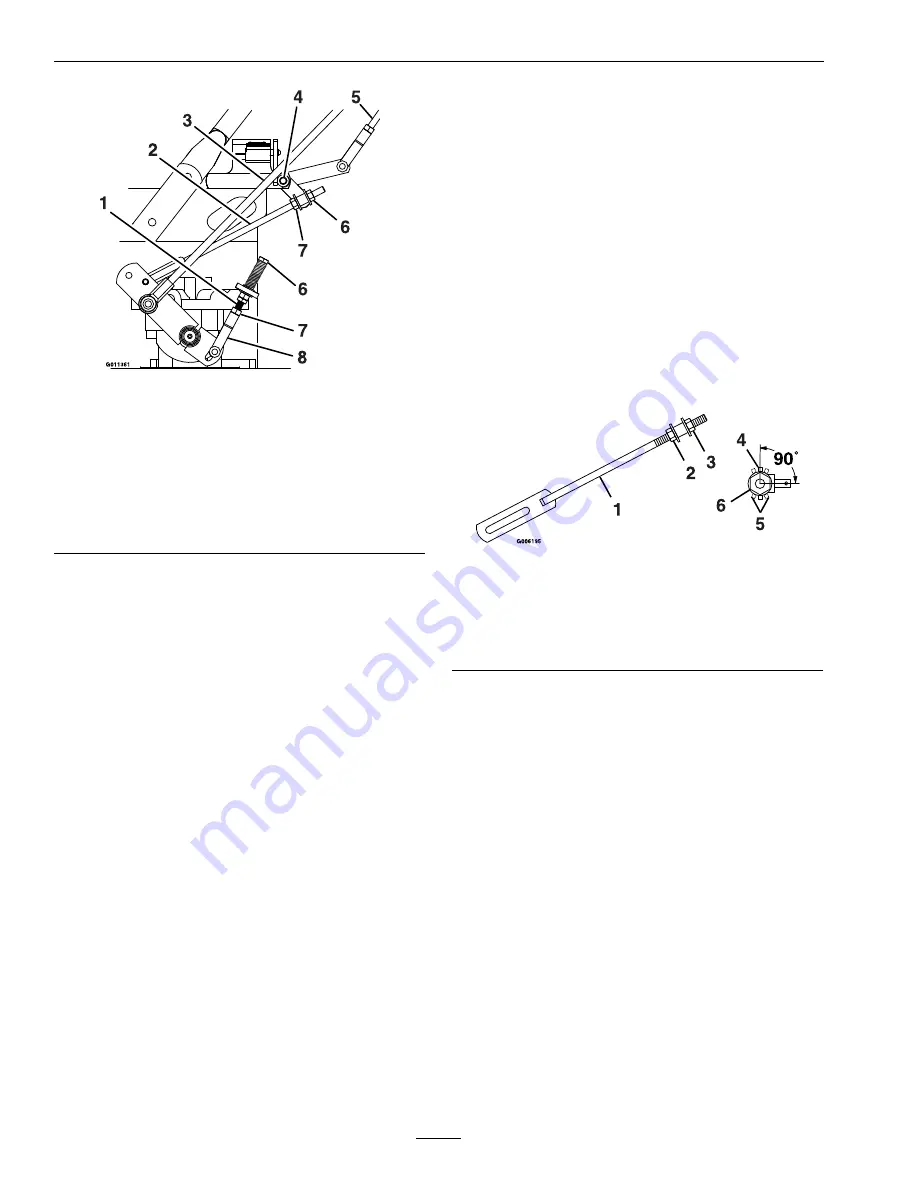
Figure 18
Viewed from Left Side of Unit
1.
Neutral Control Linkage
5.
Speed Control Linkage
2.
Hydro Control Linkage
6.
Adjust here-rotate at
approximately 1/4
turn increments and
re-check.
3.
Drive Lever Linkage
7.
Loosen nut
4.
Speed Control Crank
8.
Yoke
4. Loosen the nut against the neutral control
linkage yoke as shown in Figure 18.
5. Adjust the neutral control linkage until
the respective drive wheel stops when the
lever is pulled against the neutral spring
(neutral position). Turn the adjusting bolt
approximately 1/4 turn clockwise if the
wheel is turning in reverse or turn the bolt
approximately 1/4 turn counterclockwise if
the wheel is turning forward. Release the
drive lever to the forward drive position and
squeeze back into the neutral position. Check
to see if the wheel stops. If not, repeat the
above adjustment procedure.
6. Make this adjustment on both sides.
7. After adjustments are made and the wheels
stop when the drive levers are in the neutral
position, tighten the nuts against the yokes.
•
Adjust Hydro Control Linkages:
1. Place the speed control lever in the “neutral”
position. This adjustment is again made with
rear of machine on jack stands and engine
running at full throttle. OPC levers will have
to be held down and the park brake must be
disengaged whenever speed control levers are
moved out of the neutral position.
Note:
The neutral lock latches should be
“unlocked” and in the forward position.
2. Loosen the front nut on left hydro control
linkage as shown in Figure 18. Turn the rear
control linkage adjusting nut counterclockwise
until wheel rotates forward. Turn the rear nut
of left control linkage clockwise 1/4 of a turn
at a time, stopping to move the speed control
forward and back to neutral, until left wheel
stops rotating forward.
Turn the rear nut an additional 1/2 turn and
tighten the front nut making sure not to put
a bind on the linkage. Make sure flat part of
linkage is perpendicular to pin part of swivel
(see Figure 19).
Figure 19
1.
Left Hydro Control Link
(left side shown)
4.
Linkage is perpendicular
to pin (correct position)
2.
Front nut
5.
Linkage in incorrect
position
3.
Rear nut
6.
End view of swivel
After adjusting the left hydro control linkage,
move the speed control lever to the mid-speed
position and then back to the neutral position.
Recheck the left drive wheel rotation to see if
further adjustment is necessary - be sure the
speed control lever is in the neutral position.
Important:
If inconsistent neutral occurs,
check to be sure both springs are properly
tightened on the speed control lever under
the console–especially the rear pivot
spring.
Repeat above adjustments if necessary.
3. Place the speed control lever in neutral. Adjust
the right side linkage by turning the quick track
knob counterclockwise until the tire begins to
rotate forward. Begin to retighten the knob
clockwise about 1/4 turn at a time, stopping
to move the speed control forward and back
34
Summary of Contents for TURF TRACER X-SERIES
Page 1: ...TURF TRACER X SERIES For Serial Nos 920 000 Higher Part No 4500 699 Rev A ...
Page 11: ...Safety 103 2242 103 2243 103 4935 103 2432 116 0404 11 ...
Page 12: ...Safety 116 4296 EFI Units Only 1 Fast 2 Slow 117 2718 12 ...
Page 38: ...Schematics Schematics Electrical Diagram All units except Kohler EFI 38 ...
Page 39: ...Schematics Electrical Diagram Kohler EFI 39 ...
Page 40: ...Schematics Electrical Logic Schematic All units except Kohler EFI 40 ...
Page 41: ...Schematics Electrical Logic Schematic Kohler EFI 41 ...
Page 42: ...Schematics Hydraulic Diagram 42 ...
Page 44: ...Notes 44 ...
Page 45: ...Service Record Date Description of Work Done Service Done By 45 ...
Page 46: ...46 ...


