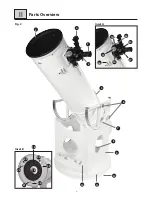
- 6 -
Setup
III
Assembling the Base
NOTE!
While assembling the base, you will need a Phillips screwdriver, a 2mm hex wrench and an
open-end wrench. We recommend assembling on a soft surface to avoid damaging the parts
of the base.
IMPORTANT!
Note that the studs are height-adjustable. It is therefore not necessary to screw in the studs
until they stop.
Important: Make sure that only approx. 4 mm of the stud heads are visible in the holes for the
quick fasteners. So the quick fastener and the stud head will interlock and all parts are firmly
connected. For that, install the studs accordingly in height (see Fig. A1).
STEP 1 (Fig. 3):
The base supports the optical tube assembly (OTA) and allows the OTA to be rotated 360°.
1. Put the first bottom plate (Fig. 1, A) on the floor and place the rubber feet (Fig. 1, S) over
the outer drill holes.
2. Screw each rubber foot down with a woodscrew (Fig. 1, N).
STEP 2 (Fig. 4):
1. Insert a plastic sleeve (Fig. 1, R) into the drill hole in the middle of both bottom plates
(Fig. 1, A + B).
2. Screw four threaded bolts (Fig. 1, L) into the outer drill holes of bottom plate on top.
3. Put both bottom plates on top of each other.
4. Bolt both bottom plates together with the fine-thread screw (Fig. 1, P) and the safety nut
(Fig. 1, O). Place one ring washer (Fig. 1, Q) on each side between the screw head or nut
and the plastic sleeve.
Fig. 3
Fig. 4
Tools Required
STEP 3 (Fig. 5):
1. Put all side parts (Fig. 1, C-F) on the floor.
2. Screw the threaded bolts (Fig. 1, L) into the small drill holes of both
side parts (Fig. 1, C + D).
3. Insert two quick fasteners (Fig. 1, M) into the large drill holes of
both side parts and the bridge (Fig. 1, E) and four quick fasteners
into the drill holes of the front part (Fig. 1, F).
NOTE!
Make sure that the opening at the bottom of the quick fasteners is
pointing to the drill hole on the edge. An arrow at the notch for the
Phillips head is showing the right direction.
STEP 4 (Fig. 6):
1. Set up the left side part (Fig. 1, C) and put the bridge (Fig. 1, E) with
its drill holes for the quick fasteners (Fig. 1, M) over the threaded
bolts (Fig. 1, L).
2. Tighten the quick fasteners with a Phillips screwdriver.
SW-17
PH-2 (6mm)
2 mm
Fig. 5
Fig. 6
max.
4 mm
Fig. A1
Summary of Contents for Explore FirstLight 10" f/5 Dobsonian
Page 19: ...19...


