background image

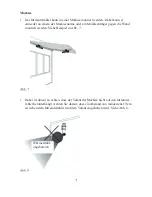
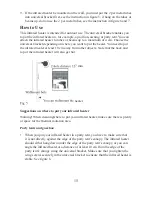
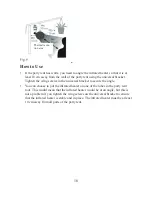
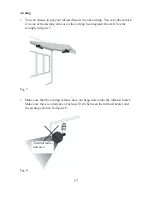
Guarantee and service

Our products undergo a strict quality-control process before delivery. If the product 

has unexpectedly been damaged or developed a defect during production or trans-

port, please return it to the retailer. You can legally make a claim under the guaran-

tee in the following circumstances:

The product is covered by a 2-year guarantee from the date of purchase. During 

this period, we will repair or replace the product if it is found to be defective due to 

material or production faults. 

Faults caused by incorrect use or handling, faults caused by unauthorised interven-

tion or repairs, and faults caused by use of non-original parts are not covered by the 

guarantee. 

Correct disposal

The symbol above and on the product means that the product is classed as 

Electrical or Electronic equipment and should not be disposed with other 

household or commercial waste at the end of its useful life. The Waste of 

Electrical and Electronic Equipment (WEEE) Directive (2012/19/EU) has 

been put in place to recycle products using best available recovery and recycling 

techniques to minimise the impact on the environment, treat any hazardous sub-

stances and avoid the increasing landfill. Contact local authorities for information 

on the correct disposal of Electrical or Electronic equipment.

21

Summary of Contents for 613-400236

Page 1: ...ITUNG INSTRUCTION MANUAL Infrarotstrahler Infrared heater 613 400236 Vertrieb durch distributor Expo Börse GmbH Industriestr 12 D 49577 Ankum www expo boerse de Importeur Schou Germany GmbH Roedernstr 8 13053 Berlin ...

Page 2: ...dnungsgemäß gepflegt wird Bewahren Sie die Bedienungsanleitung zwecks künftiger Referenz auf Inhalt der Verpackung 1 Stück Infrarotstrahler 2 Stück Universalhalterung 1 Stück Gummiplatte 2 Stück Einstellschrauben 2 Stück Flügelschrauben 2 Stück Metallrohre 2 Stück Nylon Unterlegscheiben Infrarotstrahler Deutsch 613 400236 Infrarotstrahler Universalhalterung klein Universalhalterung groß Gummiplatt...

Page 3: ...schrauben den Infrarotstrahler an die Universalhalterung montieren Siehe Abb 1 4 Jetzt kann der Infrarotstrahler an das den Rohr Träger gehängt werden 5 Den Infrarotstrahler so abwinkeln dass der Abstand zwischen dem Infra rotstrahler und den umgebenden Oberflächen Gegenstände auf jeder Seite mindestens 10 cm beträgt Der Winkel des Infrarotstrahlers lässt sich mit den Einstellschrauben und durch d...

Page 4: ...aube und Universalhalterung einsetzen Siehe Abb 1 7 Das Netzkabel in eine geerdete 230 V Steckdose einstecken Wir empfehlen die Verwendung eines Fehlerstromschutzschalters 8 Ziehen Sie an der Kordel um den Infrarotstrahler ein oder auszuschalten Siehe Abb 4 Zelt oder Markise Rohr Träger Infrarotstrahler Universalhalterung Universalhalterung Min 10 cm Hinweis Der Mind estabstand zwischen dem Infrar...

Page 5: ...strahler und anderen Gegenständen beträgt 10 cm Achten Sie darauf dass auch das hintere und obere Teil des Infrarotstrahlers heiß werden Vorschläge wo der Infrarotstrahler platziert werden kann Achtung Bei der Suche nach einem geeigneten Ort für den Infrarotstrahler ist es sehr wichtig darauf zu achten dass ausreichend Platz für die Wärmestrahlung vorhanden ist Partyzelte und Pavillons Wenn Sie Ih...

Page 6: ...rhanden ist Hier wieder die Flügelschrauben in der Uni versalhalterung festziehen um den Winkel zu sichern Der Infrarotstrahler kann auch an einem der Rohre Stangen im Partyzeltdach montiert werden Dadurch würde der Infrarotstrahler zwar winkelig montiert werden das ist aber kein Problem sofern die Flügelschrauben in der Halter ung festgezogen werden so dass der Infrarotstrahler stabil positionier...

Page 7: ...enträger gegen die Wand montiert werden Siehe Beispiel in Abb 7 Dabei ist darauf zu achten dass der Volant der Markise nicht auf den Infrarotst rahler herunterhängt Achten Sie darauf dass ein Abstand von mindestens 10 cm zwischen dem Infrarotstrahler und dem Volant eingehalten wird Siehe Abb 8 Abb 7 Abb 8 Wärmestrahl ungsbereich 7 ...

Page 8: ... Gegenstände in der Nähe verfärben oder beschädigen kann Denken Sie daran Ihren Infrarotstrahler bei Nichtgebrauch immer auszuschalten an der Kordel des Hauptschalters ziehen Bevor Sie den Infrarotstrahler un beaufsichtigt verlassen ziehen Sie den Netzstecker und stellen Sie sicher dass der Infrarotstrahler abgekühlt ist Reinigung und Aufbewahrung Der Infrarotstrahler muss regelmäßig und vor dem l...

Page 9: ...ngehalten wird Vermeiden Sie Brandgefahr den Infrarotstrahler in eingeschaltetem Zustand nicht abdecken Durch Abdeckung kann sich der Infrarotstrahler überhitzen Der Infrarotstrahler darf nicht in Bereichen verwendet werden in denen Benzin Farbe oder andere brennbaren Flüssigkeiten gelagert werden Verwenden Sie den Infrarotstrahler nur für seinen vorgesehenen Zweck Vor der Lagerung den Infrarotstr...

Page 10: ...t des Kaufs zurückgegeben werden Der Nutzer haftet für jegliche Schäden am Produkt die durch Nichtbeachtung seines vorgesehenen Zwecks oder Nichtbeachtung dieser Bedienungsanleitung verursacht werden In solchen Fällen findet das Reklamationsrecht keine Anwendung Technische Daten Spannung 230 V 50 Hz Leistung 800 W Schutzklasse IPX4 10 ...

Page 11: ...h Fehlfunktio nen aufgrund von Eingriffen und Reparaturen durch Dritte oder durch den Einbau von Nicht Originalteilen entstehen sind durch diese Garantie nicht abgedeckt Umweltgerechte Entsorgung Das Symbol über und auf dem Produkt bedeutet dass das Produkt als elek trisches oder elektronisches Gerät klassifiziert ist und am Ende seiner Nut zungsdauer nicht zusammen mit anderem Haushalts oder Gewe...

Page 12: ...ly as described in these instructions Keep the user manual for future reference Package contents 1 pc infrared heater 2 pcs universal bracket 1 pc rubber plate 2 pcs adjustment screws 2 pcs wing screws 2 pcs metal tubs 2 pcs nylon washers Infrared heater English 613 400236 Infrared heater Universal bracket small Universal bracket large Rubber plate Adjustment screws Nylon washers Short wing screws...

Page 13: ...to the tube beam See figure 1 3 Attach the universal bracket to the infrared heater using the adjustment screws See figure 1 4 You can then hang the infrared heater on the tube beam that you have chosen 5 Angle the infrared heater so that the distance between the infrared heater and the surrounding surfaces objects is at least 10cm from every direction You angle the infrared heater using the adjus...

Page 14: ... wing screw and the universal bracket to prevent rust See figure 1 7 Connect the power cable to a grounded 230 V power socket We recommend us ing a ground fault circuit interrupter 8 Pull the cord to switch the infrared heater on and off See figure 4 Tent or awning Tube beam Infrared heater Universal bracket Min 10 cm Note The minimum distance between the infrared heater and the surrounding walls ...

Page 15: ...and top of the infrared heater will also get hot Suggestions on where to put your infrared heater Warning When decidingwhere to put your infrared heater make sure there is plenty of space for the thermal radiation area Party tents and gazebos When you put your infrared heater in a party tent you have to make sure that it is not directly against the edge of the party tent s canopy The infrared heat...

Page 16: ... to secure the angle You can choose to put the infrared heater on one of the tubes in the party tent roof This would mean that the infrared heater would be at an angle but this is not a problem if you tighten the wing screws on the universal bracket to ensure that the infrared heater is stable and in place The infrared heater must be at least 10 cm away from all parts of the party tent Fig 6 Therm...

Page 17: ...awning arms or on the awning beam against the wall See the example in figure 7 Make sure that the awning valance does not hang down onto the infrared heater Make sure there is a distance of at least 10 cm between the infrared heater and the awning valance Se figure 8 Fig 7 Fig 8 Thermal radia tion area 17 ...

Page 18: ...age or discolor fabric or other objects nearby Remember to always switch off your infrared heater when it is not in use pull the cord of the main switch Pull out the plug and make sure the infrared heater has cooled down before leaving it unsupervised Cleaning and storage You need to clean the infrared heater regularly and before you store it away Switch off the infrared heater by pulling the cord...

Page 19: ... when it is switched on The infrared heater can overheat when covered Do not use the infrared heater in areas where petrol paint or other flammable liquids are stored Only use the infrared heater for its intended purpose Let the infrared heater cool before storing it Do not connect the infrared heater to any equipment that automatically switches the infrared heater on off for example a timer or au...

Page 20: ...n the event of a complaint The user is liable for any damage to the product that is caused by not using the product for its intended purpose or by not following this user manual correctly The right of complaint will not apply in these instances Technical data Voltage 230 V 50 Hz Power 800 W Safety class IPX4 20 ...

Page 21: ... faults caused by unauthorised interven tion or repairs and faults caused by use of non original parts are not covered by the guarantee Correct disposal The symbol above and on the product means that the product is classed as Electrical or Electronic equipment and should not be disposed with other household or commercial waste at the end of its useful life The Waste of Electrical and Electronic Eq...

Reviews: