13
7. Use
7.1.
Before use
1. Clean the following parts with warm water and a cloth:
a. Dough bowl
[#]
b. Dough hook
[#]
c. Dividing rod
[#]
2. Dry the parts thoroughly.
7.2.
Switching on andstarting up
•
Fire hazard caused by short-circuiting. Always check if the voltage stated on the type plate of
the product matches with the power outlet voltage.
•
Electrical shock hazard caused by short-circuiting. Always connect the power cable to a
grounded power outlet.
•
Tripping hazard. Never place the power cable in a walkway. Always place the power cable
out of the way from walkways. Leaving the power cable in a walkway can cause moderate
injury.
To switch on the product:
1. Plug the power cable[#]into a power outlet.
7.3.
Using the product
7.3.1.
Placing the dough in the bowl
To place the dough in the bowl:
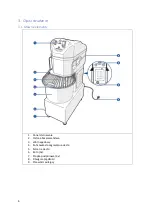
1. Rotate the safety guard [#] upwards.
2. Place the dough into the bowl [#].
3. Rotate the safety guard[#] downwards.
7.3.2.
Kneading the dough
To knead the dough:
1. Press the START button [#].
2. Rotate the speed lever [#] downwards to 1 to knead the dough slowly.
3. Rotate the speed lever [#] upwards to 2 to knead the dough quickly.
4. Press the emergency button [#] to stop the dough kneading.
5. Rotate the emergency stop button [#] clockwise to reset.
7.3.3.
Adjusting the timer
To use the timer:
1. Rotate the timer [#] to set the preferred time.
The maximum timer setting is 30 minutes
The timer automatically counts down during the dough kneading.
The product automatically stops when the timer expires.
Summary of Contents for 10012180
Page 7: ...7 3 2 Steuerung 10 Not Aus Schalter 11 START Taste 12 TIMER 13 ÜBERLASTSCHALTER ...
Page 23: ...7 3 2 Control panel 10 Emergency stop button 11 START button 12 TIMER 13 OVERLOAD SWITCH ...
Page 114: ...7 3 2 Kezelőpanel 10 Vészleállító gomb 11 START gomb 12 IDŐZÍTŐ 13 TÚLTERHELÉS KAPCSOLÓ ...


