ExRobotics B.V.
ExR-2 Robot
Operating Guide
Document No.:
20220412IP1
Version No.: 2
Owner:
Ian Peerless
Date:
2022-04-30
Page 13 of 39
This document is considered an uncontrolled copy when printed. Always ensure that you print and use a current version.
Copyright 2022 ExRobotics B.V.
6.2.
Driver Screen
Once a user has connected to a robot, most of the display information is intuitive:
▪
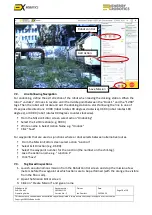
The major functions are summarised in the picture below.
▪
For safety reasons, only one operative can control a robot at any given time. The logo towards
the top right of the screen will show who that is. To take over control, click on that icon.
▪
All video and LiDAR
streams are displayed on the control station. Clicking on the “Expand”
icon of any video stream window moves it to the largest window.
▪
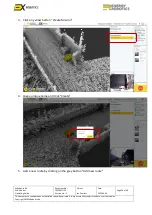
To take a snapshot, hover the cursor over any video stream and then click on the Point of
Interest (POI) icon that appears in the top-left corner. Then use the cursor to select the area
of interest and click on the
“Accept” button to capture the image.
Alternatively, you can take
a full-size picture without selecting the POI icon.
▪
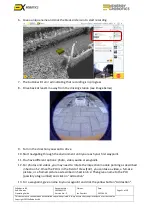
Snapshots are displayed in the “
Media Log
” once they have been uploaded to the server (this
happens automatically after taking them) and can be viewed in large scale by clicking on
them. From there they can be saved to the local machine by right clicking the full-sized
picture and selecting “Save As...”.
▪
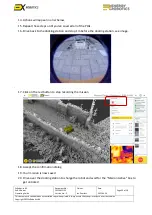
To take a video, a mission must be active. This is done by undocking the robot and driving to
the location of interest (Videos are currently only
recorded if the robot status is “
Mission
Active
”). Once ready, hover the cursor over any video stream and click on the “Video” icon
(small circle) that appears in the top-left corner.
The message “recording” will appear. To stop
recording
click the “Video” icon
again.
▪
Videos will be available only after the robot is back in the docking station (to save bandwidth
when driving, videos are not uploaded immediately). Videos are displayed in the Mission
Report website under
“Recorded Media”
and can be viewed in large scale by clicking on them.
From there they can be saved to the local machine by right clicking the full-sized picture and
selecting “Save As...”.


