2
421502-en-GB_V2.0 3/19
Introduction
Thank you for selecting the Extech 421502 Digital Thermometer. The 421502 features
dual thermocouple inputs, T1, T2, and T1
–
T2 displays, MIN-MAX-AVG recording,
selectable units of measure, high/low alarms, automatic power OFF, and data hold. This
professional meter, with proper care, will provide years of safe reliable service. Visit
for the latest version of the user manual.
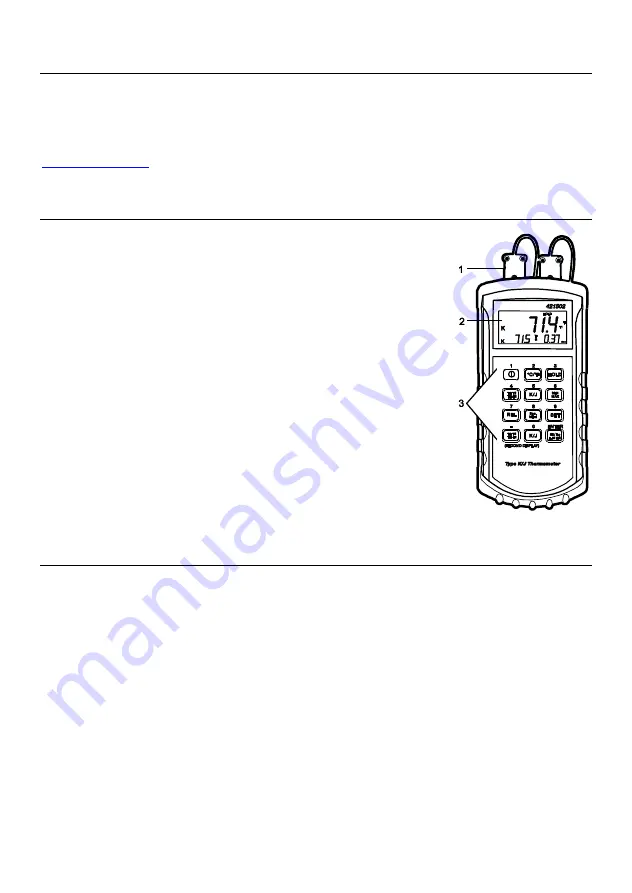
Meter Description
1.
Thermocouple Input Jacks (T1 and T2)
2.
LCD Display. The primary temperature display is the
readout in large digits on the top row. The secondary
displays are shown on the bottom row (smaller digits)
and include a temperature reading (lower left) and the
real time clock (lower right). Temperature readings can
be set to show T1, T2, or T1 minus T2 temperatures
3.
Dual-function control buttons. Primary function printed
on buttons and secondary function printed above
buttons (numerical keypad and ENTER button)
Note: The battery compartment (not pictured) is located on
back of meter. T
he meter’s protective jacket must be
removed to gain access to the compartment.
Operation
Meter Power
Ensure that a fresh 9V battery is installed (rear compartment) before powering the
meter. Press the power button (upper left button) to switch the meter ON or OFF. The
meter is equipped with an APO utility where it switches off automatically after 30
minutes of inactivity. If the SET or MIN-MAX-AVG mode is engaged, APO is disabled, and
the meter cannot be powered down manually. Exit these modes before attempting to
power down. Long press the
“
MIN-MAX
”
button to exit the MIN-MAX-AVG mode. To exit
the SET mode, use the “ENTER” button to step back to the normal operating mode.
Connecting Thermocouples
The thermocouples connect to the T1 and T2 input jacks on the top of the meter (observe
correct polarity). The meter accepts type J or K thermocouples, select the thermocouple


