background image

42545A-en-GB_V4.5   1/16 

3

Operating Instructions 

Basic IR Measurements 

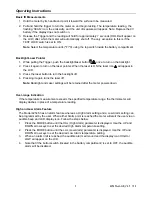
1.  Hold the meter by its handle and point it toward the surface to be measured. 
2.  Pull and hold the trigger to turn the meter on and begin testing. The temperature reading, the 

flashing ‘SCAN’ icon, the emissivity, and the unit of measure will appear. Note: Replace the 9V 
battery if the display does not switch on. 

3.  Release the Trigger and the reading will hold for approximately 7 seconds (HOLD will appear on 

the LCD) after which the meter will automatically shut off. The only exception to this is if the 
TEST LOCK switch is set to ON. 

Note

: Select the temperature units (ºF/ºC) using the top switch inside the battery compartment 


Backlight/Laser Pointer 

1.  While pulling the Trigger, push the backlight/laser button          once to turn on the backlight.


2.  Press it again to turn on the laser pointer. When the laser is ON the laser icon     will appear in 

the LCD.


3.  Press the laser button to turn the backlight off.


4.  Pressing it again turns the laser off.


Note

: Backlight and Laser settings will be retained after the meter powers down. 


Over-range Indication 

If the temperature measurement exceeds the specified temperature range, the thermometer will 
display dashes in place of a temperature reading. 

 
High and Low Alarm Feature 

The Model 42545 has an alarm feature whereas a High Alarm setting and a Low Alarm setting can 
be programmed by the user. When either Alarm point is reached the meter will alert the user via an 
audible beep and LCD display icon. Follow the steps below: 
1. 

Press the MODE button until the HAL (High Alarm) parameter is displayed. Use the UP and 
DOWN arrow keys to set the desired High Alarm temperature setting. 

2. 

Press the MODE button until the LAL (Low Alarm) parameter is displayed. Use the UP and 
DOWN arrow keys to set the desired Low Alarm temperature setting. 

3. 

When an alarm limit is reached, the audible alarm will sound and the display icon HIGH or 
LOW will appear on the LCD. 

4. 

Note that if the bottom switch (located in the battery compartment) is set to OFF, the audible 
alarm will be disabled. 


Summary of Contents for 42545

Page 1: ...User s Manual High Temperature InfraRed Thermometer with Laser Pointer MODEL 42545 ...

Page 2: ... proper use will provide years of reliable service Safety Use extreme caution when the laser pointer beam is on Do not point the beam toward anyone s eye or allow the beam to strike the eye from a reflective surface Do not use the laser near explosive gases or in other potentially explosive areas Meter Description 1 Laser pointer beam 2 IR Sensor 3 Measurement Trigger 4 Battery and Switch Compartm...

Page 3: ...utton to turn the backlight off 4 Pressing it again turns the laser off Note Backlight and Laser settings will be retained after the meter powers down Over range Indication If the temperature measurement exceeds the specified temperature range the thermometer will display dashes in place of a temperature reading High and Low Alarm Feature The Model 42545 has an alarm feature whereas a High Alarm s...

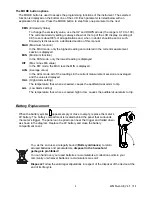
Page 4: ...ess the MIN is displayed AVG Average value In the AVG mode all of the readings in the current measurement session are averaged and the value is displayed HAL High Alarm setting The temperature that when exceeded causes the audible visual alarm to trip LAL Low Alarm setting The temperature that when exceeded high to low causes the audible visual alarm to trip Battery Replacement When the battery sy...

Page 5: ...ambient temperature However it can take up to 30 minutes for the meter to adjust to extremely wide changes 7 To find a hot spot aim the meter outside the area of interest then scan across in an up and down motion until the hot spot is located Field of View The meter s field of view is 50 1 For example if the meter is 50 inches from the target spot the diameter of the target must be at least 1 inch...

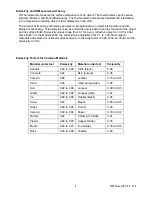
Page 6: ... flat black finish For the Model 42545 the emissivity is adjustable from 0 1 to 1 00 Most organic materials and painted or oxidized surfaces have an emissivity factor of 0 95 When in doubt set the emissivity to 0 95 Emissivity Factors for Common Materials Material under test Emissivity Material under test Emissivity Asphalt 0 90 to 0 98 Cloth black 0 98 Concrete 0 94 Skin human 0 98 Cement 0 96 Le...

Page 7: ...95 default value Field of View D S Approx 50 1 ratio D distance S spot Laser power Less than 1mW Class II Spectral response 8 to 14 m wavelength General Specifications Display 4 digit backlit LCD display with function indicators Display rate 1 second approx Operating Temperature 0 C to 50 C 32 F to 122 F Operating Humidity Max 90 RH Power Supply 9V battery Automatic Power Off Approx 7 seconds afte...

Reviews: