42560 V5.0 8/08
8
Emissivity and IR Measurement Theory
IR Thermometers measure the surface temperature of an object. The thermometer’s optics
sense emitted, reflected, and transmitted energy. The thermometer’s electronics translate
the information into a temperature reading which is then displayed on the LCD.
The amount of IR energy emitted by an object is proportional to an object's temperature
and its ability to emit energy. This ability is known as emissivity and is based upon the
material of the object and its surface finish. Emissivity values range from 0.1 for a very
reflective object to 1.00 for a flat black finish. For the Model 42560, the emissivity is
adjustable from 0.1 to 1.00. Most organic materials and painted or oxidized surfaces have
an emissivity factor of 0.95. When in doubt, set the emissivity to 0.95.
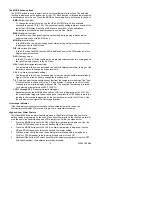
Emissivity Factors for Common Materials
Material under test
Emissivity
Material under test
Emissivity
Asphalt
0.90 to 0.98
Cloth (black)
0.98
Concrete 0.94
Skin
(human)
0.98
Cement
0.96
Leather
0.75 to 0.80
Sand 0.90
Charcoal
(powder)
0.96
Soil
0.92 to 0.96
Lacquer
0.80 to 0.95
Water
0.92 to 0.96
Lacquer (matt)
0.97
Ice
0.96 to 0.98
Rubber (black)
0.94
Snow
0.83
Plastic
0.85 to 0.95
Glass
0.90 to 0.95
Timber
0.90
Ceramic
0.90 to 0.94
Paper
0.70 to 0.94
Marble 0.94
Chromium
Oxides
0.81
Plaster
0.80 to 0.90
Copper Oxides
0.78
Mortar
0.89 to 0.91
Iron Oxides
0.78 to 0.82
Brick
0.93 to 0.96
Textiles
0.90
Automatic Emissivity Adjustment
The 42560 has the ability to automatically calibrate the emissivity setting. However, in
order to do so, the temperature of the measured surface must be above 212ºF (100ºC).
Follow the steps below to use the automatic emissivity adjustment feature:
1. Press the MODE button until the EMS (Emissivity) icon appears on the lower LCD line.
2. With meter turned OFF, press and hold the Laser/Backlight button and then press and
hold the MODE button to turn the meter on until the EMS icon begins to blink and the
emissivity value is displayed as dashes “- - - -”.
3. The IR temperature will be displayed on the middle line of the LCD and the Type-K
temperature will be displayed on the lower LCD line.
4. Touch the Type-K sensor to the surface and, at the same time, take an IR reading.
5. When both the IR and the Type-K measurements stabilize, press the
AT
E
button
(doubles as button). The new emissivity value will now be displayed.
6. Proceed to take measurements.

