background image

42570  V1.2   8/09 

Operating Instructions 

IR Temperature Measurements 

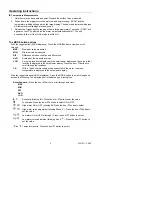
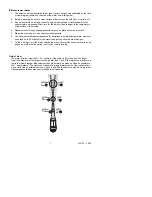
1.  Hold the meter by its handle and point it toward the surface to be measured. 
2.  Pull and hold the trigger to turn the meter on and begin testing. “SCAN” and the 

temperature reading will appear on the large display. The upper and lower sub-displays 
will indicate values/settings previously used. 

3.  Release the Trigger and the reading will hold for approximately 7 seconds (“HOLD” will 

appear on the LCD) after which the meter will automatically shut off. The only 
exception to this is if the LOCK mode is set to ON. 


The MODE button options 

With the trigger pulled (SCAN displayed), Press the MODE button to view and scroll 
through: 

MAX 

:  

Maximum value measured 

MIN

:  

Minimum value measured 

DIF

:  

Difference between the Max and Min values 

AVG

:  

Average of the measured values  

LOG

:  

A memory location is displayed in the small upper display and the value in that 
location is displayed in the small lower display. Press the 

 or 

 buttons to 

scroll through the locations.  

TK

:  

With a Type K thermocouple probe connected to the meter, the probe 
temperature is displayed in the small lower display. 

 
With the trigger released (HOLD displayed), Press the MODE button to scroll through and 
access the following. The selected item is indicated by a blinking icon. 

Recorded data

: (Press the 

 or 

 button to scroll through and view) 

MAX


MIN


DIF


AVG


LOG 

ε

 = 

Emissivity (blinking 

ε

=). Press the 

 or 

 button to set the value. 


Lock mode. Press the 

 or 

 buttons to select ON or OFF. 


High alarm ON or OFF (blinking 

H

). Press the 

 or 

 button to select. 

  High alarm value adjustment (blinking 

and


). Press the 

 or 

 button to 

set the value. 


Low alarm ON or OFF (blinking 

L

). Press the 

 or 

 button to select. 


Low alarm value adjustment (blinking 

and


). Press the 

 or 

 button to 

set the value. 


°C or °F

   Temperature units. Press the 

 or 

 button to select. 


Summary of Contents for 42570

Page 1: ...User Manual Dual Laser InfraRed IR Thermometer MODEL 42570 ...

Page 2: ...at 781 890 7440 ext 210 for authorization or visit our website at www extech com click on Contact Extech and go to Service Department to request an RA number A Return Authorization RA number must be issued before any product is returned to Extech The sender is responsible for shipping charges freight insurance and proper packaging to prevent damage in transit This warranty does not apply to defect...

Page 3: ...USB port side DISPLAY 1 SCAN measurement in progress 2 Bargraph 3 Laser pointer active 4 Power locked ON 5 HOLD last measurement locked in display 6 Max Min temperature display or memory location display 7 Main temperature display 8 High Low limit alarm 9 USB connection 10 Battery status 11 Emissivity or Type K or Stored value display 12 Thermocouple probe installed 13 Emissivity setting 14 Logged...

Page 4: ...easured values LOG A memory location is displayed in the small upper display and the value in that location is displayed in the small lower display Press the or buttons to scroll through the locations TK With a Type K thermocouple probe connected to the meter the probe temperature is displayed in the small lower display With the trigger released HOLD displayed Press the MODE button to scroll throu...

Page 5: ...ODE button The setting is stored and memory and will remain as the turn on condition until changed Temperature Units The temperature units can be set to F or C The selection is made using the MODE button Lock feature The LOCK feature disables the Auto Power Off feature for the period of use when selected The feature is useful for long term temperature monitoring and hands free use The meter will r...

Page 6: ...ecorded temperature will appear in the lower right corner 4 To select another log location press the up and down keys Recalling Data To recall stored data after the unit shuts off 1 Press the MODE button until LOG appears in the lower left corner A LOG location number will be shown below LOG and the stored temperature for that location will be display 2 To move to another LOG location press the UP...

Page 7: ...mpensates for deviations in ambient temperature However it can take up to 30 minutes for the meter to adjust to extremely wide changes 7 To find a hot spot aim the meter outside the area of interest then scan across in an up and down or side to side motion until the hot spot is located Field of View The meter s field of view is 50 1 For example if the meter is 50 inches from the target spot the di...

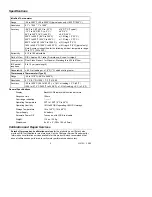
Page 8: ... F 1 o C whichever is greater Thermocouple Thermometer Type K Range 50 to 1370 C 58 F to 2498 F Resolution 0 1 C 0 1 F 1000 1 C 1 F 1000 Accuracy 50 to 1000 C 58 to 1832 F 1 5 of reading 3 C 5 F 1000 to 1370 C 1832 F to 2498 F 1 5 of reading 2 C 3 6 F General Specifications Display Backlit LCD display with function indicators Response time 100ms Over range indication Operating Temperature 32 o F t...

Page 9: ...ject to change without notice For the latest version of this User s Guide Software updates and other up to the minute product information visit our website www extech com Extech Instruments Corporation 285 Bear Hill Rd Waltham MA 02451 Copyright 2009 Extech Instruments Corporation a FLIR company All rights reserved including the right of reproduction in whole or in part in any form ...

Reviews: