background image

65

64

EN

EN

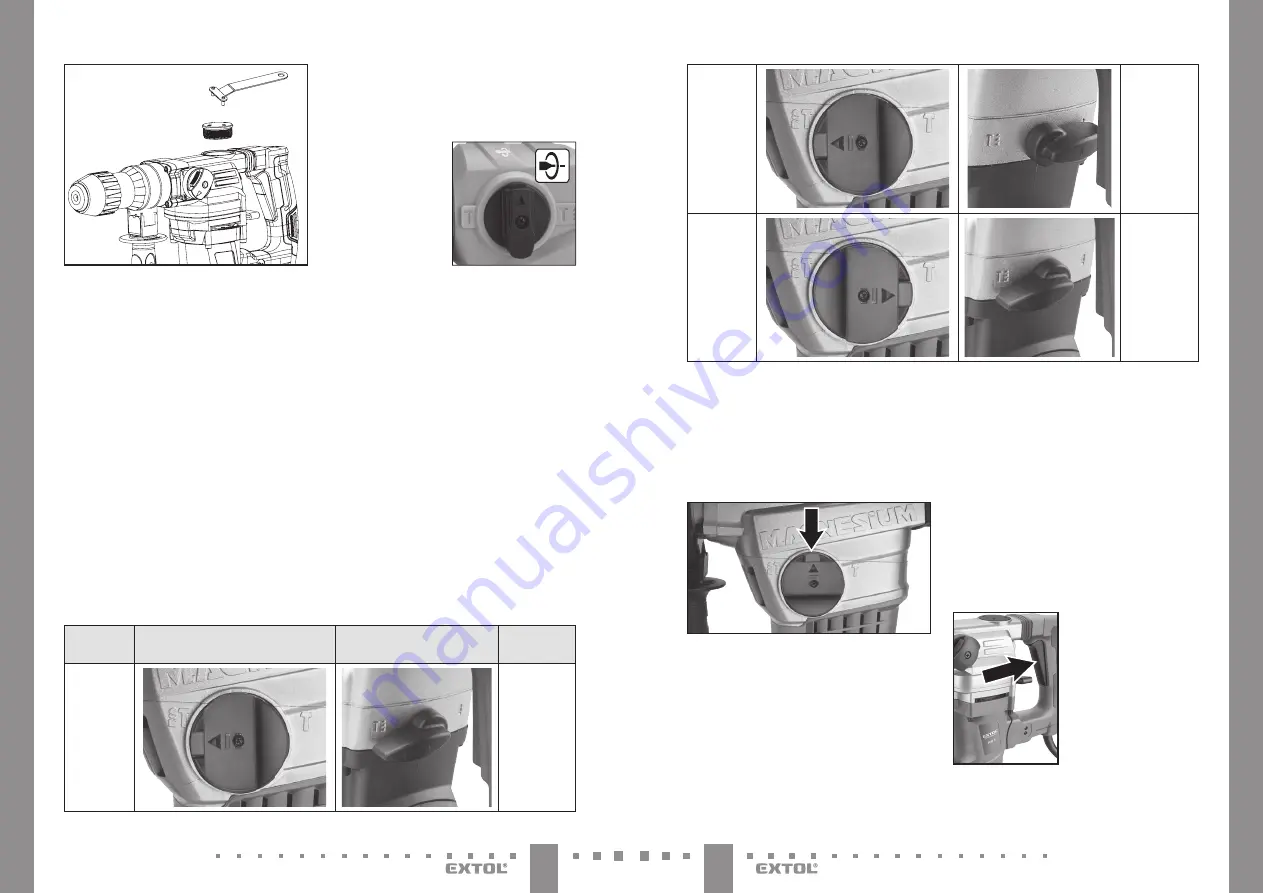
Drilling

without 

impact

Wood
Metal

Plastic

Chiselling

Masonry
Concrete

Bricks


WARNING


y

Never change the work mode settings while the power 
tool is running! The work mode can only be changed 
when the trigger switch is released and when the clam-
ping head is not rotating.

1.   To change (turn) the gearbox toggle switch, first 

press the locking safety on the toggle switch, see Fig. 10. 

Fig. 10

2.   Then set the gearbox toggle switch to the position 

with the symbol of the respective work mode so that 
it clicks into the given position, otherwise the gear-
box will not be correctly set and will be damaged.


ATTENTION


y

The hammer drills do not have the chisel lock function, 
which may lead to the situation where the work surface 
(rotation) of the chisel may change. This is a standard 
event on hammer drill models in this category and can-
not constitute a product defect.

V. Starting / stopping

TURNING ON


y

Prior to connecting the power cord into an el. power 
socket, check that the voltage in the socket corresponds 
to the voltage specified on the rating label located on 
the power tool. The power tool can be used in the vol-
tage range of 220-240 V~50 Hz.

1.   Insert the power cord plug into an el. power socket. 

The presence of electricity in the hammer drill is indi-
cated by a lit indicator light (applies only for hammer 
drill models 8890101 and 8890210).

2.   Start the power tool by pressing the trigger switch.

Fig. 11

On model 8890210 it is possible 
to control the speed and 
number of impacts by the 
degree to which the trigger 
switch is pressed.

TURNING OFF


y

To turn it off, release the trigger switch.

Fig. 9

There should be enough lubricant inside the gearbox 
that the gears are submerged in Vaseline. 
If necessary, add a spoon of Vaseline into the gearbox.

2.   Screw the cover properly back on and tighten secure-

ly. The cover must seal well so that no stones, etc. 
enter into the gearbox while chiselling/drilling.

REMOVING THE WORK TOOL  

FROM THE SDS CLAMPING HEAD


y

Push down the SDS plus head and take out the inserted 
work tool from the head. Then release the clamping head.

SETTING THE WORK MODE


y

The following table presents the gearbox toggle switch 
combinations (Fig. 1, position 3) and the work mode toggle 
switch combination (Fig. 1, position 8) for the required work 
mode. On hammer drill 8890207 the symbols for the selecti-
on of the work mode are directly on the toggle switch.  
Hammer drill 8890101 does not have the impactless 
drilling function and, therefore, the selection of impact 

drilling or chiselling is performed using a single toggle 
switch (Fig. 2, position 9).

TURNING THE CHISEL TO THE REQUIRED 

POSITION AND LOCKING THE CHISEL 

 

The hammer drill 
Extol® Premium 
8890207 is equipped 
with a chisel lock, 
which enables the 
chisel to maintain the 
same pre-set position 
during the chiselling 
process (chisel lock function). To set the chisel to the 
required position, set the gearbox toggle switch (fig. 
1, position 3) to the position with the symbol of the 
chisel with the arrow shown on the body of the ham-
mer and turn the chisel with your hand to the requi-
red work position. Then set the gearbox toggle switch 
to the position with the symbol of the hammer and 
set the lever of the work mode toggle switch (fig. 
1, position 8) to the position with the symbol of the 
hammer and drill on the top side. The lock function 
(chisel lock) has no significance on pointed chisels. 


y

On other hammer drill models, it is possible for short 
term (immediate) setting of the chisel to the required 
position to use the drilling mode and during this mode 
to turn the chisel to the required position and then 
to set the chiselling work mode. Since other hammer 
drill models do not have the chisel lock function, it 
may happen that the set rotation position of the chisel 
may change during work. This is not a fault, but rather 
a normal event on hammer drill models in this category.

Work 

mode

Gear box

toggle switch 

Work mode

toggle switch

Intended

for material

Drilling

with impact

Masonry
Concrete

Bricks

Summary of Contents for 401232

Page 1: ...vá SK Véső és fúrókalapácsok HU Meißel und Bohrhammer DE Rotary Hammer EN Původní návod k použití Preklad pôvodného návodu na použitie Az eredeti használati utasítás fordítása Übersetzung der ursprünglichen Bedienungsanleitung Translation of the original user s manual Version 10 2021 ...

Page 2: ...hluku během skutečného používání nářadí se může lišit od deklarovaných hodnot v závislosti na způso bu jakým se nářadí používá zejména jaký se opracovává druh obrobku y y Je nutné určit bezpečnostní měření k ochraně obsluhující osoby která jsou založena na zhodnocení expozice ve skuteč ných podmínkách používání počítat se všemi částmi pracovního cyklu jako je čas po který je nářadí vypnuto a kdy b...

Page 3: ...áž montáž krytu převo dovky pro vnášení vazelíny 2 8 9 10 1 3 Obr 2 4 5 6 7 11 12 III Součásti a ovládací prvky Obr 1 Pozice popis Na Obr 1 je model kladiva 8890207 který má totožné ovládací prvky jako kladivo 8890210 a Extol Craft 401232 Liší se však vzhledem 1 Ochranná protiprachová krytka 2 SDS upínací hlava nástroje 3 Přepínač převodovky pro režim vrtání s příklepem bez příklepu sekání a nasta...

Page 4: ...ovce IV Před uvedením do provozu UPOZORNĚNÍ y y Před použitím nářadí si přečtěte celý návod k použití Návod nechte přiložený u výrobku aby se s ním mohla obsluha kdykoli seznámit Pokud nářadí komukoli půjčujete přikládejte k němu i tento návod k použití Zamezte znehodnocení a poškození tohoto návodu y y Před jakýmkoli nastavováním seřizováním údržbou kladiva výměnou vkládáním nástroje odpojte přív...

Page 5: ...dobře těsnit aby se do převodovky nedostaly kamínky atd při sekání vrtání VYJMUTÍ NÁSTROJE Z SDS UPÍNACÍ HLAVY y y Stlačte SDS plus hlavu a vložený nástroj z hlavy vyjmě te Pak upínací hlavu uvolněte NASTAVENÍ REŽIMU PRÁCE y y V následující tabulce jsou vyobrazeny kombinace nastavení přepínače převodovky Obr 1 pozice 3 a přepínače režimu práce Obr 1 pozice 8 pro požadovaný pracovní režim U kladiva...

Page 6: ... Seřizovací nástroj nebo klíč který zůstane připevněn k otáčející se části elektrického nářadí může být příčinou poranění osob VI Způsob práce y y Připrácipoužívejteosobníochrannépomůcky zejména ochranusluchu zrakuarespirátorstřídoufiltruP2pro ochranudýchacíchcestpředprachem dálevhodnérukavice y y Před započetím práce se přesvědčte zda v sekaném vrtaném materiálu nejsou přítomna rozvodná vedení na...

Page 7: ...chy je nutno udržo vat suché čisté a bez mastnot Kluzké rukojeti a úchopové povrchy neumožňují v neočekávaných situacích bezpečné držení a kontrolu nářadí 5 SERVIS a Opravy elektrického nářadí je nutno svěřo vat kvalifikované osobě která bude použí vat identické náhradní díly Tímto způsobem bude zajištěna stejná úroveň bezpečnosti elektrické ho nářadí jako před opravou VIII Odkazy na štítek a pikt...

Page 8: ...jí příslušným bezpečnostním požadavkům Evropské unie Při námi neodsouhlasených změnách zařízení ztrácí toto prohlášení svou platnost Toto prohlášení se vydává na výhradní odpovědnost výrobce Extol Premium 8890207 8890101 8890210 Extol Craft 401232 Sekací a vrtací kladiva Harmonizované normy včetně jejich pozměňujících příloh pokud existují které byly použity k posouzení shody a na jejichž základě ...

Page 9: ...STRAHA y y Emisia vibrácií a hluku počas skutočného používania náradia sa môže líšiť od deklarovaných hodnôt v závislosti od spô sobu akým sa náradie používa najmä aký sa opracováva druh obrobku y y Je nutné určiť bezpečnostné meranie na ochranu obsluhujúcej osoby ktoré sú založené na zhodnotení expozície v skutočných podmienkach používania počítať so všetkými časťami pracovného cyklu ako je čas v...

Page 10: ...klepu sekanie 9 Štítok s technickými údajmi 10 Vetracie otvory motora 11 Otočná pomocná rukoväť 1 1 4 2 8 9 10 11 1 1 3 5 6 7 Obr 1 Obr 2 Pozícia popis Na Obr 2 je model kladiva 8890101 1 Protiprachový kryt 2 SDS upínacia hlava nástroja 3 Kryt prevodovky na vnášanie vazelíny pre jej mazanie 4 Prevádzkový spínač 5 Hlavná rukoväť 6 Kontrolka signalizujúca pripojenie náradia k el napätiu Pri modeli 8...

Page 11: ...br 9 a skontrolujte množ stvo maziva v prevodovke IV Pred uvedením do prevádzky UPOZORNENIE y y Pred použitím náradia si prečítajte celý návod na použitie Návod nechajte priložený pri výrobku aby sa s ním mohla obsluha kedykoľvek zoznámiť Pokiaľ náradie komukoľvek požičiavate prikladajte k nemu aj tento návod na použi tie Zabráňte znehodnoteniu a poškodeniu tohto návodu y y Pred akýmkoľvek nastavo...

Page 12: ... nastaviť režim vŕtania a pri tomto režime natočiť sekáč do požadovanej polohy a potom nastaviť pracovný režim sekania Keďže ostatné modely kladív nemajú funkciu aretácie sekáča môže pri práci dôjsť k zmene nastavenej polohy natočenia sekáča Nejde o chybu ale o bežný jav pri modeloch kladív v tejto kategórii Režim práce Prepínač prevodovky Prepínač režimu práce Určené pre materiál Vŕtanie s príkle...

Page 13: ...e prachu je zdraviu škodlivé Pri práci zaistite dostatočné odvetrávanie priestoru y y Pri práci používajte certifikovanú ochranu zraku sluchu a dýchacích ciest s dostatočnou úrovňou ochrany O dostatočnej úrovni ochrany sa poraďte v obchode s osobnými ochrannými prostriedkami VII Všeobecné bezpečnostné pokyny VÝSTRAHA Je nutné prečítať všetky bezpečnostné pokyny návod na používanie obrázky a predpi...

Page 14: ...práce Používanie elektrického nára dia na vykonávanie iných činností než tých pre ktoré bolo určené môže viesť k nebezpečným situáciám h Rukoväte a povrchy na uchopenie je treba udržiavať suché čisté a bez mastnoty Šmykľavé rukoväte a povrchy na uchopenie neumož ňujú v neočakávaných situáciách bezpečné držanie a kontrolu náradia 5 SERVIS a Opravyelektrickéhonáradiazvertekvalifiko vanejosobe ktoráb...

Page 15: ...ýkonu zariadenia reprezentujúcehodanýtyp pozritekapitoluTechnickéúdaje Garantovanáhladinaakustickéhovýkonuzariadenia 101dB A Kompletizáciu technickej dokumentácie 2006 42 ES 2000 14 ES vykonal Martin Šenkýř Technická dokumentácia 2006 42 ES 2000 14 ES je k dispozícii na adrese spoločnosti Madal Bal a s Postup posúdenia zhody 2006 42 ES 2000 14 ES Overenie jednotlivého zariadenia notifikovanou osob...

Page 16: ...be van kapcsolva de nincs használva y y Az akusztikus nyomás és teljesítmény mérése az EN ISO 3744 szerint történt Az akusztikus terhelés mértéke meghal adja a 85 dB A értéket ezért munka közben fülvédőt kell használni ellenkező esetben a zaj maradandó halláskároso dást okozhat II Jellemzők Az Extol Craft 401232 véső és fúrókalapács kitűnő és kedvező árú termék az ezermesterek részére Az Extol Pre...

Page 17: ...ELSZERELÉSE FIGYELMEZTETÉS y y A fúrókalapácsot ne használja a kiegészítő fogantyú nélkül A gép feletti uralom elvesztése esetén sérülés érheti vagy anyagi kár keletkezhet 1 Afogantyúmarkolatátafüggőlegestengelyekörül elforgatvalazítsamegabilincsszorítását majdafogan tyúthúzzaráafúrókalapácsnyakára lásda3 ábrát y y A kiegészítő fogantyút fordítsa olyan helyzetbe hogy munka közben kényelmesen és bi...

Page 18: ...z hegyes hornyok kimunkálásához hajlított végű vésőt stb a szerszámok nem tartozékai a fúrókalapácsnak y y A fúráshoz mindig az anyagnak megfelelő fúrót használjon Fémek és kemény műanyagok fúrásá hoz használjon gyorsacél HSS fúrókat Az SDS plus és SDS max szerszámbefogás univerzális abba az azonos típusú szerszámok különböző gyár tóktól is befoghatók 2 Az SDS szárat alaposan törölje meg puha ruhá...

Page 19: ...ég alatt álló vezetékhez ér az elektromos kéziszerszám fémrészei szintén feszültség alá kerülnek ami áramütést okozhat 2 Biztonságiutasításokhosszúfúrókhasználatához a A fúrógépet ne üzemeltesse magasabb fordu latszámon mint a fúró betétszerszám megen gedett névleges fordulatszáma Magasabb for dulatszámon előfordulhat hogy a hosszú fúró elgörbül ami balesetet vagy személyi sérülést okozhat b Afúrá...

Page 20: ... a használati utasítás előírásai szerint valamint a ren deltetésének megfelelő módon továbbá az adott munkakörülményeket és a munka típusát is figyelembe véve használja A ren y y Munka közben viseljen megfelelő tanúsítvánnyal és védelmi fokozattal rendelkező védőszemüve get fülvédőt és szűrőmaszkot További informá ciókat a munkavédelmi eszközöket forgalmazó üzletekben kaphat VII Általános biztonsá...

Page 21: ... weboldalon találhatóak meg illetve a szakszervizek felsorolása a termék vásárlásának helyén is beszerezhető Tanácsadással a 1 297 1277 ügyfélszolgálati telefonszámon állunk ügyfeleink rendel kezésére deltetéstől eltérő géphasználat veszélyes és váratlan helyzeteket hozhat létre h A kéziszerszám fogantyúit és markolatait tartsa tiszta száraz zsír és olajmentes állapotban Ha a kéziszerszámot nem tu...

Page 22: ... s2 15 8 13 6 14 6 13 7 EU Megfelelőségi nyilatkozat Gyártó Madal Bal a s Bartošova 40 3 CZ 760 01 Zlín Cégszám 49433717 kijelenti hogyazalábbijelölésű sajáttervezésűésgyártásútermék illetve az ezen alapuló egyéb kivitelek megfelelnek az Európai Unió idevonatkozó biztonsági előírásainak Az általunk jóvá nem hagyott változtatások esetén a fenti nyilatkozatunk érvényét veszti A jelen nyilatkozat kia...

Page 23: ...egelwurdegem ENISO3744gemessenundübersteigtdenWertvon85dB A deshalb istbeiderArbeiteingeeigneterGehörschutzzutragen sonstkanndieLärmbelastungeinenGehörverlustzuFolgehaben II Charakteristik Der Meißel und Bohrhammer Extol Craft 401232 ist die ausgezeichnete Wahl für Heimprofis zum günstigen Preis Die Meißel und Bohrhämmer der Kategorie Extol Premium sind die richtige Wahl für diejenigen die hohen W...

Page 24: ...beschädigten oder fehlenden Teilen darf nicht benutzt und muss in einer autorisierten Werkstatt der Marke Extol repariert werden siehe Kapitel Instandhaltung und Service oder Webseiten am Anfang der Bedienungsanleitung MONTAGE VOM ZUSATZGRIFF TIEFENANSCHLAG HINWEIS y y Benutzen Sie den Bohrhammer niemals ohne mon tierten Zusatzgriff Der Verlust der Kontrolle über das Werkzeug kann Verletzungen ver...

Page 25: ...Bohrhammermodelle keine Meißelarretierfunktion besitzen kann sich während der Arbeit die Position vom Meißel ändern Es handelt sich um keinen Fehler sondern um eine normale Erscheinung bei Bohrhämmern in dieser Kategorie 2 Ziehen Sie den Griff in der gewünschten Position an und zwar durch Drehen nach Abb 3 Durch Sicherung vom Griff wird auch der Tiefenanschlag gesichert SPANNEN ENTNAHME VOM ARBEIT...

Page 26: ...n befinden da es durch ihre Beschädigung zu Verletzungen Explosionen und weiteren Sachschäden kommen kann Zum Orten von solchen Leitungen sind geeignete Metall und Stromortungsgeräte anzuwenden y y Halten Sie den Bohrhammer mit beiden Händen fest an den Griffflächen vom Haupt und Zusatzgriff bei einer stabilen und festen Körperhaltung siehe Abb 12 Die Bohrhämmer greifen stark ein und somit kann di...

Page 27: ...riesets beim Tragen oder Versetzen des Werkzeuges in der Position AUS befin det Ein Herumtragen des Werkzeuges mit dem Finger auf dem Schalter oder Anschluss des Steckers Wasser in das Geräteinnere eindringt da dies zu Stromschlagverletzungen führen kann Legen Sie den Bohrhammer auf eine trockene Stelle ab wo kein Eindringen von Wasser in das Geräteinnere droht y y Beim Bohren von Löchern in Metal...

Page 28: ...Tragen Sie keine lose Kleidung und keinen Schmuck Die Bedienung muss darauf achten dass sich ihre Haare und Kleidung in genügender Entfernung von beweglichen Teilen befin den Lose Kleidung Schmuck und langes Haar können durch bewegliche Teile erfasst werden g Sofern Mittel zum Anschluss von Einrichtungen zum Absaugen und Sammeln von Staub zur Verfügung stehen ist es nötig solche Einrichtungen anzu...

Page 29: ...erkstoffen ist die beim Bohren Meißeln entstehen weil sie das Spannsystem beschädigen y y Halten Sie die Lüftungsschlitze des Motors sauber sonst wird sich dieser infolge einer mangelhaften Luftströmung überhitzen y y Zur Reinigung der Geräteoberfläche benutzen Sie ein feuchtes in Seifenwasser getauchtes Tuch Achten Sie darauf dass kein Wasser in das Geräteinnere dringt y y Benutzen Sie zur Reinig...

Page 30: ...sible with impact drills that is y y with percussion into concrete bricks and stone y y withoutpercussionintowood steel plastics ceramics etc b Forchisellingworkintoconcrete bricks stoneandasphalt e g formakinggroovesorchisellingopenings holes Withtheuseofappropriatetools alsoforchisellingaway walltiles floortiles wallplaster constructionglue etc Onhammerdrillmodels8890207 8890210andExtolCraft 401...

Page 31: ... gearbox cover for the application of Vaseline 2 8 9 10 1 3 Fig 2 4 5 6 7 11 12 III Parts and control elements Fig 1 Position description On Fig 1 there is hammer drill model 8890207 which has identical control elements as hammer drill 8890210 and Extol Craft 401232 However their appearance is different 1 Protective anti dust cover 2 SDS tool clamping head 3 Gearbox toggle switch for impact impact...

Page 32: ...he gearbox IV Before putting into operation ATTENTION y y Read the entire user s manual before using the power tool Keep the user s manual with the product so that its user may become acquainted with it at any time If you lend the power tool to somebody include this user s manual with it Prevent this user s manual from being damaged or destroyed y y Before carrying out any settings adjustments mai...

Page 33: ...into the gearbox while chiselling drilling REMOVING THE WORK TOOL FROM THE SDS CLAMPING HEAD y y PushdowntheSDSplusheadandtakeouttheinserted worktoolfromthehead Thenreleasetheclampinghead SETTING THE WORK MODE y y Thefollowingtablepresentsthegearboxtoggleswitch combinations Fig 1 position3 andtheworkmodetoggle switchcombination Fig 1 position8 fortherequiredwork mode Onhammerdrill8890207thesymbols...

Page 34: ...ely to the work conditions they reduce the risk of injury to persons VI Method of work y y Use protective aids during work in particular hearing and eye protection and a respirator with a filtration class P2 for protection of the respiratory tract against dust and furthermore appropriate gloves y y Before starting work make sure that there are no utility lines e g electrical water gas steam etc in...

Page 35: ...thing or jewellery The user must ensure that they have hair and clothing at a sufficient distance from moving parts Loose clothing jewellery and long hair may become caught in the moving parts g If there is equipment available for the extraction and collection of dust it is nece ssary that such equipment is connected and used correctly The use of such equipment may limit the danger posed by the cr...

Page 36: ...writeuptheEUDeclarationofConformityonbehalfofthemanufacturer signature name function Martin Šenkýř Member of the Board of the manufacturer y y Ensure that the SDS clamping head is free of stones construction dust or other abrasive materials created during chiselling drilling since these damage the clamping system y y Keep the motor vents clean otherwise the motor may overheat as a result of insuff...

Reviews: