28
W415-1598 / 06.01.16
CONTROls PROCEDURE
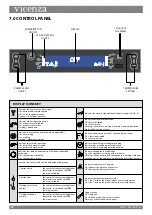
Press key 6 and
SET clOck
will appear.
Press key 2 several times until
uSER
is displayed.
Press key 6.
diSPlaY
will appear.
Press key 2 until
PEllET
appears.
Use key 4 to increase or 5 to decrease the load (during the
WORk
phase.)
Press key 6 to confirm and key 1 until you have returned to the HOME
screen.
11.3 v1- AiR
The menu allows to adjust the speed of the front fan in percentage.
CONTROls PROCEDURE
Press key 6 and
SET clOck
will appear.
Press key 2 several times until
uSER
is displayed.
Press key 6.
diSPlaY
will appear.
Press key 2 until
v1 aiR
appears.
Use key 4 to increase or 5 to decrease
Press key 6 to confirm and key 1 until you have returned to the HOME
screen.
1
lOW FUEl:
the appliance can never develop a suitable flame, tending to remain very low even at high powers.
at minimum power the appliance may switch off taking the appliance into
NO PEllETS
alarm condition.
when the appliance displays the
NO PEllETS
alarm, there may be unburned pellets inside the burn pot.
ExCEss FUEl
:
the appliance develops a very high flame even at low power.
the glass is very dirty, obscuring it almost completely.
the burn pot tends to become encrusted, blocking the holes for air intake due to the excessive pellet feed, pellets are only
burned partially.
The adjustment to be performed is in percentage. Therefore changing this parameter will lead to a proportional variation of all
appliance feeding speeds. Feeding is from -30% to +20%.
Follow the procedure on the display to perform this adjustment:
11.4 sTANDBy (sTBy)
sTANDBy wiTh DiGiTAL ThERMOsTAT (sTANDARD)
sTBy FuNCTiON sET AT ON
if the appliance reaches the set room temperature and the
STBY
function is active (
ON
), the appliance will switch off after a default
delay time and display
STaNdBY
.
When the room temperature is lower than the setting and once the appliance has cooled, it will start to work again at the set power
and display
WORk
.
Summary of Contents for Vicenza V3.4
Page 14: ...SECURING kit FIGURE 2 14 W415 1598 06 01 16 ...
Page 46: ...47 18 0 NOTES W415 1598 06 01 16 ...
Page 47: ...48 W415 1598 06 01 16 ...
Page 62: ...14 W415 1598 06 01 16 KIT DE FIXATION FIGURE 2 ...
Page 68: ...20 W415 1598 06 01 16 6 0 assemblage de panneau en céramique inférieur 2 1 ...


