background image

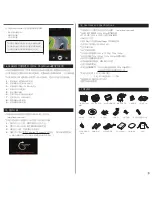
 Video quick setup screen

 Press QUICK SETUP           button to go to quick setup


Select recording options

 Use UP / DOWN                     button to choose option

 Press SELECT              to confirm setting option

 Video quick setup screen

 Press QUICK SETUP           button to go to quick setup


Select video resolution and recording speed

 Use UP / DOWN                    button to choose option

 Press SELECT              to confirm setting option

 Video quick setup screen

 Press QUICK SETUP            button to go to quick setup


Select image quality

 Use UP / DOWN                    button to choose option

 Press SELECT              to confirm setting option

 Video quick setup screen

 Press QUICK SETUP            button to go to quick setup

● 

Select WiFi connectivity

 Use UP / DOWN                     button to choose option

 Press SELECT              to confirm setting option

8. Quick setup

1.


Press QUICK SETUP          button to select quick setup options on bottom of the screen.

2.


Quick setup mode changes as 


recording option


resolution


 image quality  


wifi on/off


→ 

exit 

 in turn.

3.


Select the quick setup option and press SELECT


           button to adjust setting option.

4.


In setting option, press UP / DOWN                    button to choose setting option.

5.


 Press SELECT             button to confirm setting option.

Quick setup screen

Operation

 Photo quick setup screen

 Press QUICK SETUP           button to go to quick setup

● 

Select photo shooting option

 Use UP / DOWN                     button to choose option

 Press SELECT              to confirm setting option

 Photo quick setup screen

 Press QUICK SETUP           button to go to quick setup

● 

Select image size

 Use UP / DOWN                     button to choose option

 Press SELECT           to confirm setting option

 Without entering user setting menu, user can adjust various quick setups in live screen.

 (         )  

 (         )   

 (         )   

 (         )   

 (         )   

 (         )   

 (         )    

 (      ) 

 (      ) 

 (      ) 

 (      ) 

 (      ) 

 (      ) 

 (      ) 

 (      ) 

 (       ,       ) 

 (       ,       ) 

 (       ,       ) 

 (       ,       ) 

 (       ,       ) 

 (       ,       ) 

 (       ,       ) 

●  

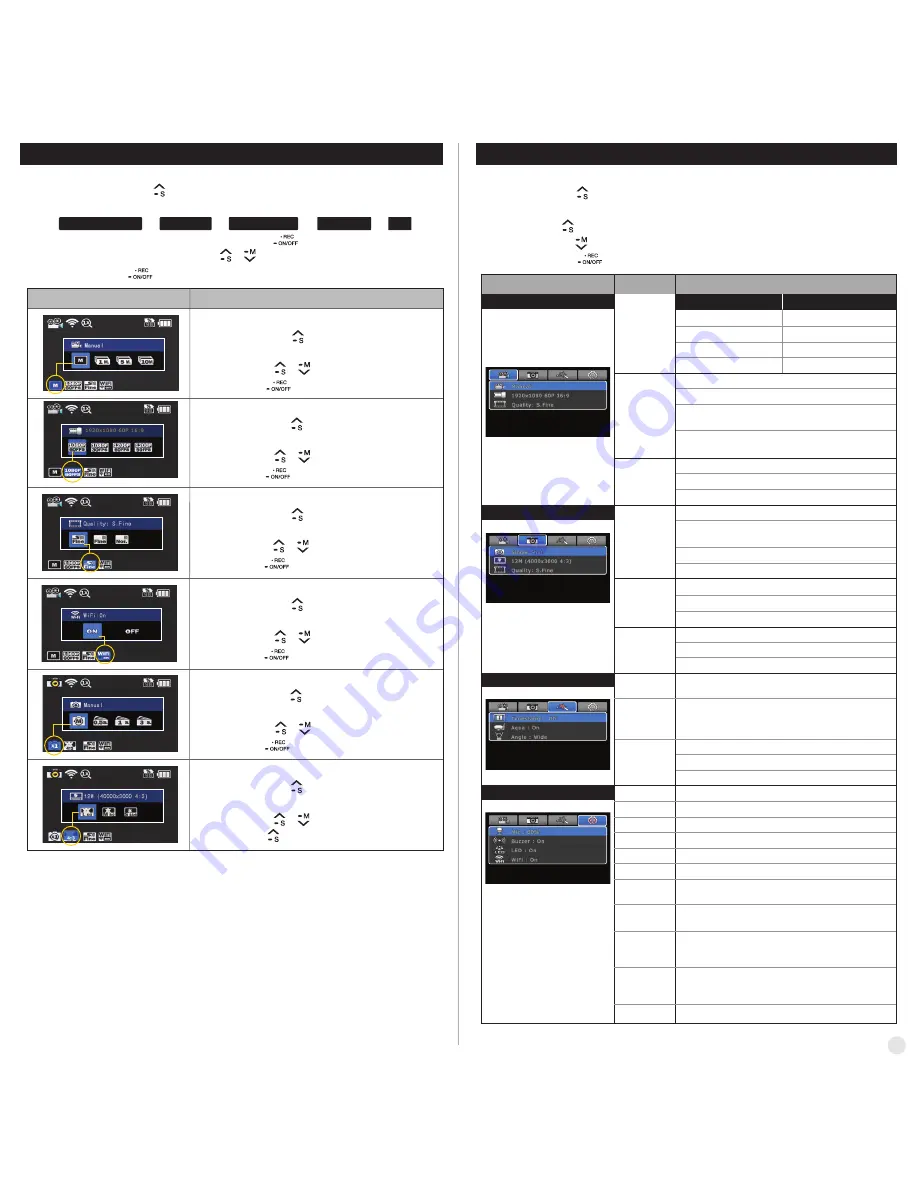
User can select basic settings and detailed setting options through user setup menu.


9. User setup menu

Resolution

Recording

option

Image

quality

1080p 60fps, 30fps
1200p 60fps, 30fps
720p 120fps, 60fps, 30fps
480p 240fps
Manual

Super Fine (

*Use CLASS10 memory card only)

Fine
Normal

Timer 1min, 5min, 10min, 30min
Multi file REC. 1min, 5min, 10min, 30min

(record consecutive video files of setup time)

Time lapse 1sec, 3sec, 5sec, 10sec, 30sec

(captures each image of setup time and save as video file)

1080p 50fps, 25fps
1200p 50fps, 25fps
720p 100fps, 50fps, 25fps
480p 200fps

Function

Sub menu

Description

Recording

option

Manual

Burst 11 photo images per second
Timer 5sec, 10sec

Time lapse 0.5sec, 1sec, 3sec, 5sec, 10sec, 30sec

(captures each image of setup time and save as photo)

On / Off . Shows current time in recorded file

On / Off . 
When the camera is shooting underwater, select 
'aqua scene on' to give more vivid color images in the scene

Resolution

12M (4000 x 3000) 4:3
8.5M (3648 x 2432) 3:2
7.2M (3648 x 2052) 16:9

FOV

Mic. Volume

Buzzer

LED

WiFi

TV Out

Time

Format

Default Setting

Auto LCD Off

Auto Power Off

Info

Aqua scene

Time stamp

Wide lens angle
Medium lens angle
Narrow lens angle

Image
quality

Super Fine (

*Use CLASS10 memory card only)

Normal

Fine

Video

Photo

Effect

Settings

Off, 30%, 60%, 100%
Buzzer On / Off

Shows current firmware version

LED On / Off
WiFi On / Off
NTSC / PAL
Set current time (YYMMDD:HHMM)
Yes / No.  

Memory card format
Yes / No

Turn back all settings to default
Yes / No

LCD will automatically turn off in 30sec when there is 

no operation                    
Yes / No

The camera will automatically turn off in 3min when there 

is no operation.

1.


Press SETUP           button and hold for 2 seconds to enter user setup menu.

2.


User setup menu is divided into four categories (video, photo, effect, settings)

3.


Press  UP          button to move category.

4.


Press DOWN          button to enter the sub-menu.

5.


Press SELECT             button to select and confirm setting option within sub-menu.

NTSC

PAL

 (      ) 

 (         )  

 (      ) 

 (      ) 

13

Summary of Contents for 600FPS

Page 1: ......

Page 2: ...ing category Within user setup mode press UP button to switch category Enter Quick Setup Within user setup mode press DOWN button to enter setting menu in each category Confirm setting menu Zoom Mode Within user setup mode press SELECT button to confirm setting menu Press ZOOM button to enter zoom mode Function Button Description If Auto Power off is set the camera will automatically shut down in ...

Page 3: ...ery capacity status Current mode WiFi Zoom Memory capacity Battery Function Icons Mode Description ALL VIDEO In high speed recording camera zoom and audio recording will be disabled WVGA 848x480 240fps high speed video recording High speed recording file is played with 1 8 speed slow motion video In high speed recording camera zoom and audio recording will be disabled Zoom function will be disable...

Page 4: ...enu 9 User setup menu Resolution Recording option Image quality 1080p 60fps 30fps 1200p 60fps 30fps 720p 120fps 60fps 30fps 480p 240fps Manual Super Fine Use CLASS10 memory card only Fine Normal Timer 1min 5min 10min 30min Multi file REC 1min 5min 10min 30min record consecutive video files of setup time Time lapse 1sec 3sec 5sec 10sec 30sec captures each image of setup time and save as video file ...

Page 5: ... Press UP DOWN button to use control panel and select the file by pressing SELECT button 3 While the file is playing you can press UP DOWN button to use control panel and select the file by pressing SELECT button Press MODE button and hold for two seconds to change to playback mode Mode changes as video mode photo mode playback mode video mode in turn User can view recorded video or photo through ...

Page 6: ...arge up to two cells of battery gauge for proper upgrade 1 Format the memory card and copy firmware file to the root directory of Micro SD card 2 Insert the Micro SD to ISAW EXTREME and turn on power 3 Firmware upgrade will be automatically started as showing the updating status on the LCD screen 4 When upgrade is completed the camera shows F W Updating 7 7 stage 100 and automatically turns off Do...

Page 7: ...モードに移動します Function Button Description Auto Power offに設定した場合 3分間製品を作動させなければ自動的に電源が切れます ズームイン Zoom in ズームアウ ト Zoom out UPボタンを押すと zoom inします 最大4倍 DOWNボタンを押すと zoom outします メイン画面 1x でDOWNボタンを押すと zoomモードを解除できます 1 製品のバッテリースロッ トを開け バッテリーを挿入します 2 Micro SDカードを挿入します Micro SDカードが入っていないと 録画できません 3 POWER ボタンを2秒間押し続けると LEDが点滅しながら電源が入り 液晶モニタ ーに映像が表示されます 3 電源を入れる Power REC Select Setup Quick setup up Mode Zoom Down ...

Page 8: ...では ズーム機能をサポートしていません 最高画質 必ずCLASS10メモリーカードを使用してください 7 2MP 3648 x 2052解像度 16 9 ratio比率 8 5MP 3648 x 2432解像度 3 2比率 12MP 4000x3000解像度 4 3比率 セルフタイマーで指定された時間が経過した後に写真 1枚を撮影します 1秒に11枚 連続撮影します 写真を1枚撮影 WiFiのオン オフを設定でき 一般画質 高画質 イメージ画質 WiFiスイッチ イメージサイズ 指定された秒単位で写真をキャプチャーし 保存します 0 5sec 1sec 3sec 5sec 10sec 30sec 60sec Function Icons Mode Description 6 ビデオ撮影 1 電源が入った状態でREC ボタンを押すと 映像撮影が始まります 2 撮影が始まるとLEDが点滅し 右...

Page 9: ...ごとにキャプチャー後 動画保存 タイムラプス 0 5秒 1秒 3秒 5秒 10秒 30秒 60秒 ごとに写真キャプチャー 1080p 50fps 25fps 1200p 50fps 25fps 720p 100fps 50fps 25fps 480p 200fps カテゴリー 詳細設定 設定メニュー 撮影モード バスト 1秒に11枚撮影 タイマー 5秒 10秒 画面上の時間表示On Off 水中撮影専用カラー調整On Off 解像度 12M 4000 x 3000 4 3 8 5M 3648 x 2432 3 2 7 2M 3648 x 2052 16 9 水中モード 時間表示 広い画角 広角 標準画角 狭い画角 望遠 撮影画質 Super Fine Class10メモリーカードを使用してください Normal Fine ビデオ設定ウィンドウ 内蔵マイクのボリューム Off 30 60 100 ...

Page 10: ...態に表示されます カメラとスマートフォンのWiFi通信を設定してください WiFi信号が活性化し WiFi待機中になります MODE ボタンで再生モードに変換できます モード変更は ビデオ撮影 写真撮影 映像再生 ビデオ撮影の順番で循環します 再生モードでは 録画された映像や撮影された写真を製品の液晶ウィンドウ で見ることができます ISAW EXTREMEのWiFi機能を利用し スマートフォンでカメラを制御できます iOS 5 0以上 Android Gingerbread以上のバージョンでのみ作動します カメラを接続する前にApp Storeでアプリケーションをダウンロードしてから使用してください iPhone App StoreまたはGoogle Play Storeで ISAW VIEWER を検索してください 10 再生モード変換 12 スマートフォンコントロール 11 バッテリ...

Page 11: ...SAW製品の最新ファームウェアは ISAWのホームページでいつでも検索できます www isawcam com バッテリーケージが2個以上充電されていなければ ファームウェアをアップデートできません 1 メモリーカードをフォーマッ トした後 ファームウェアファイルをメモリーカードにコピーします 2 メモリーカードをISAW EXTREMEに挿入し 電源を入れます 3 自動的にアップグレードが実行され アップグレードが完了するとメッセージが表示されます 4 アップグレードが完了すると F WUpdating7 7stage100 というメッセージが表示され 自動的に電源が切れます 製品の電源が切れている状態でUSBをコンピュータまたはアダプターに接続すると バッテリーの充電が開始します USBがコンピュータに接続された状態で電源を入れると コンピュータで リムーバルディスク として認識され ...

Page 12: ...Free your action memo ...

Page 13: ...按鈕2秒 按REC 按鈕開始拍攝 按住MODE按鈕2秒 變換錄像 照片 輸出影像模式 按QUICK SETUP按鈕可以在拍攝待機狀態下選擇快捷設定 按SELECT按鈕進入選中的快捷設定菜單 按住SETUP按鈕2秒進入用戶設定菜單 用UP按鈕移動至設定菜單內的目錄 用DOWN按鈕移動至目錄內的詳細設定 用SELECT按鈕選擇選中的詳細設定 按ZOOM按鈕進入放大與縮小 Zoom 模式 按DOWN按鈕zoom out 在原本畫面 1x 中按DOWN按鈕可以退出zoom模式 按UP按鈕 zoom in 最大4倍 開 關電源 模式轉換 快捷設定 進入用戶設定菜單 變更設定菜單內的目錄 放大 Zoom in 縮小 Zoom out 放大與縮小 ZOOM 設定 移動設定菜單 內的詳細設定 確認設定菜單 內的詳細設定 進入快捷設定菜單 錄像開始 停止 Function Button Descriptio...

Page 14: ...像 高速錄像 720p 120fps 480p 240fps 不支持放大與縮小功能 可以開啟 關閉WiFi電源 Function Icons Mode Description 4 LCD畫面及圖標的顯示功能 5 圖片圖標標示 6 拍攝錄像 7 拍攝照片 拍攝錄像畫面 照片拍攝畫面 1min 5min 10min 30min 0 5sec 1sec 3sec 5sec 10sec 30sec 60sec 慢動作錄像不支持放大與縮小功能和語音錄音功能 慢動作錄像不支持放大與縮小功能和語音錄音功能 照片拍攝 選項 圖片尺寸 錄像畫質 WiFi開關 圖片畫質 WiFi 開關 錄像畫質 錄像畫質 拍攝1張照片 可以開啟 關閉WiFi電源 普通畫質 高畫質 最佳畫質 12MP 4000x3000分辨率 4 3比率 8 5MP 3648 x 2432分辨率 3 2比率 7 2MP 3648 x 2052...

Page 15: ...動至要變更的設定 5 按SELECT 按鈕時 完成所選設定的變更 通過用戶設定菜單可以變更詳細設定 1 按住SETUP 按鈕2秒鐘進入用戶設定菜單 2 設定菜單由目錄和詳細設定構成 3 設定菜單的目錄以UP 按鈕移動 4 設定菜單的詳細設定以DOWN 按鈕移動 5 用SELECT 按鈕進入詳細設定后 變更為選中的設定 錄像拍攝畫面的快捷設定窗 按QUICK SETUP 按鈕移動至快捷設定菜單 用SELECT 按鈕進入拍攝選項 用UP DOWN 按鈕在菜單內移動 用SELECT 按鈕選擇 錄像拍攝畫面的快捷設定窗 按QUICK SETUP 按鈕移動至快捷設定菜單 用SELECT 按鈕進入分辨率選項 用UP DOWN 按鈕在菜單內移動 用SELECT 按鈕選擇 錄像拍攝畫面的快捷設定窗 按QUICK SETUP 按鈕移動至快捷設定菜單 用SELECT 按鈕進入畫質選項 用UP DOWN 按鈕在...

Page 16: ...OS 5 0以上 Android Gingerbread 以上的版本中運行 連接相機之前 請先從App Store下載應用程式使用 請在iPhone App Store或Google Play Store中搜索 ISAW VIEWER 1 進入播放模式后 通過SELECT 按鈕選擇要播放檔的類型 影像或照片 2 選擇影像或照片時顯示檔的小樣 使用UP DOWN 按鈕 移動控制圖標后用SELECT 按鈕選擇檔 3 播放影像或照片時也使用UP DOWN 按鈕 移動控制圖標 然后使用SELECT 按鈕可以操作播放檔 電池容量不足時LCD畫面顯示 電池不足 圖標 如果正在錄像 將在保存影像結束錄像後關閉電源 此時請為電池充電 USB充電時約耗時3小時30分鐘 使用ISAW專用AC適配器時 充電時間約為2小時30分鐘 專用AC適配器及車輛用適配器是另售品 1 關閉 ISAW EXTREME的電源 2...

Page 17: ...p 30fps標準 錄像時間隨拍攝環境略所不同 電池充電時間 3 5小時 USB充電 2 5小時 AC適配器 另售品 通過圖形LCD簡便的用戶設定 提供各種外殼配件 ISAW產品的最新固件請隨時登錄ISAW主頁查找 www isawcam com 只能在電池顯示為兩節以上的狀態下進 行固件升級 14 錄像及照片檔管理 可在MAC OS及Window環境下使用 1 開啟ISAW EXTREME的電源 2 將相機連接至電腦的USB接口 3 相機的LCD內顯示 USB Ready 提示 4 點擊PC的 我的電腦 5 搜索便攜式硬碟 6 雙擊 ISAW 所在的便攜式硬碟 7 雙擊 DCIM MEDIA 檔夾 8 開啟錄像或照片檔夾 9 請點擊檔移動至電腦 固件升級期間內 請注意避免關閉電源或者取出電池 可以通過Application中內置的各種按鈕調整相機 15 固件升級 1 格式化內存卡之後 將...

Reviews: