External Antenna Model Suspended Ceiling T-Bar Mount
Altitude™ 4522 Series Access Point Installation Guide
20
External Antenna Model Suspended Ceiling T-
Bar Mount
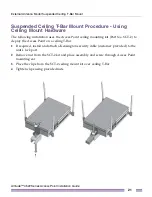
Ceiling mount requires holding the Altitude 4522 Access Point up against a T-bar of a
suspended ceiling grid and twisting the case onto the T-bar. If you are deploying an
external antenna model Altitude 4522 Access Point on a ceiling T-Bar, the Access Point
mounting kit (Part No. KT-135628-01) or ceiling mount hardware (SCT-2) is required.
Suspended Ceiling T-Bar Mount Procedure - Using
Mounting Kit
The following installation uses the Access Point mounting kit (Part No. KT-135628-01) to
deploy the Access Point on a ceiling T-Bar.
1
If required, install and attach a Kensington security cable (customer provided) to the
unit’s lock port.
2
Using only the mounting bracket from the mounting kit, rotate and click the mounting
bracket into the mounting slots on the Altitude 4522 Access Point.
3
Attach an Ethernet cable from the Access Point to a controller with an 802.3af compatible
power source or use the PWRS-14000-148R power supply to supply power to the
Altitude 4522 Access Point (once fully cabled).
4
With the ceiling tile raised, slip the T-Bar bracket on to the exposed T-Bar flange.
5
Lower the ceiling tile and verify the stability of the T-Bar mounting bracket connection.
There will be no stability in this assembly until the ceiling tile is lowered on to the T-Bar
to secure the mounting hardware.
6
Verify that the unit has power by observing the LEDs.
CAUTION
If you are not using a 802.3af capable controller to power the Altitude 4522 Access Point,
ensure that only the Altitude 4522 Access Point’s designated power supply (PWRS-14000-148R) is
used. Using an incorrectly rated power supply could damage the unit and void the product warranty.
Do not actually connect to the power source until the cabling portion of the installation is complete.
Summary of Contents for Altitude 4522 Series
Page 68: ......


