DVS 406 Audio I/O Card • Installation
DVS 406 Audio I/O Card • Installation
Installation
3
2
Installing the Audio I/O Card
The audio I/O card is installed in the DVS 406 by following the
instructions and illustrations shown below.
Internal access
To gain access to the internal components, do the following:
1.
Remove the power cable from the DVS 406 and from the
power source.
Do not open the cover of the scaler without
unplugging the power cord.
2.
If the DVS 406 scaler is rack mounted, remove the input and
output cables from it and remove the unit from the rack. If
the scaler is not rack mounted, you do not need to remove
the input and output cables.
3.
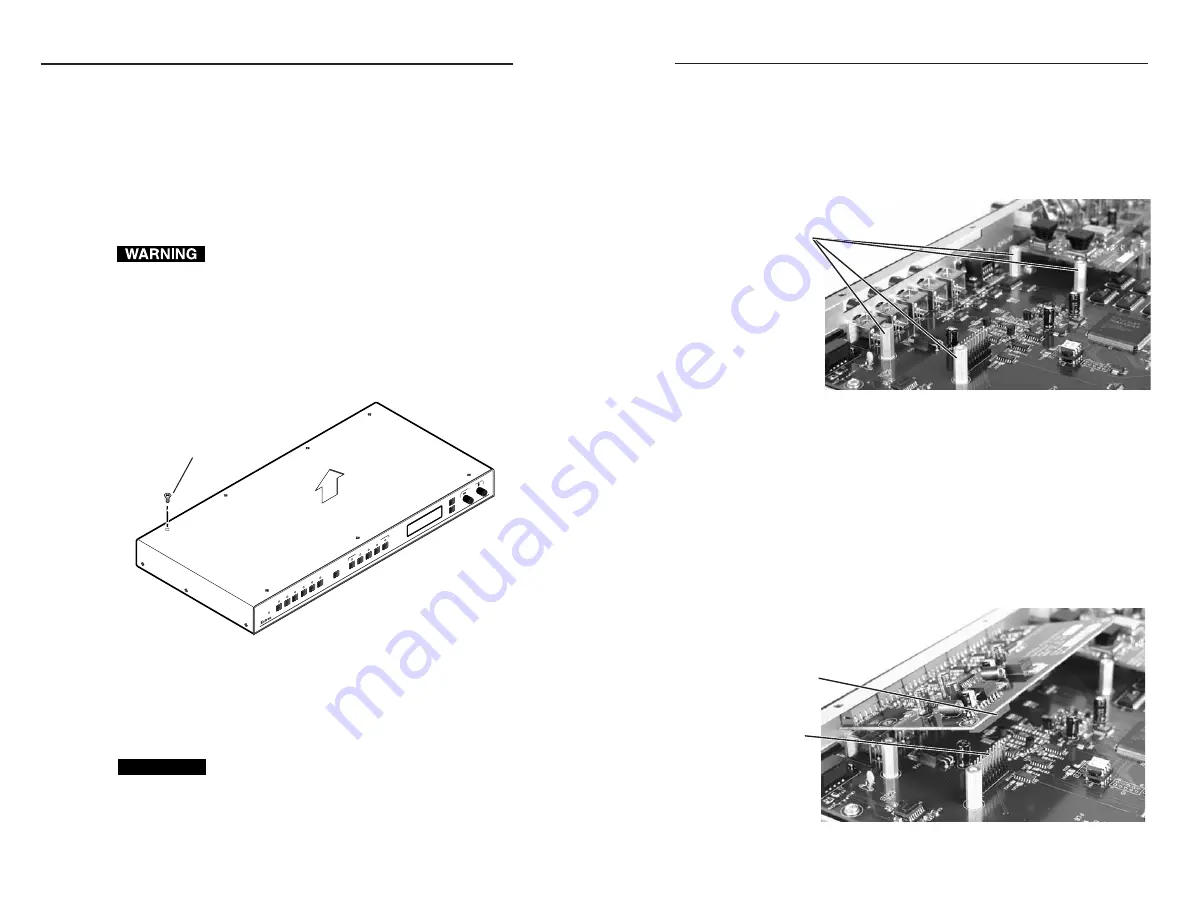
Remove 13 screws from the top and sides of the cover
(figure 1).
Fig. 1 — Removing the cover
4.
Remove the cover by slightly lifting each side alternately
until the cover is free.
Reverse this procedure to reinstall the cover after the audio card
has been installed.
CAUTION
Do not touch any switches or other electronic
components inside the scaler. Doing so could damage
the scaler. Electrostatic discharge (ESD) can damage
IC chips even though you cannot feel it. You must be
electrically grounded. A grounding wrist strap is
recommended.
Card installation
After following the instructions in “Internal access” to remove
the cover, do the following:
1.
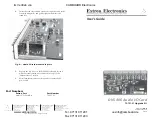
Locate the four audio card standoffs located at the left rear
portion of the main circuit board (looking from above with
the front panel nearest to you).
Fig. 2 — Audio card standoffs
2.
Remove the adhesive audio connector cover from the rear
audio connector opening of the scaler and position the audio
card at an angle with the audio connector protruding
through the rear audio connector opening.
3.
The audio card has a 20-pin socket on the underside that
must align with the 20 pins on the main circuit board. Be
sure to align the pins properly, in order to prevent bending
the pins, before pressing the audio card firmly in place
against the standoffs. The four mounting holes on the audio
card should now be directly over the standoffs.
Fig. 3 — Audio card positioned above pins and
standoffs
NE
XT
ME
NU
PIC
TU
RE
A
DJU
ST
ME
NT
S
DI
GI
TA
L V
ID
EO
S
CA
LE
R
4
2
1
3
5
6
VI
DE
O/
S-
VI
DE
O
RG
B/
YU
V
RG
B
VI
DE
O/
S-
VI
DE
O
VI
DE
O/
S-
VI
DE
O
SD
I
TA
KE
COL/TNT
BRT/CONT
DETAIL
SIZE
CENTER
DV
S 4
06
AD
JU
ST
Lift Cover
Straight Up
Remove (13)
screws from
top and sides
Audio card
standoffs
20-pin socket on
back of audio card
20-pin connector
on main board
im Vertrieb von
CAMBOARD Electronics
www.camboard.de
Tel. 07131 911201
Fax 07131 911203
ce-info@camboard.de


