3
1.
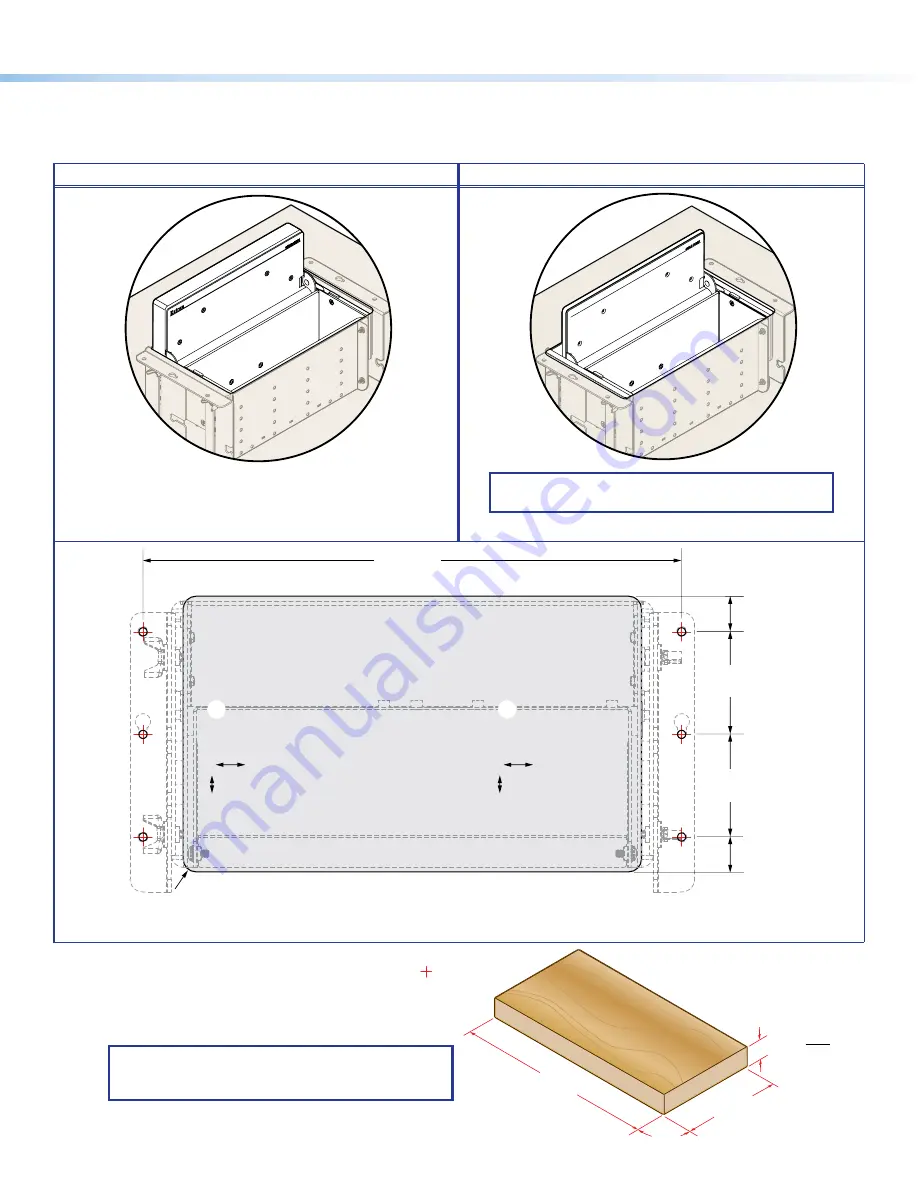
Cut a hole in the table for the Cable Cubby 1252 MS. See the table below to determine:
•
The location and orientation of the cut on the table
•
The correct size of the cut, based on the thickness of the table surface and the lid.
A
Lid is thicker than or as thick as the table surface
B
Lid thickness is thinner than table surface
Extr
on
Extr
on
Extr
on
NOTE:
A thinner lid requires a slightly larger cut
because the enclosure extends into the cut-out.
Figure 1.
Thicker Lid Material
Figure 2.
Thinner Lid Material
SURFACE
CUT-OUT
AREA
Bottom View
Front (Width)
Rear (Width)
2.00"
(50.8 mm)
2.00"
(50.8 mm)
0.63"
(16.0 mm)
10.50"
(266.7 mm)
0.63"
(15.9 mm)
R= 0.25" (6.3 mm)
Cut Dimensions
Thicker table surface:
Width:
8.81 inches
(223.8 mm)
Depth:
5.25 inches
(133.3 mm)
Corner 0.25 inch
radius:
(6.3 mm)
Cut Dimensions
Thinner table surface:
Width:
9.5 inches
(241.3 mm)
Depth:
5.25 inches
(133.3 mm)
Corner 0.25 inch
radius:
(6.3 mm)
A
B
Figure 3.
Enclosure Dimensions and Mounting Hole Locations
2.
Mark and pre-drill pilot holes, 1/8-inch in diameter,
8.56"
(217.4 mm)
4.43"
0.81"
(112.5 mm)
MAX
(20.6 mm)
(
Varying thickness
)
0.2"
(5 mm) Radius Corners
1/2-inch deep at the six mounting locations shown ( ) in
figure 3.
3.
Fabricate the Cable Cubby lid to the dimensions shown
at right.
NOTE:
Make the cut as accurate as possible, the
cutout piece can be used for the lid to be attached
to the Cable Cubby.


