background image

68-2636-01 Rev. B

03 16

DA HD 4K Series

User Guide

Distribution Amplifiers

4K HDMI Distribution Amplifier

Summary of Contents for DA2 HD 4K

Page 1: ...68 2636 01 Rev B 03 16 DA HD 4K Series User Guide Distribution Amplifiers 4K HDMI Distribution Amplifier ...

Page 2: ...ncia de voltaje peligroso sin aislar dentro del producto lo que puede representar un riesgo de descarga eléctrica ATENCIÓN Este símbolo I cuando se utiliza en el producto avisa al usuario de la presencia de importantes instrucciones de uso y mantenimiento recogidas en la documentación proporcionada con el equipo Para obtener información sobre directrices de seguridad cumplimiento de normativas com...

Page 3: ...rved Trademarks All trademarks mentioned in this guide are the properties of their respective owners The following registered trademarks registered service marks SM and trademarks TM are the property of RGB Systems Inc or Extron Electronics Registered Trademarks Extron AVTrac Cable Cubby CrossPoint DTP eBUS EDID Manager EDID Minder Flat Field FlexOS Global Configurator GlobalViewer Hideaway Inline...

Page 4: ... X2 X2 CE NOTE For commands and examples of computer or device responses mentioned in this guide the character 0 is used for the number zero and O is the capital letter o Computer responses and directory paths that do not have variables are written in the font shown here Reply from 208 132 180 48 bytes 32 times 2ms TTL 32 C Program Files Extron Variables are written in slanted form as shown here p...

Page 5: ...rection 17 SIS Commands 18 Introduction to SIS 18 Symbols Used in this Guide 19 Error Messages 20 Command and Response Table for SIS Commands 21 Configuration Software 25 Downloading PCS from the Extron Website 25 Using PCS Software 26 Overview 26 Input Output Configuration 27 EDID Minder 28 Device Menu 28 PCS Help File 28 Updating Firmware 29 Downloading Firmware to a PC 29 Uploading Firmware to ...

Page 6: ...DA HD 4K Series Contents vi ...

Page 7: ... pixel clock signal format and communication between source and sink devices Please contact an Extron Application Engineer for more information All three models feature EDID Minder which maintains continuous EDID communication between connected devices and Key Minder which continuously authenticates HDCP encryption between all devices ensuring the simultaneous distribution of source content to all...

Page 8: ...s HDMI source signals for output to a connected DVI display Output muting via RS 232 or USB port Provides the capability to mute one or all outputs at any time This allows content to be viewed on a local monitor prior to appearing on the main presentation display HDCP authentication and signal presence LED indicators Front panel LED indicators for signal presence and HDCP authentication provide re...

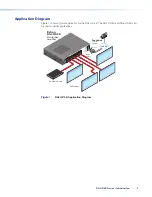
Page 9: ...G REMOTE OUTPUTS IN PUT 1 3 1 4 2 3 1 4 2 3 1 4 2 2 3 100 LINK ACT COM IR INPUT RELAY TX RX R IPL 250 ON OFF DISPLA Y MUTE SCREE N UP SCREE N DOWN VCR DVD DOC CAM LAPTOP PC MOD EL 80 MOD EL 80 MOD EL 80 MOD EL 80 Extron DA4 HD 4K Distribution Amplifier HDMI Cables RS 232 TCP IP TouchLink Control System 4K Displays 4K Media Player Figure 1 DA4 HD 4K Application Diagram DA HD 4K Series Introduction ...

Page 10: ...ead the Attention notifications on page 7 Ne branchez pas de sources d alimentation externes avant d avoir lu les mises en garde sur la page 7 DA4 HD 4K and DA6 HD 4K connect to a 100 240 VAC 50 or 60 Hz power source using the provided IEC power cord see page 7 3 Connect the display devices and power them on see Connecting Output Displays on page 9 The distribution amplifier automatically reads an...

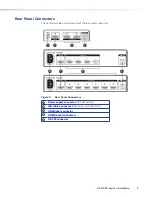
Page 11: ...0 3A MAX DA4 HD 4K RS 232 4 3 2 1 Tx Rx G REMOTE OUTPUTS INPUT 50 60 Hz 100 240V 0 3A MAX DA6 HD 4K RS 232 Tx Rx G OUTPUTS REMOTE INPUT 50 60 Hz 100 240V 0 3A MAX DA6 HD 4K RS 232 4 3 6 5 2 1 Tx Rx G OUTPUTS REMOTE INPUT A A B B C C D D E E C C E E D D Figure 2 Rear Panel Connectors A Power supply connector DA2 HD 4K only B IEC cable connector DA4 HD 4K and DA6 HD 4K C HDMI input connector D HDMI ...

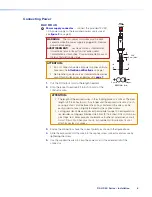
Page 12: ... Strip the jacket to expose 3 16 inch 5 mm of the conductor wire ATTENTION The length of the exposed wires in the stripping process is critical The ideal length is 3 16 inches 5 mm Any longer and the exposed wires may touch causing a short circuit between them Any shorter and the wires can be easily pulled out even if tightly fastened by the captive screws La longueur des câbles exposés est primor...

Page 13: ...within the dedicated closet podium or desk Sauf mention contraire les adaptateurs AC DC ne sont pas appropriés pour une utilisation dans les espaces d aération ou dans les cavités murales La source d alimentation doit être située à proximité de l équipement de traitement audiovisuel dans un endroit ordinaire avec un degré 2 de pollution fixé à un équipement de rack à l intérieur d un placard d une...

Page 14: ...g bracket provided 1 Plug the HDMI cable into the panel connection 1 2 Loosen the HDMI connection mounting screw from the panel enough to allow the LockIt lacing bracket to be placed over it 2 The screw does not have to be removed 3 Place the LockIt lacing bracket on the screw and against the HDMI connector then tighten the screw to secure the bracket 3 ATTENTION Do not overtighten the connector m...

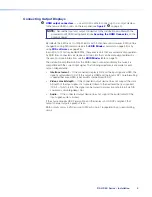
Page 15: ...tors the EDID of each connected display to ensure it is compatible with the current input signal The following adjustments are made for each output independently Interface format If the connected display is DVI and the input signal is HDMI the signal is reformatted to DVI If the output is HDMI and the input is DVI no reformatting is needed because HDMI is backwards compatible with DVI Video color ...

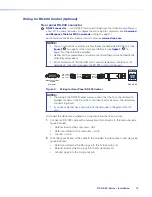
Page 16: ...x G REMOTE Transmit Receive Receive Transmit Ground Ground DB9 Pin Locations Female 5 1 9 6 Pin 2 Rx Pin 3 Tx Pin 5 G Computer DA2 HD 4K Figure 3 Wiring for Rear Panel RS 232 Control NOTES The wiring in the RS 232 cables crosses over so that the Tx on the distribution amplifier connects to the Rx of the control device and vice versa Ground always connects to ground If you use cable that has a drai...

Page 17: ...A6 HD 4K DISTRIBUTION AMPLIFIER CONFIG HDCP 1 2 3 4 SIGNAL INPUT OUTPUTS EDID 5 6 Figure 4 Connecting a PC to the DA6 HD 4K Front Panel USB Port 2 If this is the first time the distribution amplifier has been connected to the PC the Found New Hardware Wizard window opens The first screen offers to connect to Windows Update to search the web for the appropriate driver needed for the USB port to com...

Page 18: ...software automatically Recommended and click Next NOTE You do not need to insert an installation disc The PC locates the driver needed and installs it in the correct location on the hard drive 5 When the Completed screen appears click Finish to close the wizard NOTE The wizard opens only on the first occasion you connect the distribution amplifier to that USB port The wizard reappears if you conne...

Page 19: ... HDCP DA4 HD 4K HDMI DISTRIBUTION AMPLIFIER CONFIG HDCP 1 2 3 4 SIGNAL INPUT OUTPUTS DA6 HD 4K HDMI DISTRIBUTION AMPLIFIER CONFIG HDCP 1 2 3 4 SIGNAL INPUT OUTPUTS 5 6 A A B B C C D D E E A A B B F F C C D D C C E E D D F F E E F F Figure 7 Front Panel Features A Power Status LED B USB Config Port C Input signal LED D Output signal LEDs E Input HDCP LED F Output HDCP LEDs DA HD 4K Series Installat...

Page 20: ...rect device driver see Front Panel USB Port on page 11 C Input Signal LED Lights green when a TMDS signal is detected on the HDMI input If the source requires HDCP encryption this LED may light only when HDCP is authenticated D Output Signal LEDs Light green when hot plug detect is detected from the corresponding sink device Each output signal has its own signal LED two for the DA2 HD 4K four for ...

Page 21: ...al available values are shown in the following table There are 12 factory loaded EDIDs six slots that are automatically populated by EDID from connected sink devices and two slots that can be manually populated with EDID imported by the user Slot X Native Resolution Refresh Hz Rate Type Video Format 1 1280x800 60 IT HDMI 2 1440x900 60 IT HDMI 3 1600x900 60 IT HDMI 4 1680x1050 60 IT HDMI 5 1920x120...

Page 22: ...t and each output However it does not report itself as a repeater or forward a KSV list The distribution amplifier supports HDCP Output Mode Input The HDMI input negotiates and authenticates HDCP with the souce device if the source requires HDCP encryption The authentication process is repeated whenever the stored EDID is changed or updated which is indicated by pulling HPD low HDCP support can be...

Page 23: ... the signal is converted to DVI RGB color space 8 bit color no audio no AVI Infoframe etc with a quantization range to match the input You can use SIS commands to force the TMDS output format see page 22 Auto signal passes through unaltered unless the sink is DVI DVI RGB 4 4 4 0 255 no audio no InfoFrames HDMI RGB Full RGB 4 4 4 0 255 HDMI RGB Limited RGB 4 4 4 16 235 HDMI YUV 444 Limited YUV 4 4 ...

Page 24: ...lifier transmit Tx wire connects with the control device receive Rx and vice versa Only one serial port can be used at a time If the front port is in use the rear captive screw connector must be disconnected from the computer or other control device Likewise if the captive screw port is in use the config port on the front panel must be disconnected from the computer or other control device SIS com...

Page 25: ...pth default 0 0 auto based on EDID of sink 1 force 8 bit X EDID memory location default 39 see table on page 15 X EDID data as 256 bytes of Hex data text representation X Native resolution and refresh rate translated from Hex for example 1600x1200 60 Hz X Controller firmware version to the second decimal place X Text string of up to 24 characters default DA HD 4K SERIES Alphanumeric characters and...

Page 26: ...0 Auto pass through if HDMI sink force DVI format if DVI sink 1 DVI RGB 444 2 HDMI RGB Full 3 HDMI RGB Limited 5 HDMI YUV 444 Limited 7 HDMI YUV 422 Limited X1 Video mute 0 Video mute disabled 1 Video mute TMDS 2 Video and sync mute Error Messages E01 Invalid input channel number too large E10 Invalid command E13 Invalid value too large DA HD 4K Series SIS Commands 20 ...

Page 27: ...ute status Z X X X AmtX X X Verbose mode 0 1 Verbose mode 2 3 Audio mute status of outputs 1 to 2 DA2 HD 4K 1 to 4 DA4 HD 4K or 1 to 6 DA6 HD 4K Video Color Bit Depth Set video color bit depth for a specific output EVX X BITD BitdVX X Set video color bit depth X for output X Set video color bit depth for all outputs EVX BITD BitdVX View video color bit depth status for all inputs EVBITD X X X Bitd...

Page 28: ...ode X for output X Set the output HDCP mode for all outputs ESX HDCP HdcpSX Sets the output HDCP mode X for all outputs View the output HDCP mode for all outputs ESHDCP X X X HdcpSX X X Verbose mode 0 1 Verbose mode 2 3 Output HDCP status of outputs 1 to 2 DA2 HD 4K 1 to 4 DA4 HD 4K or 1 to 6 DA6 HD 4K NOTES X Output 1 through 2 DA2 HD 4K 1 through 4 DA4 HD 4K 1 through 6 DA6 HD 4K X Status 0 disa...

Page 29: ... the EDID memory location View EDID assignment EAEDID X Shows the currently assigned EDID Save EDID of output to user location ESX X EDID EdidSX X Store the EDID of specified output X into EDID memory location X user loaded slots 64 or 65 Read EDID in HEX EREDID X Read out EDID in HEX as text from currently selected EDID X View EDID native resolution ENEDID X Shows native resolution of currently a...

Page 30: ...t part number N 60 1480 01 60 1481 01 60 1482 01 DA2 HD 4K DA4 HD 4K DA6 HD 4K View firmware version Q X Firmware build X Reset EZXXX Zpx NOTES X Firmware build to two decimal places x xx X Unit name a text string of up to 24 characters Alphanumeric characters and hyphens only No distinction between upper and lower case No spaces First character must be a letter and the last character cannot be a ...

Page 31: ...er Click the Download link at the top of the page figure 8 1 1 Click the appropriate link on the left sidebar menu 2 1 1 2 2 Figure 8 Software and Firmware Links on the Download Tab For software either click the Software link at the top of the sidebar or if the software is listed in the sidebar click directly on that link for example see the PCS link in figure 8 2 If there is no direct link to you...

Page 32: ...figuration Software The Product Configuration Software opens to the Device Discovery screen Figure 10 PCS Device Discovery Screen 4 Select the DA HD 4K device by clicking on it to highlight it in the list 5 Click Connect see figure 10 The Product Configuration Software opens to the device main menu Figure 11 DA HD 4K Main Menu The configuration page has a global navigation bar ribbon from which ea...

Page 33: ...ether the display connected to the output is HDCP compliant Format Select this to set the HDMI output format Choices are Auto based on sink EDID default DVI RGB 444 HDMI RGB 444 Full HDMI RGB 444 Limited HDMI YUV 444 Limited HDMI YUV 422 Limited Color Bit Depth Select this to set the color bit depth either Auto or Force 8 bit HDCP Mode When enabled the HDCP Mode can be set to either follow the cur...

Page 34: ...ge the EDID resolution and refresh rate for HDMI input and outputs see figure 14 above Set to either match output rate or a custom user defined EDID or a factory setting see table on page 15 for EDID data Device Menu This menu allows the user to Disconnect the device view the harware Settings Reset Device Update Firmware or view information About this Module see figure 15 below Figure 15 Device Me...

Page 35: ...ease Notes for more information about the program 7 Click Download 8 Follow the on screen instructions to download the firmware Make a note of where the firmware file is stored on the PC Uploading Firmware to a DA HD 4K Device 1 If you have not already done so download and install Firmware Loader see Downloading Software from the Extron Website on page 25 2 Download the latest version of the firmw...

Page 36: ...available on the Available Devices menu Make sure that it is selected 8 Click Connect If the connection is successful the unit name is displayed in green in the Connected Device section followed by a green check mark 9 Click the Browse button in the New Firmware File Optional section 10 On the Open window navigate to the new firmware file which has an S19 extension and double click it ATTENTION Va...

Page 37: ...on Circuit overloading Connect the equipment to the supply circuit and consider the effect that circuit overloading might have on overcurrent protection and supply wiring Consider the equipment nameplate ratings when addressing this concern Reliable earthing grounding Maintain reliable grounding of rack mounted equipment Pay particular attention to supply connections other than direct connections ...

Page 38: ... ask for an Application Engineer to receive an RA Return Authorization number This will begin the repair process USA 714 491 1500 or 800 633 9876 Europe 31 33 453 4040 Asia 65 6383 4400 Japan 81 3 3511 7655 Units must be returned insured with shipping charges prepaid If not insured you assume the risk of loss or damage during shipment Returned units must include the serial number and a description...

Reviews: