

Extron Electronics, USA
1230 South Lewis Street, Anaheim, CA 92805
800.633.9876 714.491.1500 FAX 714.491.1517
USA
Extron Electronics, Europe
Beeldschermweg 6C, 3821 AH Amersfoort
+31.33.453.4040 FAX +31.33.453.4050
The Netherlands
Extron Electronics, Asia
135 Joo Seng Rd. #04-01, PM Industrial Bldg.
+65.383.4400 FAX +65.383.4664
Singapore 368363
Extron Electronics Information
ExtronWEB
™
: www.extron.com
ExtronFAX
™
: 714.491.0192
24-hour access—worldwide!
IR 401 Remote Control Instruction Guide, continued
Extron Electronics, USA
1230 South Lewis Street, Anaheim, CA 92805
800.633.9876 714.491.1500 FAX 714.491.1517
USA
Extron Electronics, Europe
Beeldschermweg 6C, 3821 AH Amersfoort
+31.33.453.4040 FAX +31.33.453.4050
The Netherlands
Extron Electronics, Asia
135 Joo Seng Rd. #04-01, PM Industrial Bldg.
+65.383.4400 FAX +65.383.4664
Singapore 368363
Extron Electronics Information
ExtronWEB
™
: www.extron.com
ExtronFAX
™
: 714.491.0192
24-hour access—worldwide!
68-517-01
Rev. B, 05 01
Display Power
— After the System 5
cr
Plus switcher is programmed (set up) with learned or downloaded
commands, press this button to toggle the projector’s power on or off. The switcher’s
Display Power LED blinks fast during projector power up and slowly during projector power down.
Display Mute
— After setup, this button functions as the display’s mute on/off switch.
Display Mode
— After the switcher is set up, this button changes the mode of the display/projector
between computer video, S-video, and composite video. It takes the place of the single-button (step)
mode function found on some projectors’ remote controls.
Each of the following buttons can have one “learned”/downloaded IR command associated with it:
Room
— This toggles the switcher’s relay contacts to control items such as lights
and display screens. Refer to the System 5
cr
Plus User’s Manual for details.
PC 1
&
PC 2
— Press these buttons to select input 1 (PC 1 on the switcher’s
front panel) or input 2 (PC 2 on the switcher’s rear panel), respectively. Both
inputs accept only RGB computer video and audio.
Input 3
— This corresponds to the System 5
cr
Plus’s Input 3, which can be con-
figured to accept audio and RGB, or S-video, or composite video. It also
corresponds to the System 5
cr
’s PC 3, which accepts computer video and audio.
VID 1
&
VID 2
– Press these to select input 4 (Vid 1) or input 5 (Vid 2). Both can
be configured for audio and either S-video or composite video.
+
and
-
— Press these buttons to adjust the audio output volume.
Mute
— Press this button to toggle audio output on and off.
IR 401 Remote Control Instruction Guide, continued
Extron Electronics, USA
1230 South Lewis Street, Anaheim, CA 92805
800.633.9876 714.491.1500 FAX 714.491.1517
USA
Extron Electronics, Europe
Beeldschermweg 6C, 3821 AH Amersfoort
+31.33.453.4040 FAX +31.33.453.4050
The Netherlands
Extron Electronics, Asia
135 Joo Seng Rd. #04-01, PM Industrial Bldg.
+65.383.4400 FAX +65.383.4664
Singapore 368363
Extron Electronics Information
ExtronWEB
™
: www.extron.com
ExtronFAX
™
: 714.491.0192
24-hour access—worldwide!
Display Power
— After the System 5
cr
Plus switcher is programmed (set up) with learned or downloaded
commands, press this button to toggle the projector’s power on or off. The switcher’s
Display Power LED blinks fast during projector power up and slowly during projector power down.
Display Mute
— After setup, this button functions as the display’s mute on/off switch.
Display Mode
— After the switcher is set up, this button changes the mode of the display/projector
between computer video, S-video, and composite video. It takes the place of the single-button (step)
mode function found on some projectors’ remote controls.
Each of the following buttons can have one “learned”/downloaded IR command associated with it:
Room
— This toggles the switcher’s relay contacts to control items such as lights
and display screens. Refer to the System 5
cr
Plus User’s Manual for details.
PC 1
&
PC 2
— Press these buttons to select input 1 (PC 1 on the switcher’s
front panel) or input 2 (PC 2 on the switcher’s rear panel), respectively. Both
inputs accept only RGB computer video and audio.
Input 3
— This corresponds to the System 5
cr
Plus’s Input 3, which can be con-
figured to accept audio and RGB, or S-video, or composite video. It also
corresponds to the System 5
cr
’s PC 3, which accepts computer video and audio.
VID 1
&
VID 2
– Press these to select input 4 (Vid 1) or input 5 (Vid 2). Both can
be configured for audio and either S-video or composite video.
+
and
-
— Press these buttons to adjust the audio output volume.
Mute
— Press this button to toggle audio output on and off.
IR 401 Remote Control Instruction Guide, continued
Extron Electronics, USA
1230 South Lewis Street, Anaheim, CA 92805
800.633.9876 714.491.1500 FAX 714.491.1517
USA
Extron Electronics, Europe
Beeldschermweg 6C, 3821 AH Amersfoort
+31.33.453.4040 FAX +31.33.453.4050
The Netherlands
Extron Electronics, Asia
135 Joo Seng Rd. #04-01, PM Industrial Bldg.
+65.383.4400 FAX +65.383.4664
Singapore 368363
Extron Electronics Information
ExtronWEB
™
: www.extron.com
ExtronFAX
™
: 714.491.0192
24-hour access—worldwide!
Display Power
— After the System 5
cr
Plus switcher is programmed (set up) with learned or downloaded
commands, press this button to toggle the projector’s power on or off. The switcher’s
Display Power LED blinks fast during projector power up and slowly during projector power down.
Display Mute
— After setup, this button functions as the display’s mute on/off switch.
Display Mode
— After the switcher is set up, this button changes the mode of the display/projector
between computer video, S-video, and composite video. It takes the place of the single-button (step)
mode function found on some projectors’ remote controls.
Each of the following buttons can have one “learned”/downloaded IR command associated with it:
Room
— This toggles the switcher’s relay contacts to control items such as lights
and display screens. Refer to the System 5
cr
Plus User’s Manual for details.
PC 1
&
PC 2
— Press these buttons to select input 1 (PC 1 on the switcher’s
front panel) or input 2 (PC 2 on the switcher’s rear panel), respectively. Both
inputs accept only RGB computer video and audio.
Input 3
— This corresponds to the System 5
cr
Plus’s Input 3, which can be con-
figured to accept audio and RGB, or S-video, or composite video. It also
corresponds to the System 5
cr
’s PC 3, which accepts computer video and audio.
VID 1
&
VID 2
– Press these to select input 4 (Vid 1) or input 5 (Vid 2). Both can
be configured for audio and either S-video or composite video.
+
and
-
— Press these buttons to adjust the audio output volume.
Mute
— Press this button to toggle audio output on and off.
68-517-01
Rev. B, 05 01
68-517-01
Rev. B, 05 01
68-517-01
Rev. B, 05 01
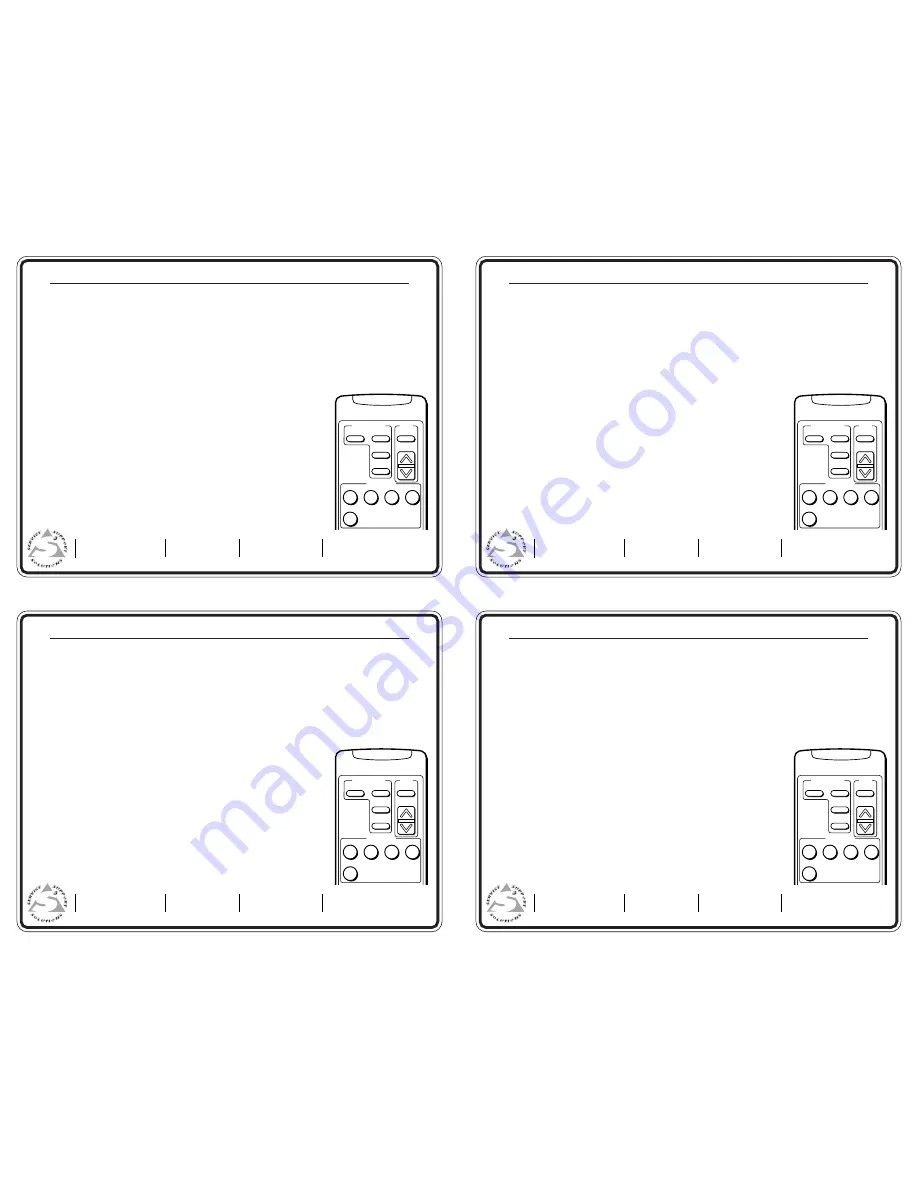
Control Functions
Audio
Input Selection
Display
Power
Display
Mute
Mode
Room
Mute
Volume
4
3
2
1
5
Control Functions
Audio
Input Selection
Display
Power
Display
Mute
Mode
Room
Mute
Volume
4
3
2
1
5
Control Functions
Audio
Input Selection
Display
Power
Display
Mute
Mode
Room
Mute
Volume
4
3
2
1
5
Control Functions
Audio
Input Selection
Display
Power
Display
Mute
Mode
Room
Mute
Volume
4
3
2
1
5


