2
Setting up the Microphones
VLP 302 Pendant Microphone
1.
Verify that the battery is installed and fully charged.
2.
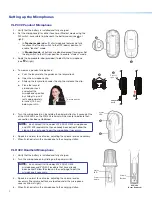
Set the microphone(s) for either Teacher or Student mode using the
DIP switch, accessible from beneath the battery cover (see
2
at
right):
•
In
Teacher mode
(default), all microphone features are fully
functional. Set the dip switch to the OFF (down) position to
enable “teacher” mode.
•
In
Student mode
, all buttons are disabled except for power. Set
the dip switch to the ON (up) position to enable “student” mode.
3.
Apply the appropriate label (provided) to identify the microphone
(see
3
at right).
4.
To wear as a pendant microphone:
a.
Push the lanyard into the guides on the lanyard lock.
b.
Open the microphone clip.
c.
Slide up the lanyard lock under the clip, then release the clip.
d.
Place the lanyard
around your neck
and adjust the
microphone’s position
by sliding it up so it
rests approximately
6 inches (15.2 cm)
below your chin.
~ 6 inches (15.2 cm)
Extron
PWR
OF
F/
M
UT
E
O
N
VLH 302 Handheld Microphone
1.
Verify that the battery is installed and fully charged.
2.
Turn the microphone on by sliding up the power switch.
NOTE:
Each VoiceLift kit includes VLP 302/VLH 302
microphones and VLR 302 receivers that have already
been paired. Follow the steps on the next page to pair the
microphone if necessary.
3.
Speak in a normal tone of voice, adjusting the volume level as
necessary (the volume buttons are located under the microphone
cover as show at right).
4.
When finished, return the microphone to the charging station.
5.
Turn the microphone(s) on by holding the power button for 3 seconds. One
of the LINK LEDs on the VLR 302 receiver will illuminate to indicate that
connection has been established.
NOTE:
Each VoiceLift kit includes VLP 302/VLH 302 microphones
and VLR 302 receivers that have already been paired. Follow the
steps on the next page to pair the microphone if necessary.
6.
Speak in a normal tone of voice, adjusting the volume level as necessary.
7.
When finished, return the microphone to the charging station.
2
3
c
b
Press to
open clip
Lanyard
Lock
a
Status
LED
5
6
Status
LED
Power
Switch
VLH 302
(Cover Removed)
+
Volume
Buttons


