background image

Network Settings 


HD  TVI  Hybrid  DVR  User  Manual


45 


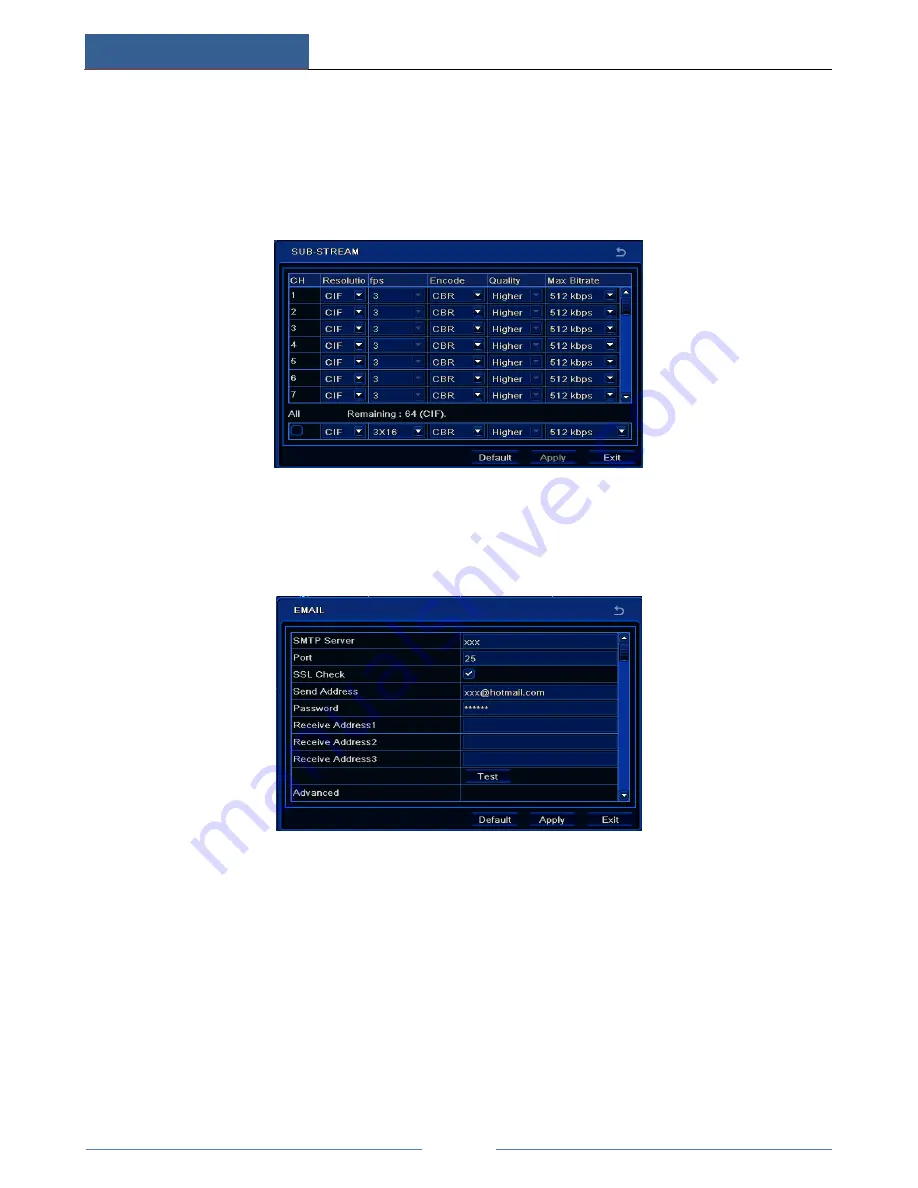
11.2  Sub Stream 

To set up sub stream: 


Go to Main Menu

Setup

Network

Sub Stream interface.   


Select fps, resolution, quality, encode and max bit rate. 


Select “All” to set the same settings for all channels. 


11.3  Email 

To set up Email: 


Go to Main Menu

Setup

Network

Email interface.   


Set SMTP Server and port.


SMTP Server/Port:

 The name and port number of SMTP server. You can set up SSL check 

(such as Gmail) according to actual needs. 


Set sender’s address and password.


Set receiver’s email address and click “Test” button to test the validity of the mailbox.   


Attaching image:

 If selected, the system will attach images when sending emails. 


11.4  Network Server 

This function is mainly used for connecting ECMS/NVMS. The setting steps are as follows:   


In the server interface, select “Enable” as shown below. 


Check  the  IP  address  and  port  of  the  transfer  media  server  in  the  ECMS/NVMS.  The 

Summary of Contents for TVST TR SERIES

Page 1: ...Yongh U Us se er r M Ma an nu ua al l Please read this manual carefully for correct use of the product and preserve it for reference purposes ...

Page 2: ... with a dry cloth Do not block any ventilation openings and ensure proper ventilation around the machine Do not power off the device at normal recording condition This machine is for indoor use only Do not expose the machine in rain or moist environment In case any solid or liquid get inside the machine s case please turn off the device immediately and get it checked by a qualified technician Do n...

Page 3: ... 4 Live View 15 4 1 Login 15 4 2 Live View 15 4 3 Sequence View 17 4 4 Mask View 17 5 Add IP Cameras 19 6 Record 22 6 1 Record Settings 22 6 2 Manual Record 24 6 3 Schedule Recording 24 6 4 Motion Based Recording 25 6 5 Sensor Based Recording 26 7 Playback 28 7 1 Playback 28 7 2 Playback by Time Search 29 7 3 Playback by Event Search 29 7 4 Playback by File Search 30 7 5 Snap Setting and Playback ...

Page 4: ...set 51 12 2 2 Import Export 51 12 2 3 Block Allow List 51 13 Device Management 52 13 1 User Management 52 13 1 1 Add Delete Modify User 52 13 1 2 Online Users 53 13 1 3 Logoff 54 13 2 Disk Management 54 13 3 View Information 54 13 4 Shutdown 55 13 5 Upgrade 55 14 Remote Surveillance 56 14 1 IE Remote Surveillance by NAT 56 14 1 1 NAT Settings 56 14 1 2 NAT Access 56 14 2 IE Remote Surveillance via...

Page 5: ...Contents HD TVI Hybrid DVR User Manual 14 8 Remote Management 66 Appendix A FAQ 67 Appendix B Calculate Recording Capacity 71 Appendix C Compatible Devices 72 Appendix D DVD Writer Installation 73 ...

Page 6: ... Manual Schedule Motion detection and Sensor alarm recording Support recycle after HDD full Resolution frame rate and picture quality are adjustable Support remote playback in Network Client through LAN or internet Security Customize user right log search system setup two way audio file management disk management remote login live view manual record and playback Support event log recording and che...

Page 7: ...network Backup The light turns blue when backing up files and data Play The light turns blue when playing video REC Power Indicator when connected the light is blue AUDIO 1 Adjust audio 2 Increase the value in setup P T Z 1 Enter PTZ mode 2 Decrease the value in setup MENU Enter Menu in live INFO Check the information of the device BACKUP Enter backup mode in live SEARCH Enter search mode in live ...

Page 8: ...ect as the standard No Name Descriptions 1 AUDIO OUT Audio output connect to sound box 2 AUDIO IN Connect to audio input device like microphone pickup etc 3 HD TVI VIDEO IN HD TVI signal 1080P 720P analog signal 960H D1 video inputs 4 HDMI Connect to high definition display device 5 VGA Connect to monitor Audio input 6 LAN Network port 7 USB Connect USB storage device or USB mouse 8 DC12V DC12V po...

Page 9: ... 5 VGA Connect to monitor 6 AUDIO IN Audio input connect to audio input device like microphone pickup etc 7 HDMI Connect to high definition display device 8 LAN Network port 9 E SATA Connect to external SATA storage device 10 ALARM IN Alarm input connect to sensor 11 ALARM OUT Alarm output 12 GND Grounding 13 RS485 P Z Connect to speed dome Y is TX Z is TX 14 RS485 K B Connect to keyboard A is TX ...

Page 10: ... 10 ALARM IN Alarm input connect to sensor 11 VGA Connect to monitor 12 ALARM OUT Alarm output 13 LAN Network port 14 USB Connect USB storage device or USB mouse 15 Power Switch Turn on off the power 16 Power Input AC100V 240V power input 1 4 Connections Video Connections Video Input The interfaces of video inputs are BNC interfaces The input signal is PAL NTSC 1 0Vp P 75Ω Video Output Supports VG...

Page 11: ...d relay please refer to the following connection diagram Alarm Output The way to connect alarm output device Pull out the green terminal blocks and loosen the screws in the alarm out port Then insert the signal wires of the alarm output devices into the port of NO and COM separately Finally tighten the screws Provided that the external alarm output devices need power supply you can connect the pow...

Page 12: ...ert signal cables into Y and Z port separately Y is TX Z is TX and tighten the fixed screws Next connect pluggable block back into terminal block Finally connect the video cable of the speed dome to the video input interface of the HD TVI Hybrid DVR Type 2 Disconnect pluggable block from the RS 485 terminal block and then loosen the fixed screws from the pluggable block insert signal cables into A...

Page 13: ... output 2 1 2 Shutdown You can power off the device by using remote controller keyboard or mouse By remote controller Press Power button This will take you to a Shut down window The unit will power off after a while by clicking OK button Disconnect the power By keyboard and mouse Click Main Menu Shutdown to pop up the Shutdown window The unit will power off after a while by clicking OK button Disc...

Page 14: ...ton To enter into preset setting in PTZ mode Cruise Button To go to cruise setting in PTZ mode Track Button To go to track setting in PTZ mode Wiper Button To enable wiper function in PTZ mode Light Button To enable light function in PTZ mode Clear Button To return to the previous interface Fn2 Button Unavailable temporarily Info Button Get information about the device To control playback Play Pau...

Page 15: ...hen a remote is to be used to control a single device However when controlling multiple devices with multiple remote controllers you would need to configure the device ID please refer to below steps Activate remote controller to control the device Turn the IR sensor of the remote controller towards the IR receiver on the front panel press the number key 8 twice on the Button Function REC Record ma...

Page 16: ...veal the control menu on the screen Right click again to hide the menu In Configuration Click to enter a particular option Right click to cancel the option or return to the previous menu In order to input a value in a particular screen move cursor to the input box and click It supports mouse drag Take setting up motion detection area for example Click customized hold down the left button and drag ...

Page 17: ...itch between lower case and upper case ESC Exit 2 5 Common Buttons Default Restore the settings to the factory default settings Apply Apply and save the settings Copy Copy button Click this button to copy the settings of one channel to other channels quickly ...

Page 18: ... clicking Exit button and then go to the setup interface to do detailed setup To set up the wizard follow the steps as below Set device name language data format time format time zone system date etc Then click Next button to continue Set network Please set the network according to the actual network situation Then click Next button to continue Set the disk management You can format the HDDs and s...

Page 19: ...Wizard Setup HD TVI Hybrid DVR User Manual 14 Click Next button to complete the wizard setup ...

Page 20: ...isplay The default username is admin and the default password is 123456 Please input the default username and password for the first time to log in 4 2 Live View Click right mouse or press ESC button on the front panel and then the control bar will display at the bottom of the screen Symbol Meaning Symbol Meaning Green Manual record Red Sensor Alarm record Yellow Motion detection record Blue Sched...

Page 21: ...able sound PTZ Click the PTZ button to control rotation position speed and auto scan of the PTZ Snap Click this button to snap the live pictures These pictures will automatically be saved in the SATA disk Record Click this button to start stop recording Playback Click this button to playback the record files You can click Move button and drag it anywhere with the left mouse to move the main menu b...

Page 22: ... the latter channel groups of dwell picture Click Apply to save the setting Return to the live view interface Right click to show the menu toolbar Then enable Dwell button If there is something you don t want to display in the live image You can set mask For a given channel a maximum of three areas can be masked 4 4 Mask View To set up mask area Go to Main Menu Setup Live Mask interface Click Sett...

Page 23: ...the mask setting interface Click Apply button to save the settings Set up Mask Area To delete mask area Click Setting button in the mask interface Select a certain masked area and double click to delete that masked area Then click Apply button to save the settings ...

Page 24: ...search the devices in the same local network The IPC which supports the Onvif protocol may be added manually Go to the search tab Click Refresh to refresh the searched devices If the IPC is not in the same local network you can select the device and click Setup to modify the IP address of the searched device Note If the network of IP cameras and HD TVI Hybrid DVR are in LAN their IP address must b...

Page 25: ... will be listed in the device management interface Connected status means connecting the device successfully and you will see the live image You may also select the added device and click Setup button to modify channel IP address of the device To add IP cameras via WAN Please go to Main Menu IP Camera tab Click Add button to pop up a window as shown below You need to check Enable ...

Page 26: ... box select channel and manufacturer and manually input IP address server port username and password of this device Note If the HD TVI Hybrid DVR and the IP cameras you want to add are in WAN the IP address of the IP camera input here must be WAN IP ...

Page 27: ... Disk Management to access disk management settings In this interface you can format your disk 6 1 Record Settings Go to Main Menu Setup Record Record to do record settings Enable record and audio Then click Apply to save the settings Set record stream Go to Record Bitrate tab to set record birate as shown below ...

Page 28: ... adjustable according to the change of the video resources This will help you save much storage room Image Quality When VBR is selected you need to choose image quality The higher the image quality you choose the more bitrate will be required Average Bitrate When VBR is selected you need to choose image quality Set expiration time pre alarm time and post alarm time Expiration Time Set the expirati...

Page 29: ...u toolbar will display by right clicking in the live view mode Then click button to start recording 6 3 Schedule Recording The system allows defining schedule for normal recording for seven days of a week 24 hours of a day Every row denotes an hourly timeline for a day Click the grid to do relevant setup A highlighted area denotes selected timeline Operate the following steps to set schedule Go to...

Page 30: ...camera will be triggered to record when there is a motion event detected The setting steps are as follows Go to Main Menu Setup Schedule Motion tab Choose channel to set schedule for motion based recording The setting steps are similar to normal schedule recording See Chapter 6 3 Schedule Recording for details Go to Main Menu Setup Alarm Motion Motion interface Enable motion alarm and set the moti...

Page 31: ...ort this function Set schedule for sensor based recording Go to Main Menu Setup Schedule Sensor Select channel and then set the schedule The settings steps of schedule for sensor based recording are similar to normal schedule recording See Chapter 6 3 Schedule Recording for details Go to Main Menu Setup Alarm Sensor Sensor to see the following figure Enable sensor alarm and choose the sensor type ...

Page 32: ...e setting steps are similar to normal schedule recording See Chapter 6 3 Schedule Recording for details Note The timelines of these two schedules schedule for sensor based recording and schedule for sensor alarm must match otherwise you will not get the record in some time ...

Page 33: ...the next recording file FF Rewind Forward rewind the record Pause play Pause play the record Stop Stop the record Audio Click to enable audio Click again to disable audio Frame Click Pause button in single channel display mode and then click this button top play the record frame by frame Screen mode Click this button to choose the screen display mode Cut After you choose the playback time click Cu...

Page 34: ... time by clicking a particular grid or by entering the specific value in the start time field Select the channel display mode and click Play button to play record Use the playback toolbar to control the playback 7 3 Playback by Event Search Go to Main Menu Search Event Search button Select date and channels on the right hand side A data with highlighted borderline indicates presence of data Checkm...

Page 35: ...on to display the searched files in the file list box Use All button to lock unlock or delete all files in the file management column Double click an unlocked item to play Lock Select a file and click Lock button to lock this file after that that file will not be deleted or covered Unlock Select a locked file and click Lock button to unlock this file Delete Select an unlocked file and click Delete...

Page 36: ...on Motion Enable motion alarm and then set the motion detection area see Chapter 9 2 Motion Alarm for details Go to alarm handling setting by click Setting button under Trigger Then checkmark the snapshot channel and click OK button to confirm the settings Set schedule for motion alarm The setting steps are similar to normal schedule recording See Chapter 6 3 Schedule Recording for details Click A...

Page 37: ... details Click Apply to save the settings The picture will be automatically captured once a sensor alarm happens 7 5 2 Playback by Picture Search Go to Main Menu Search Image tab Select data and channels on the right hand side Press Search button to search for a recorded image Once an alarm image has been identified the user can double click the image to play recording ...

Page 38: ...up 8 1 Backup Go to Main Menu Backup Set the start end time select channels and click Search button to display the searched data in the data backup list box Select a required file or checkmark All to select all data files Click Backup button to display backup information window In the backup information interface you can check the relevant information of backup files such as storage type save file...

Page 39: ...n media player 8 2 Clip Backup You can cut the record file and do backup in the playback interface The setting steps of clip backup are as below Insert USB storage device into the device In the playback mode click button to set the start time Then click this button again to set the end time Click button to see a backup window as shown in the above mentioned figure Select the storage type and save ...

Page 40: ...ction Operate the following steps to configure sensor based alarm Go to Main Menu Setup Alarm Sensor Sensor tab Enable channels by checking the checkboxes beside the desired channels Set the alarm type according to triggered alarm type Two options NO and NC Click Apply button to save the setting Go to Alarm Handling tab Select hold time Click Setting button to pop up a dialog box as shown below ...

Page 41: ...he setting Go to To PTZ tab Set preset cruise and track options for a PTZ in case of a sensor based alarm Single or multiple PTZ units could be programmed to perform this function on the same alarm Go to Schedule tab The setting steps for schedule for sensor based alarm are similar to normal schedule setup You can refer to Schedule Recording for details This step is very important for sensor alarm...

Page 42: ... for more details After clicking Area button a dialog box will pop up as below In the Area interface you can drag slide bar to set the sensitivity value 1 8 The higher the value is the more sensitive it is to motion Since the sensitivity is influenced by color and time day or night you can adjust its value according to the practical conditions Left click the grid and drag to delete area Click icon...

Page 43: ... The setup steps of video loss trigger are similar to Alarm Handling See Sensor Alarm Handling setting for more details 9 4 Other Alarm This tab gives a choice to configure alarm for Disk Full IP Conflict the Disconnect event Disk Attenuation or Disk Lost Go to Main Menu Setup Alarm Other Alarm Use the dropdown menu and select the event or the alarm Check the required trigger options If the select...

Page 44: ...larm Alarm Out Buzzer Checkmark Buzzer and set buzzer alarm hold time This would trigger the buzzer when the system is on an alarm Note The alarm out and buzzer must be enabled in prior and their schedules must cover the schedule of other alarm types like sensor motion alarm so that the triggered alarm out and buzzer can take effect on an alarm 9 6 Manual Alarm Some models may support this functio...

Page 45: ...the speed dome Select All to set the same settings for all channels Address The address of the PTZ device Baud rate Baud rate of the PTZ device Range form 110 300 600 1200 2400 4800 9600 19200 34800 57600 115200 230400 460800 921600 Protocol Communication protocol of the PTZ device Range from NULL PELCOP PELCOD LILIN MINKING NEON STAR VIDO DSCP VISCA SAMSUNG RM110 HY N control Simulative Cruise If...

Page 46: ... the dome Select the serial number of the preset point Click button to enable the PTZ wiper and click button to enable the PTZ light Note PTZ must support wiper and light button and these two buttons are just available when selecting PELCOP or PELCOD Click Save button to save the setting Click icon to hide the tool bar Right click to view this bar again Click icon to exit the current interface Ret...

Page 47: ...he position of preset point Click Preview button to preview the cruise line Click OK button to save the setting To set up track In the Advanced interface click track Setting button to see a dialog box as below Control the dome by rotating up up left down right down left left down right and up right and adjust the rotate speed and the value of zoom focus and iris of the dome Click Start Record butt...

Page 48: ...P T Z HD TVI Hybrid DVR User Manual 43 ...

Page 49: ...three ways to connect internet If you have a DHCP server running and would like your device to automatically obtain an IP address and other network settings check the checkbox beside Obtain an IP address automatically Then the device will distribute IP address subnet mask and gateway IP and DNS server If you want to configure your own settings disable Obtain an IP address automatically item and in...

Page 50: ...ver Port The name and port number of SMTP server You can set up SSL check such as Gmail according to actual needs Set sender s address and password Set receiver s email address and click Test button to test the validity of the mailbox Attaching image If selected the system will attach images when sending emails 11 4 Network Server This function is mainly used for connecting ECMS NVMS The setting s...

Page 51: ...etting Now the ECMS NVMS system will automatically connect this device 11 5 NAT Go to Main Menu Setup Network NAT interface Enable NAT and input the NAT Server The default NAT Server is www autonat com Click Apply to save the settings 11 6 Other Settings If your device is set to use PPPoE as its default network connection you may set up DDNS to be used in connection The setting steps are as follow...

Page 52: ...rk tab and then click Other Settings tab Check DDNS Select www autoddns com in DDNS Type column as shown above Enter the host name at random like 123 Click Register to register the domain name When the successful prompt pops up it means you are successfully registering your domain name UPnP settings You can use UPnP function to enable the fast connection of the device to WAN via router without por...

Page 53: ...fully request your domain name you will see your domain in the list Application Go to Main Menu Setup Network Other Settings checkmark DDNS select dvrdydns at the DDNS Sever pull down list box and input user name and password Map the server port and IP address in the router if the user enables UPnP function he can skip this step Click Save button to save the settings Login IE browser and input reg...

Page 54: ... speed dome cameras Video Format Two modes PAL and NTSC User can select the video format according to that of camera Password Check If this option is enabled the user would need to input the user name and the password for performing corresponding operations Show System Time If selected the current time will be displayed during live monitoring Max Online Users To set the max number of concurrent us...

Page 55: ...gain for adjusting CVBS video output automatically 12 1 2 Date Time Go to Main Menu Setup Basic Date Time interface Set the date format time format time zone in this interface checkmark Sync time with NTP server to refresh NTP server date You can also adjust system date manually Click Apply button to save the settings 12 1 3 DST Go to Main Menu Setup Basic DST interface In this interface enable da...

Page 56: ...low List Here authorized user can prohibit computer users within a certain IP address range from accessing to the HD TVI Hybrid DVR or allow computer users within a certain IP address range to access the HD TVI Hybrid DVR For example if an admin user doesn t want computer users within IP address range from 192 168 000 002 to 192 168 000 004 to access the HD TVI Hybrid DVR he can checkmark Block li...

Page 57: ...d and select user type You can also check Binding PC MAC Address and input this address Note When the default value of binding PC MAC Address is 0 the user is not bound with the specified computer If the bind option is used the user would be able to log into the HD TVI Hybrid DVR only through the specific computer carrying the MAC address Click OK to save the settings Select Authority tab and then...

Page 58: ... the relevant operation To change user password Go to Main Menu Setup Users interface Select the added user you want to change its password and then click Change Password button 13 1 2 Online Users This function allows you to check how many users are accessing the device and help the administrator to disconnect the online user Go to Main Menu Information Online Users interface Refresh Refresh the ...

Page 59: ...r you go to Disk Management Advanced tab you can check model S N firmware health status of the disk in this interface You also can monitor the temperature internal circuit dielectric material of the disk analysis the potential problems of the disk and warn so as to protect its data 13 3 View Information Go to Main Menu Information interface as shown below In this interface you may check the inform...

Page 60: ...g Click QRCODE to check the QRCODE You can quickly access the mobile client by scanning QRCODE 13 4 Shutdown Click Main Menu Shutdown to pop up a system shutdown window Click OK to confirm shutdown 13 5 Upgrade At present it only supports USB update Get the software from your vendor when there is a new software version The setting steps are as follows Copy the upgrade software which gets from vend...

Page 61: ...NAT and input the NAT Server The default NAT Server is www autonat com Click Apply to save the parameters Please refer to NAT for details 14 1 2 NAT Access After finishing the NAT settings you can enter the NAT Server on the PC Input http www autonat com to go to the IE client If you are the first time to access the NAT the network will download the ActiveX automatically Note If you cannot downloa...

Page 62: ...VI Hybrid DVR to connect to internet 1 Connect the device to internet through router or virtual server Go to Main Menu Setup Network Network interface to input IP address Subnet Mask etc If using DHCP please enable DHCP in both the HD TVI Hybrid DVR and router Forward IP address and port number in Virtual Server setup of the router or virtual server Configure the firewall to allow accessing the HD...

Page 63: ...ad Active X control The following setting steps are as the same as and in Point 1 14 3 Remote Surveillance through Apple PC Note Because the current plug in version of client end just only supports 32 bit mode so the safari browser shall start 32 bit mode If the browser is the earlier MACOS version the default setting is 32 bit mode and the setting can be skipped The setting steps are as follows R...

Page 64: ...etwork segment should be the same as the PC If using DHCP please enable DHCP in the HD TVI Hybrid DVR and router After the above information is completed you can enter LAN IP and HTTP port in the Safari browser For example input http 192 168 1 100 81 here 192 168 1 100 is LAN IP of HD TVI Hybrid DVR 81 is the http port of the device and click button Then the browser will download Active X control ...

Page 65: ... to the login interface of the device 14 3 2 WAN There are also two ways for the device to connect to Internet 1 Connect the device to internet through router or virtual server The network setups are the same as step one to step four of point 1 on WAN of IE remote surveillance Enter WAN IP and http port in the Safari browser to install the Active control 2 Connect the DVR to internet directly The ...

Page 66: ...zoom focus on the dome and set the presets etc Buttons Description to rotate the dome upwards to rotate the dome diagonally up left to rotate the dome diagonally up right to rotate the dome downwards to rotate the dome diagonally down left to rotate the dome diagonally down right to rotate the dome towards left to rotate the dome towards right to stop rotating the dome Drag the scroll bar to adjus...

Page 67: ...t requires low network bandwidth Therefore you can select the stream according to your bandwidth All to master sub stream Set all channel to master stream or sub stream Enable audio Enable or disenable audio Full screen In full screen status the live preview picture will display with full screen and the tool bar will be hid Double click left mouse or click right mouse to return Zoom in Single chan...

Page 68: ...ight date in the area indicates recorded data Select the date in area and record channels in area Click Search button The record data will be displayed in the data information list box Set the data playing time and display mode in the area as required Click Play button to playback Click the relevant buttons in the interface for operation like FF pause change channel mode etc ...

Page 69: ...y Event Search Go to Search Event Search interface Click the highlighted date and select record channels Checkmark the event type motion and sensor Click Search button Double click certain item to play File Management Go to Search File Management interface ...

Page 70: ...locked file and then click Unlock button to unlock this file Delete Select an unlock file and then click Delete button to delete this file from file list Remote Backup Click Backup button to go to backup interface Select channels set the start and end time and then click search button to display the file information in the file list box Select backup files and click Browse button to set the save p...

Page 71: ...s Only one user can do configuration setup at a given point of time Click Config tab to go to the below interface The sub menu list and the options in every menu are similar to that of the HD TVI Hybrid DVR 14 7 Tools Click on the tool s tab to access the Disk Management tool Here you can view the status of the hard drive s view change the read write properties and format the hard drive s 14 8 Rem...

Page 72: ...ttings Q4 Why are no images displayed on few or all the channels of the HD TVI Hybrid DVR a It could be a wiring issue Please check the cable and the ports of the cameras b The problem can also be related to cameras Please check the same c Please make sure that you have added and enabled the cameras Q5 Why can t I find the HDD a The power from the adapter may be not enough for operating the HD TVI...

Page 73: ...ns Select Security Custom Level Refer to Fig 8 1 Enable all the sub options under ActiveX controls and plug ins Refer to Fig 8 2 Then click OK to finish setup b Other plug ins or anti virus may block ActiveX Please disable or do the required settings Fig 8 1 Fig 8 2 Q9 HD TVI Hybrid DVR displays please wait all the time Why and How can I do a HDD power cable and data cable may not be well connecte...

Page 74: ...ybrid DVR already contains a HDD the migrated disk being installed would have to be formatted In general migrating disks from one HD TVI Hybrid DVR to another is not recommended Q12 What is the minimum configuration required for remote monitoring PC Module Parameters CPU Intel Celeron 2 4G Motherboard Intel 845 HDD 80G RAM 512M VGA NVIDIA GeForce MX440 FX5200 ATIRADEON 7500 X300 OS Windows 2000 SP...

Page 75: ... doing backup Then double click to open your USB disk to find your backup files and backup player Double click icon to install backup player b After you install it open this player and click Open Path button to open your backup file Next click play button to play the backup file Double click the image and then right click to enable audio If you save your backup files in AVI format you can directly...

Page 76: ...ps Used Space MB h 1080P 15fps NTSC 12 PLA 12M 2700 10M 2250 8M 1800 6M 1350 4M 900 2M 450 The calculation format is Total Recording capacity Used space per hour MB h coverage rate of hard disk recording time hour channel numbers For instance one customer sets resolution to 1080P frame rate to 15fps bitrate to 4M and enables total 4 channels He wants the unit to record continuously in a month Belo...

Page 77: ...B 32GB Compatible SATA CD DVD writers after test Brand Model TECLAST GH22NP20 TL 22XD BENQ DW220S 0K4 LITEON DH 20A6S01C LITEON DH 20A4P02C SAMSUNG TS H653B Compatible HDD list Brand Capacity Seagate Barracuda 80GB 160GB 250GB 320GB 1 5TB 2TB 3TB Seagate SV35 3 1TB Seagate Pipeline HD 2 500GB Maxtor Diamondmax 160GB HITACHI Deskstar 80GB 160GB Western Digital 160GB 250GB 320GB 1 5TB 2TB 3TB Samsun...

Page 78: ...the case Connect the power and data cables Secure the DVD writer with the screws Type II Loosen the screws and take out the brace with a triangular mark if there is no such brace please skip this step And then install the DVD Writer Connect the power and data cables and then install the HDDs as shown below Install back the mounting bar and fix the other two HDDs under it as shown below ...

Page 79: ...Appendix HD TVI Hybrid DVR User Manual 74 ...

Page 80: ...450011000687 A0 ...

Reviews: