background image


Disclaimer 

EZ Dupe's duplicator machine is specially designed for data backup of storage devices. Please observe the 

relevant provisions of copyright when using it. Any backup without the consent or authorization of the copyright 
holder is illegal. Please confirm before backup. EZ Dupe is not responsible for any illegal acts, and the user is 
responsible for all legal liabilities. 

The source port of duplicator is write-protected, and the settings and data content of any storage device in the 

source port will not be changed at all. Do not place the source storage device on the target port to avoid 
accidentally changing (deleting) of data. It has nothing to do with EZ Dupe if there is any mistake in correcting 
(deleting) the data by user. In addition, EZ Dupe is not responsible for the risks and data losses incurred as a 
result of duplication. By purchasing this product, the user accepts this statement and agrees to be bound by it. 

The content of this manual is for reference only. The copyright of the content belongs to EZ Dupe. Please do 

not copy or repost it without authorization. EZ Dupe reserves the right to change the function of the product 
without prior notice. 


Things to know before using the duplicator 

1.


Please read this manual carefully before operation to avoid any misconduct. 

2.


Make sure that the storage device you want to use is of good quality and can be used normally. 

3.


The capacity of target storage device must be greater than or equal to the capacity of source storage device to 
avoid incomplete data backup. 

4.


It is recommended to use the Copy + Compare function when backing up, to ensure that the backup data is 
100% the same as the source data, because the target storage device may have write errors or damaged 
sectors. 

5.


When updating the firmware, please do not turn off the power. If the power is interrupted accidentally, the 
machine cannot be turned on, and it must be returned to the factory for processing. 

6.


Keep the duplicator used in a dry environment. Rain, moisture, liquid, etc. may corrode the circuit board and 
cause the machine to malfunction. 

7.


Avoid using the duplicator in dusty or dusty environments. Dust may cause bad contact with the port. 

8.


This product warranty does not apply to accident, man-made destruction, abuse, or improper use (such as 
using not in accordance with the product description, or intended to exceed the scope of use for which this 
product was designed, or improper use of fixtures, etc.) 

9.


If the duplicator performs normally, it is strongly recommended not to update the firmware, unless there is a 
problem in use or a new function is required. 

10.


For convenience, the source storage device will be referred to as the master disk, and the target storage 
device will be referred to as the target disk in this manual. The master disk and the target disk will be 
collectively referred to as disks. 


Summary of Contents for NV-05M

Page 1: ...0 Copyright 2020 All rights reserved PCIe Duplicator NVMe M 2 User s Manual...

Page 2: ...device you want to use is of good qualityand can be used normally 3 The capacityof target storage device must be greater than or equal to the capacityof source storage device to avoid incomplete data...

Page 3: ...n Instructions 6 5 Attention 7 6 Quick Start Guide 7 6 1 Start up and Preparations 7 6 2 Fast Copy 8 7 Functions 8 7 1 Function List 8 7 2 Introduction toMain Functions 10 7 2 1 FAST COPY 10 7 2 2 FUL...

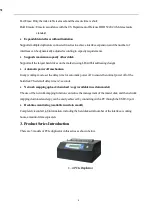
Page 4: ...elyrecord all the duplicator s work status for easy analysis It is available on certain model 2 Product Features Efficient and stable duplication speed Speed is up to 600 MB s which can achieve 36 GB...

Page 5: ...ower off mechanism In anyworking mode set the delaytime for automatic power off to ensure the normal power off of the hard disk The default delaytime is 3 seconds Network mapping upload download copy...

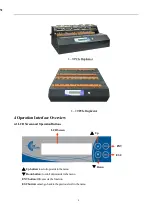
Page 6: ...erface Overview 4 1 LCD Screen and Operation Buttons Up button to scroll upwards in the menu Downbutton to scroll downwards in the menu ENT button OK execute the function ESC button cancel go back to...

Page 7: ...ete Red light off Green Light flashing Copy Erase Compare Red light always on Green Light off FAIL after Copy Erase Compare Red light off Green Light always on PASS after Copy Erase Compare 4 3 Adapte...

Page 8: ...while the duplicator is performing the task to avoid damage to the duplicator and the hard disk Do not disassemble the duplicator without the guidance and authorization from the manufacturer otherwise...

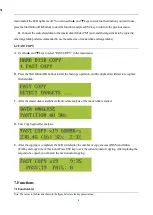
Page 9: ...FAST COPY in the main menu B Press the Start button OK button to start the fast copyoperation and the duplicator will start to recognize the hard disk C After the master disk is identified effective d...

Page 10: ...UPDATE DISK 8 SETTING 1 CMP AFTER COPY N 2 SET COPY PERCENT 3 COPY UNKNOWN N 4 ERASE PATTERN 00 5 SPEED MOD AUTO 6 SET PASSWORD 7 CAPACITY CHECK N 8 KICK SLOW DISK N 9 ADVANCED 1 POWER ON TIME 2 POWE...

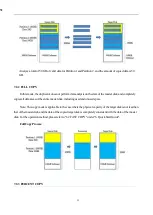
Page 11: ...d the copied data of the target disk is completelyconsistent with the effective data area of the master disk The effective data area of the master disk is not equal to the capacityof the effective dat...

Page 12: ...tely copies all data areas of the entire master disk includingused and unused space Note This copymode is applicable to the case where the physical capacityof the target disk is not less than that of...

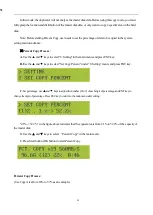
Page 13: ...Setting in the main menu and press ENT key B Use the and keys to select Set CopyPercent under 8 Setting menu and press ENT key C Set percentage use and keys to adjust the number 0 to 9 of each digit o...

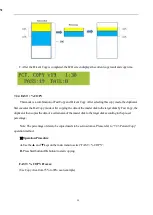
Page 14: ...e master disk to the target disks byFast Copy the duplicator then copies the data of a certain area of the master disk to the target disk according to the pre set percentage Note The percentage of dat...

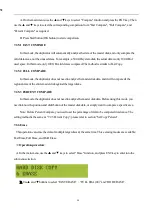
Page 15: ...son methods are available for user to choose 1 Fast Compare 2 Full Compare 3 Percent Compare User can choose the corresponding comparison mode according to different needs If you need to automatically...

Page 16: ...ata and it will compare all the regional data of the entire master disk against the target disks 7 2 5 3 PERCENT COMPARE In this mode the duplicator does not need to analyze the master disk data Befor...

Page 17: ...This function erases data accordingto the US Department of Defense DOD5220 22 M data erasure standard It erases all sectors of the hard disk three times The erasing time is equivalent to three full e...

Page 18: ...stem settings include the duplicator s working parameter settings Generally the factorydefault settings can be used If you reallyneed to modifythe system settings be sure to confirm the setting change...

Page 19: ...t data such as 00 5A A5 AA FF RDM random value can be selected to write to the target disks the default value is 00 7 2 8 5 SPEED MOD AUTO Set the mode of the duplicator speed based on the hard disks...

Page 20: ...t disk will be removed 7 2 8 8 KICK SLOW DISK N You can select Yes or No to turn this function on or off the default is No After this function is turned on the disk with slow speed will be kicked out...

Page 21: ...the default value is 3S Operation Procedure A Press ENT keyto enter into the Power Off Time setting B Use the and keys to adjust the time 7 2 8 9 3 LANGUAGE Set the system displaylanguage to Chinese o...

Page 22: ...be upgraded Operation Procedure See 8 System software upgrade steps 3 7 2 8 9 6 TESTMODE OFF This is for aging test scenarios After turning on this option return to the main menu and select anycopy f...

Page 23: ...enu B Use and keys to set the percentage value 7 2 8 9 8 SYSTEM INFO In this menu you can view the current system information of the duplicator Number of ports available for duplication Current firmwa...

Page 24: ...nter into Block Size sub menu B Use and keys to select the value 7 2 8 9 11 CAP CHECK PERCENT This is to set the maximum difference allowed between the capacityof the master disk and the target disks...

Page 25: ...the dual file system otherwise you can onlycopythe first file system Operation Procedure A Press ENT button to enter int the NVME WAIT LNK 2S sub menu B Use and keys to switch between Yes or No 8 Syst...

Page 26: ...vanced Firmware Update as shown below C Press ENT key to enter into the firmware update press the ENT key again to continue D Searches for firmware in the SSD E Finds the upgrade software and starts t...

Page 27: ...ber of sectors of the target disk and the master disk are the same 10 Specification NV 05M Duplicator Specification Model NV 05M Target 4 General Specification Transfer Speed 36 GB min PCIe 36 GB min...

Page 28: ...g and work record keeping Mapping PC mapping production download and copy Compatibility File Format Supported FAT16 32 64 exFAT NTFS EXT1 2 3 4 Hardware Specification Power Supply 100 240V 400W 50 60H...

Page 29: ...1 Remove the adapter plate fixture screws and remove the fixture Step 2 Unplug the original adapter board Step 3 Insert the new adapter board Step 4 Reinstall the adapter plate fixture and tighten the...

Page 30: ...SATA cable as shown below and remove the fixing screws of the adapter board as shown below Step 2 Unplug the original adapter board and replace it with a new one Step 3 Connect the SATA cable and tig...

Reviews: