FUEL SYSTEM
Page K-3
Repair and Service Manual
Read all of Section B and this section before attempting any procedure. Pay particular attention to all Notes, Cautions and Warnings
Remove the hose (item 3) coming from fuel tank first and
plug. Remove filter (item 2) from hose (item 4) going to
fuel pump and discard the old filter
.
Installation of the new filter is the reverse of disassembly.
Fuel Pump
Refer to HONDA
®
GX610, 18 HP Engine Repair Manual
for engine, obtainable from Honda dealer for more
details.
Fuel Tank
To prevent serious injury
or death resulting from
explosion or fire, discon-
nect the battery negative (-) cable before starting any
operation on fuel tank. An electrical arc from fuel
gauge could ignite fuel vapor in the tank.
Do not smoke near the fuel tank. When removing the
seat panel (item 2), the fuel tank cap must be
removed. To reduce the chance of inhalation of gas
fumes which are harmful, cover the tank opening with
duct tape before removing panel.
To prevent serious injury or death resulting from
explosion or fire, dispose of fuel remaining in old tank
correctly. Gasoline vapor left in fuel tank is extremely
flammable. Fill tank with water to help eliminate gaso-
line vapor.
Clean up any fuel leakage from hose.
Tool List
Qty. Required
Ratchet, 3/8" drive....................................................... 1
Extension, 12", 3/8" drive ............................................ 2
Socket, 1/2", 3/8" drive................................................ 2
Pliers ........................................................................... 1
Duct tape ................................................................. A/R
Utility knife ................................................................... 1
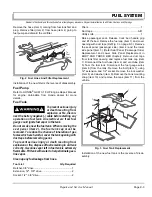
Raise passenger seat. Release truck bed handle grip
and lift the bed. Remove the fuel cap (item 1) and cover
opening with duct tape (Ref Fig. 3 on page K-3). Remove
the seat panel (passenger side) (item 2) and the lower
side panel (item 3) (Refer Seat Panel (Passenger Side)
Replacement and Lower Side Panel Replacement in
BODY AND TRUCK BED chapter). Remove duct tape
from tank filler opening and replace fuel tank cap (item
1). Disconnect the fuel hose (item 4) and vent tube (item
5) from the fuel tank. Disconnect the fuel gauge wires
(item 6) from the tank. Remove the bolt (item 7) using
12" extension and 1/2" socket. Remove the lock washer
(item 8) and washer (item 9). Remove the tank mounting
strap (item 10) and remove the tank (item 11) from the
vehicle.
Installation of the new fuel tank is the reverse of disas-
sembly.
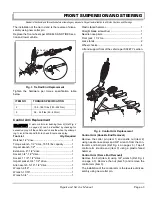
Fig. 2 Fuel Lines And Filter Replacement
2
4
3
1
To
Fuel
Pump
To Fu
el T
ank
!
!
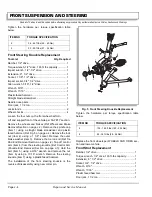
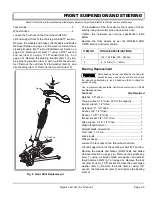
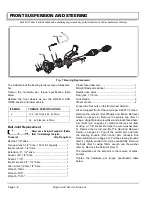
Fig. 3 Fuel Tank Replacement
3
1
2
11
4
8
9
7
5
6
10
Summary of Contents for ST 4X4
Page 6: ...Page iv Repair and Service Manual TABLE OF CONTENTS Notes...
Page 10: ...Repair and Service Manual SAFETY INFORMATION Page viii Notes...
Page 12: ...GENERAL INFORMATION ROUTINE MAINTENANCE Page A ii Repair and Service Manual Notes...
Page 24: ...SAFETY Page B ii Repair and Service Manual Notes...
Page 34: ...BODY AND TRUCKBED Page C ii Repair and Service Manual Notes...
Page 50: ...BRAKES Page D ii Repair and Service Manual Notes...
Page 68: ...CONTINUOUSLY VARIABLE TRANSMISSION CVT Page E ii Repair and Service Manual Notes...
Page 74: ...DIRECTION AND DRIVE SELECTOR Page F ii Repair and Service Manual Notes...
Page 80: ...ELECTRICAL Page G ii Repair and Service Manual Notes...
Page 114: ...FRONT SUSPENSION AND STEERING Page J ii Repair and Service Manual Notes...
Page 128: ...FUEL SYSTEM Page K ii Repair and Service Manual Notes...
Page 136: ...PAINT Page L ii Repair and Service Manual Notes...
Page 142: ...REAR AXLE AND SUSPENSION Page M ii Repair and Service Manual Notes...
Page 152: ...SPEED CONTROL Page N ii Repair and Service Manual Notes...
Page 160: ...TROUBLESHOOTING Page P ii Repair and Service Manual Notes...
Page 168: ...WHEELS AND TIRES Page R ii Repair and Service Manual Notes...
Page 174: ...GENERAL SPECIFICATIONS Page S ii Repair and Service Manual Notes...
Page 180: ...LIMITED WARRANTY Page T ii Repair and Service Manual Notes...
Page 182: ...Page T 2 Repair and Service Manual LIMITED WARRANTY Notes...

