SPEED CONTROL
Page N-4
Repair and Service Manual
Read all of Section B and this section before attempting any procedure. Pay particular attention to all Notes, Cautions and Warnings
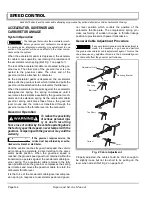
Fully depress the accelerator pedal and check that the
throttle lever (item 5) at the carburetor is opening fully.
Accelerator Pedal Replacement
To prevent serious injury
or death resulting from a
battery explosion:
When connecting battery cables, pay particular
attention to the polarity of the battery terminals.
Never confuse the positive and negative cables.
Wrap wrenches with vinyl
tape to prevent the possibil-
ity of a dropped wrench
from ‘shorting out’ a bat-
tery, which could result in an explosion and
severe personal injury or death.
The negative (-) battery cable must be removed
using insulated wrench before removing the
accelerator pedal from the vehicle.
Cover the battery with a shop rag before servicing
the vehicle.
If any adjustments or replacement are made in
the accelerator pedal area, it is necessary to go
back and perform the accelerator/governor cable adjustment
again. This must be done because any adjustment made in the
accelerator pedal area may affect the cable adjustment.
Tool List
Qty. Required
Ratchet, 3/8" drive .......................................................1
Torque wrench, 3/8" drive, ft. lbs ................................. 1
Deep well socket, 3/4", 3/8" drive ................................ 1
Wrench, 3/4" ................................................................ 1
Ball peen hammer .......................................................1
Needle nose pliers .......................................................1
Straight blade screwdriver ........................................... 1
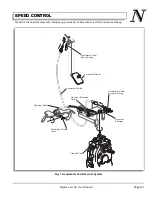
Fig. 4 Accelerator/Governor Cable Adjustment
1
2
5
4
3
!
!
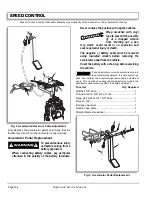
Fig. 5 Accelerator Pedal Replacement
1
8
2
4
5
7
9
3
6
Summary of Contents for ST 4X4
Page 6: ...Page iv Repair and Service Manual TABLE OF CONTENTS Notes...
Page 10: ...Repair and Service Manual SAFETY INFORMATION Page viii Notes...
Page 12: ...GENERAL INFORMATION ROUTINE MAINTENANCE Page A ii Repair and Service Manual Notes...
Page 24: ...SAFETY Page B ii Repair and Service Manual Notes...
Page 34: ...BODY AND TRUCKBED Page C ii Repair and Service Manual Notes...
Page 50: ...BRAKES Page D ii Repair and Service Manual Notes...
Page 68: ...CONTINUOUSLY VARIABLE TRANSMISSION CVT Page E ii Repair and Service Manual Notes...
Page 74: ...DIRECTION AND DRIVE SELECTOR Page F ii Repair and Service Manual Notes...
Page 80: ...ELECTRICAL Page G ii Repair and Service Manual Notes...
Page 114: ...FRONT SUSPENSION AND STEERING Page J ii Repair and Service Manual Notes...
Page 128: ...FUEL SYSTEM Page K ii Repair and Service Manual Notes...
Page 136: ...PAINT Page L ii Repair and Service Manual Notes...
Page 142: ...REAR AXLE AND SUSPENSION Page M ii Repair and Service Manual Notes...
Page 152: ...SPEED CONTROL Page N ii Repair and Service Manual Notes...
Page 160: ...TROUBLESHOOTING Page P ii Repair and Service Manual Notes...
Page 168: ...WHEELS AND TIRES Page R ii Repair and Service Manual Notes...
Page 174: ...GENERAL SPECIFICATIONS Page S ii Repair and Service Manual Notes...
Page 180: ...LIMITED WARRANTY Page T ii Repair and Service Manual Notes...
Page 182: ...Page T 2 Repair and Service Manual LIMITED WARRANTY Notes...

