BRAKES
Page D-6
Repair and Service Manual
Read all of Section B and this section before attempting any procedure. Pay particular attention to all Notes, Cautions and Warnings
Do not apply the brake when removing the
wheel lug nuts; the shoes may not fully retract
preventing removal of the brake drum.
Tool List
Qty. Required
Torque wrench, 1/2" drive, ft. lbs ................................. 1
Impact wrench, 3/4", 1/2" drive.................................... 1
Impact socket, 3/4", 1/2" drive ..................................... 1
Lug wrench, 3/4" ......................................................... 1
Torx bit screwdriver T - 45 ........................................... 1
Plastic faced hammer.................................................. 1
Hydraulic floor jack ...................................................... 1
Jack stands ................................................................. 2
Wheel chocks .............................................................. 4
Loosen the four nuts on the rear wheels half turn.
Lift and support rear of the vehicle per SAFETY section.
Remove the four rear wheel nuts and remove the wheel
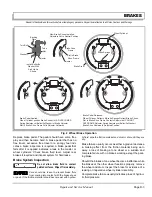
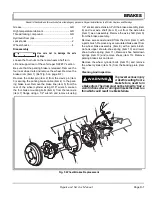
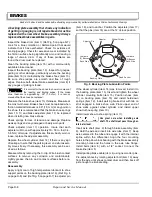
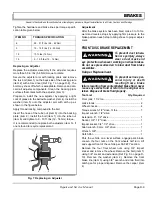
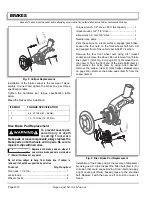
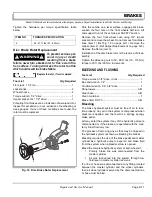
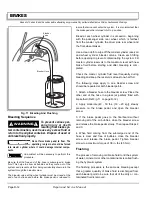
(Ref WHEELS AND TIRES). Remove the brake drum
(item 1) by grasping it firmly and pulling away from the
wheel bolts (Ref Fig. 4 on page D-6). If the drum cannot
be removed, tap the drum around the circumference with
a plastic faced hammer. If the brake drum still cannot be
removed, retract the brake shoes (item 2). Using a Torx
driver rotate adjuster Torx head bolts (item 3) on rear
side of backing plate (item 4) towards the axle to retract
shoes and remove brake drum.
To install the brake drum slide the brake drum into place.
WHEEL BRAKE SERVICE AND
REPLACEMENT
To prevent dust inhala-
tion or eye injury, always
wear a dust mask and
eye protection whenever working on wheel brakes.
Do not use pressurized air to blow dust from brake
assemblies.
Replace both brake shoes on both wheels if one or
more shoes are worn below .06" (1.5 mm) thickness at
any point.
Do not use a commercial brake cleaner
unless the entire brake has been disas-
sembled.
Use care when handling the axles. The spline at the inboard end
is subject to damage if not protected. A damaged spline may
cause damage to the internal seal when reinstalled.
If brake shoes are worn below .06" (1.5 mm) thickness at any
point, replace all brake shoes. Brake shoes should be always
replaced in pairs and both wheel brake shoes replaced. Be sure
that there is no grease, oil, or any other contaminant on brake
shoes.
Tool List
Qty. Required
Ratchet, 1/2" drive .......................................................1
Torque wrench, 3/8" drive, in. lbs................................. 1
Torque wrench, 3/8" drive, ft. lbs. ................................ 1
Extension, 6", 3/8" drive .............................................. 1
Socket, 10 mm, 3/8" drive............................................ 1
Socket, 7/16", 3/8" drive .............................................. 1
Socket, 9/16", 3/8" drive .............................................. 1
Socket, 3/4", 1/2" drive ................................................ 1
Wrench, 10 mm ........................................................... 1
Wrench, 1/2" ................................................................ 1
Wrench, 9/16" .............................................................. 1
Locking pliers............................................................... 1
Pliers............................................................................ 1
Torx bit screwdriver T - 45 ........................................... 1
Dust mask....................................................................1
Safety glasses ............................................................. 1
Parts brush .................................................................. 1
Wheel cylinder clamp .................................................. 1
Brake cleaner .......................................................... A/R
Shop towels ............................................................. A/R
Wire brush ................................................................... 1
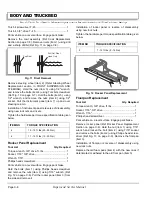
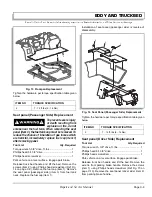
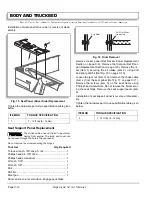
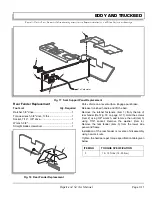
Fig. 4 Brake Drum Replacement
1
2
3
4
!
!
Summary of Contents for ST 4X4
Page 6: ...Page iv Repair and Service Manual TABLE OF CONTENTS Notes...
Page 10: ...Repair and Service Manual SAFETY INFORMATION Page viii Notes...
Page 12: ...GENERAL INFORMATION ROUTINE MAINTENANCE Page A ii Repair and Service Manual Notes...
Page 24: ...SAFETY Page B ii Repair and Service Manual Notes...
Page 34: ...BODY AND TRUCKBED Page C ii Repair and Service Manual Notes...
Page 50: ...BRAKES Page D ii Repair and Service Manual Notes...
Page 68: ...CONTINUOUSLY VARIABLE TRANSMISSION CVT Page E ii Repair and Service Manual Notes...
Page 74: ...DIRECTION AND DRIVE SELECTOR Page F ii Repair and Service Manual Notes...
Page 80: ...ELECTRICAL Page G ii Repair and Service Manual Notes...
Page 114: ...FRONT SUSPENSION AND STEERING Page J ii Repair and Service Manual Notes...
Page 128: ...FUEL SYSTEM Page K ii Repair and Service Manual Notes...
Page 136: ...PAINT Page L ii Repair and Service Manual Notes...
Page 142: ...REAR AXLE AND SUSPENSION Page M ii Repair and Service Manual Notes...
Page 152: ...SPEED CONTROL Page N ii Repair and Service Manual Notes...
Page 160: ...TROUBLESHOOTING Page P ii Repair and Service Manual Notes...
Page 168: ...WHEELS AND TIRES Page R ii Repair and Service Manual Notes...
Page 174: ...GENERAL SPECIFICATIONS Page S ii Repair and Service Manual Notes...
Page 180: ...LIMITED WARRANTY Page T ii Repair and Service Manual Notes...
Page 182: ...Page T 2 Repair and Service Manual LIMITED WARRANTY Notes...

