background image


5 -  11

MAINTENANCE

Read all of this manual to become thoroughly familiar with this vehicle. Pay particular attention to all Notices, Cautions, Warnings, and Dangers.

5

LUBRICATION

Do not use more than three (3) pumps of grease in any grease fitting at any one time. Excess grease may cause 
grease seals to fail or grease migration into areas that could damage components.

Putting more than three pumps of grease in a grease fitting could damage grease seals and cause premature bear-
ing failure.

Hardware

Periodically, the vehicle should be inspected for loose fasteners. Fasteners should be tightened in accordance with 
the Torque Specifications table.

Use care when tightening fasteners and refer to the Technician’s Repair and Service Manual for specific torque val-
ues.

Lubrication Points

View from Underside of Vehicle

Rack
Ball
Joint

ALL TORQUE FIGURES ARE IN FT. LBS. (Nm)

BOLT SIZE

Grade 2

1/4"

5/16"

3/8"

7/16"

1/2"

9/16"

5/8"

3/4"

7/8"

1"

Unless otherwise noted in text, tighten all hardware in accordance with this chart.

This chart specifies 'lubricated' torque figures. Fasteners that are plated or lubricated when

installed are considered 'wet' and require approximately 80% of the torque required for 'dry' fasteners.

4

(5)

8

(11)

15

(20)

24

(33)

35

(47)

55

(75)

75

(102)

130

(176)

125

(169)

190

(258)

Grade 5

Grade 8

6

(8)

13

(18)

23

(31)

35

(47)

55

(75)

80

(108)

110

(149)

200

(271)

320

(434)

480

(651)

6

(8)

18

(24)

35

(47)

55

(75)

80

(108)

110

(149)

170

(230)

280

(380)

460

(624)

680

(922)

BOLT SIZE

Class 5.8
(Grade 2)

M4

M5

M6

M8

M10

M12

M14

1

(2)

2

(3)

4

(6)

10

(14)

20

(27)

35

(47)

55

(76.4)

Class 8.8
(Grade 5)

2

(3)

4

(6)

7

(10)

18

(24)

35

(47)

61

(83)

97

(131)

Class 10.9
(Grade 8)

3

(4)

6

(8)

10

(14)

25

(34)

49

(66)

86

(117)

136

(184)

5.8

8.8

10.9

Torque Specifications and Bolt Grades

Summary of Contents for 622013

Page 1: ...622013 Owner s Guide ISSUED NOVEMBER 2011 REVISED JANUARY 2012 ...

Page 2: ...ces in controls will be illustrated Most of the service procedures in this guide can be accomplished using common automotive hand tools Contact your service representative on servicing the vehicle in accordance with the Periodic Service Schedule Repair or replacement parts are available through your E Z GO retailer or E Z GO Genuine Service Parts The following information is needed when contacting...

Page 3: ...e vehi cle E Z GO Division of Textron Inc reserves the right to incorporate engineering and design changes to products in this manual without obligation to include these changes on units sold previously The information contained in this manual may be revised periodically by E Z GO Division of Textron Inc and therefore is subject to change without notice E Z GO Division of Textron Inc DISCLAIMS LIA...

Page 4: ...rate of self discharge varies depending on the ambient temperature the age and condition of the batteries A fully charged battery will not freeze in winter temperatures unless the temperature falls below 75 F 60 C For winter storage the batteries must be clean fully charged and disconnected from any source of electrical drain The battery charger may be left connected to the vehicle to maintain a f...

Page 5: ...this manual to become thoroughly familiar with this vehicle Pay particular attention to all Notices Cautions Warnings and Dangers SECTION PAGE NO SAFETY 1 1 GENERAL SPECIFICATIONS 2 1 INTRODUCTION 3 1 OPERATING PROCEDURES 4 1 MAINTENANCE 5 1 ...

Page 6: ...Page iv TABLE OF CONTENTS Read all of this manual to become thoroughly familiar with this vehicle Pay particular attention to all Notices Cautions Warnings and Dangers Notes ...

Page 7: ...FETY PRACTICES 1 6 Introductions 1 6 Safety Survey 1 6 Steep Grade 1 7 Wet Areas 1 7 Sharp Turns Blind Corners Bridge Approaches 1 7 Loose Terrain 1 7 Golf Car Pedestrian Interference Areas 1 7 MAINTENANCE 1 7 Introductions 1 7 Preventive Maintenance 1 7 Parts and Materials 1 7 Ventilation 1 8 Maintenance Procedures 1 8 Maintenance Safety Procedures 1 8 FUELS HANDLING AND STORAGE BATTERY CHARGING ...

Page 8: ...1 2 SAFETY Read all of this manual to become thoroughly familiar with this vehicle Pay particular attention to all Notices Cautions Warnings and Dangers Notes 1 ...

Page 9: ... that could result in an unsafe condition Observe these NOTICES CAUTIONS WARNINGS and DANGERS be aware that servicing a vehicle requires mechanical skill and a regard for conditions that could be hazardous Improper service or repair may damage the vehicle or render it unsafe NOTICES CAUTIONS WARNINGS AND DANGERS Throughout this guide NOTICE CAUTION WARNING and DANGER will be used Please observe th...

Page 10: ...s important to the SAFE USE AND OPERATION of the product All customers should adhere to this SAFETY RESTRICTION in connection with the use of all E Z GO products new and used the Distributor or Dealer has reason to believe may be operated in personal transportation applications Information on FMVSS 571 500 can be obtained at Title 49 of the Code of Federal Regulations section 571 500 or through th...

Page 11: ...the vehicle in a responsible manner and maintain the vehicle in safe operating condition read and observe all warnings and operation instruction labels affixed to the vehicle follow all safety rules established in the area where the vehicle is being operated Leave the vehicle when there is a risk of lightning reduce speed to compensate for poor terrain or conditions apply service brake to control ...

Page 12: ...atural gas or propane water heaters and furnaces Always use a dedicated circuit for each battery charger Do not permit other appliances to be plugged into the receptacle when the charger is in operation Chargers must be installed and operated in accordance with charger manufacturers recommendations or applicable electrical code whichever is higher GENERAL SAFETY PRACTICES Introduction Like other m...

Page 13: ... golf car operation or identified by a suitable warning to operators not to operate golf cars in this area due to loose terrain or possible hazardous conditions Golf Car Pedestrian Interference Areas Areas where pedestrians and golf cars interfere shall be avoided whenever possible by rerouting the golf car traffic or the pedestrian traffic to eliminate the interference If elimination of the inter...

Page 14: ... Safety Procedures All maintenance shall be performed in accordance with the manufacturer s recommended safety procedures as outlined in the manufacturer s operation and service manuals The following list of recommended safety procedures are general in nature and in no way supersede the manufacturer s specific instructions Follow manufacturer s instructions for immobilizing golf car before beginni...

Page 15: ...ce on the golf car FUELS HANDLING AND STORAGE BATTERY CHARGING The controlling party shall supervise the storage and handling of liquid fuels in accordance with applicable fire and safety requirements Storage and handling of liquefied petroleum gas fuels shall be in accordance with American Gas Association recommendations and applicable fire safety requirements The controlling party shall require ...

Page 16: ...35962 G01 601781 74322G01 74322 G01 OFF ON 74821G01 MAX 14o 25 MAX lbs kg MAX 5 in 12 cm P P MAX 100 lbs 45 kg 74821G0 614121 cm MIN 150 R F ON OFF I O ON OFF I O F R F ON OFF I O ON OFF I O R F ON OFF I O ON OFF I O R F 14 25 14 25 614121 AUTHORIZED REPRESENTATIVE IN EC IS RANSOMES JACOBSEN LTD WEST ROAD IPSWICH SUFFOLK IP3 9TT UK 614068 28203 G01 601783 610631 614068 601783 28203G01 MAX 4 in 10 ...

Page 17: ...IED LOAD WITH HIGH CENTER OF GRAVITY COULD RESULT IN TIP OVER LOAD CENTER OF GRAVITY MAXIMUM HEIGHT x in xx cm MAX LOAD XXX LBS XXX KG WARNING MAXIMUM LOAD CENTER OF GRAVITY KEEP LOAD AS FAR FORWARD AS POSSIBLE DO NOT RIDE IN LOAD BED KEEP HANDS FINGERS AWAY FROM DUMP BED DO NOT STAND BEHIND DUMP BED 1 13 14 2 3 4 5 6 7 8 14û 25 WARNING READ MANUAL FOR MAXIMUM LOAD BED CAPACITY MAXIMUM RAMP HILL 9...

Page 18: ...INALS MAY CAUSE EXPLOSION DO NOT EXPOSE TO FLAME WARNING CORROSIVE WARNING LETHAL VOLTAGE WARNING EXPLOSIVE LOW OIL PRESSURE 17 18 19 20 21 22 23 24 25 26 27 DO NOT DISPOSE OF BATTERIES IN LANDFILL DO NOT DRIVE ON HIGHWAY WINDSHIELDS DO NOT PROVIDE PROTECTION FROM FLYING OBJECTS BATTERIES ARE HEAVY USE CARE LIFTING USE INSULATED TOOLS 28 29 30 31 32 WEAR EYE PROTECTION NO SMOKING HOT SURFACE 33 34...

Page 19: ...ON SELECTOR TO REVERSE Q AN AUDIBLE DEVICE WILL SOUND Q DEPRESS ACCELERATOR PEDAL AND ACCELERATE SMOOTHLY TO LEAVE A GASOLINE POWERED VEHICLE IN PARK Q APPLY PARKING BRAKE Q TURN KEY TO OFF Q MOVE DIRECTION SELECTOR TO FORWARD P N TO LEAVE AN ELECTRIC POWERED VEHICLE IN PARK Q APPLY PARKING BRAKE Q TURN KEY TO OFF Q MOVE DIRECTION SELECTOR TO NEUTRAL 39 40 41 ON OFF ON POSITION OFF POSITION HEADLI...

Page 20: ...1 14 SAFETY Read all of this manual to become thoroughly familiar with this vehicle Pay particular attention to all Notices Cautions Warnings and Dangers Notes 1 ...

Page 21: ...all Notices Cautions Warnings and Dangers 2 TITLE PAGE NO EXPRESS S6 Vehicle Specifications 2 3 EXPRESS S6 Vehicle Dimensions 2 4 EXPRESS S6 Vehicle Incline Information and Turning Diameter 2 5 EXPRESS L6 Vehicle Specifications 2 7 EXPRESS L6 Vehicle Dimensions 2 8 EXPRESS L6 Vehicle Incline Information and Turning Diameter 2 9 ...

Page 22: ...2 2 GENERAL SPECIFICATIONS Read all of this manual to become thoroughly familiar with this vehicle Pay particular attention to all Notices Cautions Warnings and Dangers Notes 2 ...

Page 23: ...ODUCT OVERVIEW Overall Height Overall Height With Canopy Wheel Base Front Wheel Track Rear Wheel Track Gnd Clearance Differential Power Source Performance Steering Suspension Vehicle Power Drive Train Body Chassis Motor Shaft Direct Drive Differential with helical gears Dash Mounted Forward Neutral Reverse 14 7 1 Some items shown may be optional equipment Specifications are subject to change witho...

Page 24: ...me thoroughly familiar with this vehicle Pay particular attention to all Notices Cautions Warnings and Dangers 2 4 2 135 8 in 345 0 cm 99 5 in 253 0 cm 49 0 in 124 0 cm EXPRESS S6 48 8 in 124 0 cm Rear 38 5 in 98 0 cm Front 37 8 in 96 0 cm 72 0 in 183 0 cm ...

Page 25: ...ad all of this manual to become thoroughly familiar with this vehicle Pay particular attention to all Notices Cautions Warnings and Dangers 2 RECOMMENDED MAX SIDE TILT 25 or 14 MAX RECOMMENDED MAX RAMP GRADE 25 or 14 MAX EXPRESS S6 ...

Page 26: ...ICATIONS Read all of this manual to become thoroughly familiar with this vehicle Pay particular attention to all Notices Cautions Warnings and Dangers 2 6 2 TURNING CLEARANCE DIAMETER 35 ft 6inches 10 8 m EXPRESS S6 ...

Page 27: ...e Front Wheel Track Rear Wheel Track Gnd Clearance Differential Power Source Performance Steering Suspension Vehicle Power Drive Train Body Chassis Motor Shaft Direct Drive Differential with helical gears Dash Mounted Forward Neutral Reverse 14 7 1 Some items shown may be optional equipment Specifications are subject to change without notice Field installed accessories may require installation cha...

Page 28: ...ATIONS Read all of this manual to become thoroughly familiar with this vehicle Pay particular attention to all Notices Cautions Warnings and Dangers 2 8 2 138 0 in 351 0 cm 95 0 in 241 0 cm 46 5 in 119 0 cm EXPRESS L6 ...

Page 29: ...hly familiar with this vehicle Pay particular attention to all Notices Cautions Warnings and Dangers 2 52 5 in 133 5 cm Rear 38 5 in 98 0 cm Front 37 5 in 95 0 cm 76 0 in 193 0 cm RECOMMENDED MAX SIDE TILT 25 or 14 MAX RECOMMENDED MAX RAMP GRADE 25 or 14 MAX EXPRESS L6 ...

Page 30: ...nual to become thoroughly familiar with this vehicle Pay particular attention to all Notices Cautions Warnings and Dangers 2 10 2 TURNING CLEARANCE DIAMETER 25ft 6inches 7 8 m 6 5 ft 1 98 m INTERSECTING AISLE CLEARANCE 6 5 ft 1 98 m EXPRESS L6 ...

Page 31: ...2 11 Notes Read all of this manual to become thoroughly familiar with this vehicle Pay particular attention to all Notices Cautions Warnings and Dangers GENERAL SPECIFICATIONS 2 ...

Page 32: ...2 12 GENERAL SPECIFICATIONS Read all of this manual to become thoroughly familiar with this vehicle Pay particular attention to all Notices Cautions Warnings and Dangers Notes 2 ...

Page 33: ...State of Charge Meter 3 3 Direction Selector 3 3 Accelerator Pedal 3 3 Brake and Park Brake 3 4 Horn 3 5 Front Seat 3 5 Hip Restraint Front 3 5 Hour Meter 3 5 Grab Handles 3 5 Weather Enclosure 3 5 Glove Box 3 5 Cup Holder 3 5 Steering Wheel 3 5 Charger with DC to DC Converter 3 5 Charger Receptacle 3 5 Battery Compartment 3 5 Run Tow Switch 3 6 Ash Tray 3 7 Sun Top and Windshield 3 7 Convertible ...

Page 34: ...3 2 INTRODUCTION Read all of this manual to become thoroughly familiar with this vehicle Pay particular attention to all Notices Cautions Warnings and Dangers Notes 3 ...

Page 35: ...to the OFF position and removed 2 State of Charge Meter The vehicle is equipped with a state of charge meter located in the dash panel The state of charge meter indicates the amount of usable power in the batteries The state of charge meter shows the condition of the battery pack with F indi cating a full charge on the battery pack and E indicating the battery pack needs to be charged 3 Direction ...

Page 36: ...s equipped with factory installed custom accessories some accessories remain operational with the key switch in the OFF position The brake pedal incorporates a park brake feature To engage the park brake push down on the upper section of the pedal until it locks in place The park brake will release when the service brake pedal is depressed Use the lower section of the brake pedal to operate the se...

Page 37: ...icle is equipped with grab handles for easy access to vehicle 11 Weather Enclosure Weather enclosure as an option that the vehicle may be equipped with 12 Glove Box An optional lockable glove compartment is located on each side of the instrument panel 13 Cup Holder A cup holder is provided for convenience of both the driver and passenger 14 Steering Wheel The steering wheel located in front of the...

Page 38: ...ing the Run Tow Maintenance switch to the Tow Maintenance position When in the Tow Maintenance position the Anti Roll Back and Walk Away safety features of the system no lon ger function Before attempting to tow vehicle move the Run Tow Maintenance switch to the Tow Maintenance position Failure to do so will damage the controller or motor Before disconnecting or connecting a battery or any other w...

Page 39: ...rom tree limbs or flying objects The sun top and windshield provide some protection from the elements however they will not keep the operator and passenger dry in a downpour This vehicle is not equipped with seat belts and the sun top has not been designed to provide roll over protection In addition the sun top does not protect against falling objects nor does the windshield protect against flying...

Page 40: ... The cargo platform is accessed by folding the rear seat down Be careful when loading the vehicle Tie down loads to prevent shifting Do not overload vehicle The cargo platform is limited to a maximum load of 550 lbs 1200 kg The load must be positioned on the platform as far forward as possible its center of gravity must not be higher than 4 10 cm above the platform and securely fastened down Failu...

Page 41: ...3 9 Notes Read all of this manual to become thoroughly familiar with this vehicle Pay particular attention to all Notices Cautions Warnings and Dangers INTRODUCTION 3 ...

Page 42: ...3 10 INTRODUCTION Read all of this manual to become thoroughly familiar with this vehicle Pay particular attention to all Notices Cautions Warnings and Dangers Notes 3 ...

Page 43: ...BEFORE INITIAL USE 4 2 PORATABLE CHARGER INSTALLATION 4 3 On board Charger 4 4 OPERATING THE VEHICLE 4 5 PERFORMANCE 4 5 Speed Control 4 6 Pedal Up Feature 4 6 Walk Away Feature 4 6 Anti Roll Back Feature 4 7 Anti Stall Feature 4 7 High Pedal Disable Feature 4 7 Diagnostic Mode Feature 4 7 STARTING AND DRIVING 4 7 Starting Vehicle on a Hill 4 8 Coasting 4 8 Labels and Pictograms 4 8 Sun Top And Wi...

Page 44: ...on unsuitable terrain Hydrogen gas is generated as a natural part of the lead acid battery charging process A 4 concentration of hydrogen gas is explosive and could cause severe injury or death Charging must take place in an area that is adequately ventilated minimum of 5 air exchanges per hour To reduce the chance of battery explosion that could result in severe injury or death never smoke around...

Page 45: ...the charger If the charger is operated in an outdoor location rain and sun protection must be provided A dedicated circuit is required for the charger Refer to the charger manual for appropriate circuit protection The charger may remain plugged in to the AC outlet To charge the vehicle refer to the instruction labels on the charger Insert the polarized DC plug completely into the vehicle receptacl...

Page 46: ...n the vehicle On board Charger The on board charger is located at the rear of the vehicle and is mounted between the frame rails An optional retractable AC cord reel is also available The charger is wired directly to the batteries only requiring it be plugged into a dedicated 15 amp AC outlet to be operational When charging cycle is complete replace cord around charger handle in area provided or i...

Page 47: ...he direction selector of a vehicle while the vehicle is in motion Moving the selector will result in a sudden slowing of the vehicle and the beeping of a warning device Slow down before and during turns All turns should be made at reduced speed Never drive vehicle up down or across an incline that exceeds 14 25 grade Refer to GENERAL SPECIFICATIONS for seating capacity Depressing accelerator pedal...

Page 48: ...ature The pedal up feature slows the vehicle when the accelerator pedal is released while the vehicle is moving between 10 mph 16 kph and the vehicle s top speed Example If all of the following events occur a the vehicle is being driven down a slope b the accelerator pedal is released for more than one second The pedal up feature will slow the vehicle the warning beeper will not sound until either...

Page 49: ... roll backwards slightly before power is returned to the motor High Pedal Disable Feature High pedal disable prevents undesired acceleration if the direction selector lever is changed or the key is turned on while the accelerator is depressed Diagnostic Mode Feature Diagnostic mode eases troubleshooting In the unlikely event of certain electrical system failures the PDS controller will default to ...

Page 50: ...ds limit speed with service brake Uncontrolled coasting does not occur because the controller limits the top speed of the vehicle while moving down hill However this is not a substitute for the service brake which should be used to control the speed of the vehicle This model is equipped with a feature pedal up braking that slows the vehicle s speed when the accelerator pedal is released until the ...

Page 51: ...4 9 Notes Read all of this manual to become thoroughly familiar with this vehicle Pay particular attention to all Notices Cautions Warnings and Dangers OPERATING PROCEDURES 4 ...

Page 52: ...4 10 OPERATING PROCEDURES Read all of this manual to become thoroughly familiar with this vehicle Pay particular attention to all Notices Cautions Warnings and Dangers Notes 4 ...

Page 53: ... 7 LIGHT BULB REPLACEMENT 5 7 FUSE REPLACEMENT 5 8 TRANSPORTING VEHICLE 5 8 Towing 5 8 Hauling 5 8 SERVICE AND MAINTENANCE 5 8 ROUTINE MAINTENANCE 5 9 Tire Inspection 5 9 Brakes 5 9 PERIODIC BRAKE TEST FOR MECHANICAL BRAKES 5 10 REAR AXLE 5 10 Checking the Lubricant Level 5 10 LUBRICATION 5 11 HARDWARE 5 11 SYSTEM 5 12 CAPACITIES AND REPLACEMANT PARTS 5 12 PERIODIC SERVICE SCHEDULE 5 13 BATTERY CH...

Page 54: ...5 2 MAINTENANCE 5 Battery Replacement 5 18 Battery Charging 5 19 AC Voltage 5 19 Troubleshooting 5 19 HYDROMETER 5 20 Using Hydrometer 5 21 PROLONGED STORAGE 5 22 ...

Page 55: ...mmercial plastic polish or Plexus plastic cleaner available from the service parts department Normal cleaning of vinyl seats and plastic or rubber trim requires the use of a mild soap solution applied with a sponge or soft brush and wipe with a damp cloth Removal of oil tar asphalt shoe polish etc will require the use of a commercially available vinyl rubber cleaner The painted surfaces of the veh...

Page 56: ...ed terrain When driving at full speed on a dirt road loose surfaces or wet grass vehicle stopping distance will increase If the vehicle is fully loaded it will take longer to stop than with no load When operating vehicle in wet weather conditions remember that the brakes may need to be lightly applied in order to provide enough friction to dry the brake unit If wet the brakes will lose much of the...

Page 57: ...icle Tool List Qty Tool List Qty Floor jack 1 Jack stands 4 Wheel Chocks 4 Remove payload from vehicle before lifting No person s should be in or on the vehicle while lifting To raise the entire vehicle install chocks in front and behind each front wheel Center the jack under the rear frame crossmember Raise the vehicle enough to place a jack stand under the outer ends of the rear axle Lower the j...

Page 58: ... inflation should be determined by the condition of the terrain See GENERAL SPECIFICATIONS section for rec ommended tire inflation pressure For outdoor applications with major use on grassy areas the following should be considered On hard turf it is desirable to have a slightly higher inflation pressure On very soft turf a lower pres sure reduces the possibility of tires cutting into the turf For ...

Page 59: ...re bulb failure do not touch new bulbs with bare fingers Use clean dry tissue or paper towel to handle the glass portion of the bulb For vehicles equipped with lights mounted in the cowl locate bulb socket on backside of light and turn bulb socket a quarter turn counterclockwise to unlock and pull out bulb and socket Insert new bulb and rotate socket a quarter turn clockwise to secure Similarly re...

Page 60: ...he sun top must be removed and the seat bottom secured When transporting vehicle below highway speeds check for tightness of hardware and cracks in sun top at mounting points Always remove windshield when transporting Always check that the vehicle and contents are adequately secured before transporting The rated capacity of the trailer or truck must exceed the weight of the vehicle see GENERAL SPE...

Page 61: ...le owner and service technician to carefully follow the procedures recommended in this manual Preventative maintenance applied at recommended intervals is the best guarantee for keeping the vehicle both dependable and economical This vehicle will give years of satisfactory service providing it receives regular maintenance Refer to the Periodic Service Schedule for appropriate service intervals ROU...

Page 62: ... may or may not lock Observe the vehicle stopping location or measure the vehicle stopping distance from the point at which the brakes were latched The vehicle should stop within the normal range of stopping distances If the vehicle stops more than 4 ft 1 2 m beyond the acceptable stopping distance or pulls to one side the vehicle has failed the test and should be tested again If the vehicle fails...

Page 63: ...or specific torque val ues Lubrication Points View from Underside of Vehicle Rack Ball Joint ALL TORQUE FIGURES ARE IN FT LBS Nm BOLT SIZE Grade 2 1 4 5 16 3 8 7 16 1 2 9 16 5 8 3 4 7 8 1 Unless otherwise noted in text tighten all hardware in accordance with this chart This chart specifies lubricated torque figures Fasteners that are plated or lubricated when installed are considered wet and requi...

Page 64: ... head with 8 8 or 10 9 Unmarked hardware is Grade 2 SYSTEM TEST At monthly intervals test the controller by allowing the vehicle to roll down an incline with the accelerator pedal released Braking force should be felt at approximately 2 mph 3 kph indicating that the system is functioning If vehicle speed continues to rise apply the service brake and have vehicle inspected by a trained mechanic CAP...

Page 65: ...onnections keep receptacles free of dirt and foreign matter ACCELERATOR Check for smooth movement SERVICE BRAKE MECHANICAL BRAKES Conduct brake performance test PARK BRAKE Check brake performance and adjust if required DIRECTION SELECTOR Check attachment tighten if required STEERING ASSEMBLY Check for abnormal play tightness of all hardware TIE ROD LINKAGES Check for excessive play bent components...

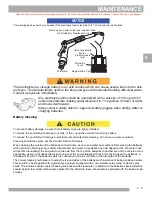
Page 66: ...he body and eyes with extended flushing with clear water Contact a physician immediately Always wear a safety shield or approved safety goggles when adding water or charging batteries Any electrolyte spills should be neutralized with a solution of 1 4 cup 60 ml sodium bicarbonate baking soda dissolved in 1 1 2 gallons 6 liters of water and flushed with water Overfilling batteries may result in ele...

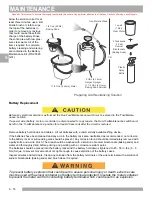
Page 67: ...t can reduce the life of the battery BATTERY MAINTENANCE Tool List Qty Tool List Qty Insulated Wrench 9 16 1 Battery Carrier 1 Hydrometer 1 Battery Maintenance Kit P N 25587 G01 1 At Each Charging Cycle To reduce the possibility of fire never attach a battery charger to a vehicle that is to be unattend ed beyond the normal charging cycle Overcharging could cause damage to the vehicle batteries and...

Page 68: ...ry Over the life of the battery a considerable amount of water is consumed It is important that the water used be pure and free of contaminants that could reduce the life of the battery by reducing the chemical reaction The water must be distilled or purified by an efficient filtration system Water that is not distilled should be analyzed and if required filtration installed to permit the water to...

Page 69: ... place per the Periodic Service Schedule When cleaning the outside of the batteries and terminals do not use a water hose without first spraying the batteries with a solution of baking soda sodium bicarbonate and water to neutralize any acid deposits Use of a water hose without first neutralizing the acid will move the acid from the top of the batteries to another area of the vehicle or stor age f...

Page 70: ... recommended no corrosion to the battery racks or surrounding area should be present Any corrosion found should be immediately removed with a putty knife and a wire brush The area should be washed with a solution of sodium bicarbonate baking soda and water and thoroughly dried before priming and painting with a corrosion resistant paint The batteries should be placed into the battery racks and the...

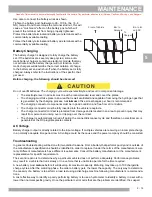
Page 71: ...o the vehicle receptacle The charger connector cord set is protected from damage and is located in an area to prevent injury that may result from personnel running over or tripping over the cord set The charger is automatically turned off during the connect disconnect cycle and therefore no electrical arc is generated at the DC plug receptacle contacts AC Voltage Battery charger output is directly...

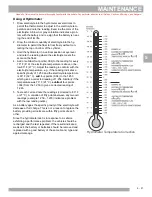
Page 72: ...avity is the measurement of a liquid that is compared to a baseline The baseline is water which is assigned a base number of 1 000 The concentration of sulfuric acid to water in a new golf car battery is 1 280 which means that the electrolyte weighs 1 280 times the weight of the same volume of water A fully charged battery will test at 1 275 1 280 while a discharged battery will read in the 1 140 ...

Page 73: ... low 80 F 27 C Adjust the reading to conform with the electrolyte temperature e g if the reading indicates a specific gravity of 1 250 and the electrolyte temperature is 90 F 32 C add four points 004 to the 1 250 which gives a corrected reading of 1 254 Similarly if the temperature was 70 F 21 C subtract four points 004 from the 1 250 to give a corrected reading of 1 246 5 Test each cell and note ...

Page 74: ...ible and will cause permanent damage to the battery In order to prevent damage the battery should be recharged A hydrometer P N 50900 G1 can be used to determine the specific gravity and therefore the state of charge of a battery In winter conditions the battery must be fully charged to pre vent the possibility of freezing A fully charged battery will not freeze in temperatures above 75 F 60 C Alt...

Page 75: ...5 23 Notes Read all of this manual to become thoroughly familiar with this vehicle Pay particular attention to all Notices Cautions Warnings and Dangers MAINTENANCE 5 ...

Page 76: ...5 24 MAINTENANCE Read all of this manual to become thoroughly familiar with this vehicle Pay particular attention to all Notices Cautions Warnings and Dangers Notes 5 ...

Page 77: ......

Page 78: ... of Textron Inc Technical Communications Department E Z GO Division of Textron Inc 1451 Marvin Griffin Road Augusta Georgia 30906 3852 USA Service Parts Manuals as well as Repair and Service Manuals are available from a local Distributor an authorized Branch Genuine E Z GO Parts Accessories Department or at www shopezgo com ...

Reviews: