OPERATING PROCEDURES
Read all of this manual to become thoroughly familiar with this vehicle. Pay particular attention to all Notices, Cautions, Warnings, and Dangers.
4 - 10
4
DUMP BED
Be careful when loading the vehicle. Secure loads to prevent shifting. Do not overload vehicle. A dump bed warning
label is affixed to the inside of the bed on the front panel.
This label must be understood and observed at all times for safe operation of the vehicle. The dump bed is limited to
a maximum load of 500 lbs (228 kg). The load must be positioned in the bed as far forward as possible, its center of
gravity must not be higher than 5" (12 cm) above the bed floor, and securely fastened down. Failure to follow these
instructions could cause personal injury, damage to the vehicle and/or cause the vehicle to tip over. Operate the
vehicle with awareness of the load.
Do not drive the vehicle with the dump bed raised or with the tailgate unsupported.
When using the optional electric dump, be sure to avoid backing up to the edge of a drop off, such as a loading dock
or ravine. A misjudgment of distance or an unstable surface could result in the vehicle falling backwards.
Always insure that no one is behind or close to the dump bed while the electric dump mechanism is being operated.
Passengers should never be allowed to ride in the dump bed. Severe injury or death could result if they should fall
out or the vehicle is involved in an accident or sudden maneuver.
OPTIONAL WINCH
This vehicle may be equipped with an optional winch. Read, understand and follow all of the following information on
the operation and use of the winch before attempting to operate it.
Operation of the Winch
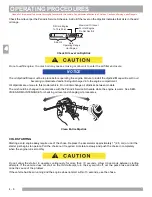
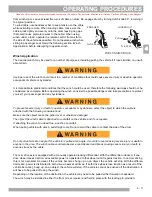
The winch can be mounted at the front or rear of the vehicle
and moved to accommodate different situations. At the front, it
is mounted under the center of the front cowl to a bracket
attached to the front axle as shown. At the rear, the winch is
mounted upside down in the hitch receiver.
If mounting winch at rear of vehicle, the winch must be
mounted upside down.
Before moving the winch, unplug the winch connector from the
wire harness. To move the winch from one end of the vehicle to
the other, remove the spring pin, pull out the clevis pin and
remove the winch mount tube from the receiver. Move to opposite end of vehicle and install by inserting clevis pin
and securing with spring pin. Plug the winch connector into wire harness.
The winch remote control plugs into the receptacle on the driver
side of the seat support.
To unwind the cable, locate the clutch knob on the winch. Pull out
knob and rotate 90° to lock out. Using handsaver bar, pull cable
Front Axle
Clevis Pin
Spring Pin
Winch shown mounted at front of vehicle
Ref Wmt 1
NOTICE
Receptacle
Remote Contro

