background image

Page K-6

ELECTRICAL COMPONENTS & WIRING

Repair and Service Manual

Read all of Section B and this section before attempting any procedure. Pay particular attention to all Notes, Cautions and Warnings.

B

21. Replace the controller splash shield and secure it to 

the body with two Torx head screws.

22. Connect the negative battery wires using an insulated 

wrench.

23. Connect the positive battery wires using an insulated 

wrench.

24. Be sure that all wires are connected properly before 

installing the body components that were removed to 
allow access to the wiring harness.

REPLACING ELECTRICAL COMPO-

NENTS

Run / Tow Switch 

(Ref Fig. 17 on page K-6)

Tool List

Qty.

Notched Pry Bar .......................................................... 1
Torx Bit 27 IP ............................................................... 1
Wire Cutters................................................................. 1
Wire Stripper................................................................ 1
Wire Terminal Crimping Tool........................................ 1
Insulated Wrench, 9/16" .............................................. 1

Using an insulated wrench, disconnect the bat-

tery cable at the negative (-), BL-, battery ter-

minal. 

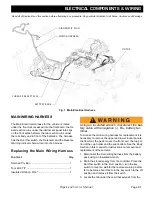
To access the splash shield where the run/tow switch is 
mounted, raise and remove the seat bottom. The splash 
shield is mounted over the controller on the passenger 
side of the vehicle.
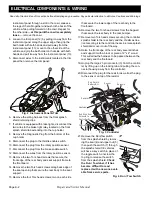
1. Disconnect the battery cable at the negative (-) battery 

terminal using an insulated wrench.

2. Remove two Torx head screws and the christmas tree 

rivet securing the controller splash shield to the rear 
body, raise splash shield and turn over to expose the 
switch and wires.

3. Remove the seal and upper nut to allow the switch to 

be removed from the splash shield. 

Check the Run / 

Tow label, if it has become difficult to read replace 
it with a new one available from service parts.

4. Cut the wires from the existing run/tow switch close to 

the switch.

5. Strip insulation from the end of each wire, using a butt 

splice connector and heat shrink tubing connect the 
wires from the new run/tow switch to the wire harness.

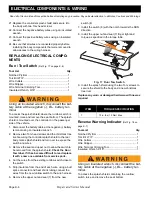
6. Remove the upper nut and seal (7) from the new 

switch (8).

7. Install the switch (8) with the notch towards the RUN 

direction.

8. Install the upper nut and seal (7) finger tight and 

torque as specified in the torque table.

Fig. 17  Run / Tow Switch

9. Install the splash shield using the two Torx screws to 

secure the shield to the body and a new christmas 
tree rivet

Replace any worn or damaged hardware with new as 
required

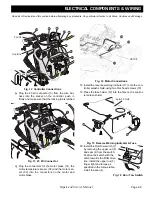
Reverse Warning Indicator 

(Ref Fig. 18 on 

page K-7)

Tool List

Qty.

Notched Pry Bar ..........................................................1
Torx Bit 27 IP ...............................................................1
Wire Cutters.................................................................1
Wire Stripper ................................................................1
Wire Terminal Crimping Tool........................................1
Insulated Wrench, 9/16"...............................................1

Using an insulated wrench, disconnect the bat-

tery cable at the negative (-), BL-, battery ter-

minal. 

To access the splash shield containing the run/tow 
switch raise and remove the seat bottom.

ITEM 

TORQUE SPECIFICATION

7

13 in. lbs (1.5 Nm) Max.

Summary of Contents for RXV FREEDOM

Page 1: ...RXV ELECTRIC SERVICE REPAIR ISSUED JANUARY 2008 REVISED APRIL 2009 605975 ...

Page 2: ...ust be towed with the Run Tow switch located under the passenger seat in the Tow position If the vehicle is to be used in a commercial environment signs similar to the ones illustrated should be used to warn of situations that could result in an unsafe condition Be sure that this manual remains as part of the permanent service record should the vehicle be resold NOTES CAUTIONS AND WARNINGS WASH HA...

Page 3: ...ontained in this manual is subject to change without notice E Z GO Division of TEXTRON Inc is not liable for errors in this manual or for incidental or consequential damages that result from the use of the material in this manual TO CONTACT US NORTH AMERICA TECHNICAL ASSISTANCE WARRANTY PHONE 1 800 774 3946 FAX 1 800 448 8124 SERVICE PARTS PHONE 1 888 GET EZGO 1 888 438 3946 FAX 1 800 752 6175 INT...

Page 4: ...e and the age and condition of the batteries A fully charged battery will not freeze in winter temperatures unless the temperature falls below 75 F 60 C For winter storage the batteries must be clean fully charged and disconnected from any source of electrical drain The battery charger and the controller are both sources of electrical drain Unplug the battery charger DC plug from the vehicle recep...

Page 5: ...N GENERAL INFORMATION ROUTINE MAINTENANCE A SAFETY B BODY C WHEELS AND TIRES D ELECTRONIC SPEED CONTROL AC MOTOR E FRONT SUSPENSION F MOTOR MOTOR BRAKE G BATTERIES CHARGING H BATTERY CHARGER I BRAKES J ELECTRICAL COMPONENTS WIRING K REAR SUSPENSION L REAR AXLE M WEATHER PROTECTION N TROUBLESHOOTING O LIGHTNING PROTECTION GROUNDING P SPECIFICATIONS Q ...

Page 6: ...Page iv Repair and Service Manual TABLE OF CONTENTS Notes ...

Page 7: ...manual or for incidental or consequential damages that result from the use of the material in this manual This vehicle conforms to the current applicable standard for safety and performance requirements These vehicles are designed and manufactured for off road use They do not conform to Federal Motor Vehicle Safety Standards and are not equipped for operation on public streets Some communities may...

Page 8: ...f each battery terminal and be sure to rewire the batteries correctly Always use specified replacement parts Never use replacement parts of lesser quality Always use recommended tools Always determine that tools and procedures not specifically recommended by the manufacturer will not compromise the safety of personnel nor jeopardize the safe operation of the vehicle Always support the vehicle usin...

Page 9: ...ling of buildings necessitating proper ventilation Five air exchanges per hour is considered the minimum requirement Never charge a vehicle in an area that is subject to flame or spark Pay particular attention to natural gas or propane gas water heaters and furnaces Always use a dedicated circuit for each battery charger Do not permit other appliances to be plugged into the recepta cle when the ch...

Page 10: ...Page viii Repair and Service Manual Notes SAFETY INFORMATION Read all of Section B and this section before attempting any procedure Pay particular attention to all Notes Cautions and Warnings ...

Page 11: ...ING AND CARE A 3 SUN TOP AND WINDSHIELD A 3 HAULING A 3 HARDWARE A 4 CAPACITIES AND REPLACEMENT PARTS A 4 PERIODIC SERVICE SCHEDULE A 5 LIST OF ILLUSTRATIONS Fig 1 Serial Number Location on Steering Column A 1 Fig 2 Serial Number on Front Frame A 1 Fig 3 Serial Number on Rear Frame A 1 Fig 4 Initial Service Chart A 1 Fig 5 Capacities A 4 Fig 6 Replacement Parts A 4 Fig 7 Torque Specifications and ...

Page 12: ...A ii Repair and Service Manual Notes GENERAL INFORMATION ROUTINE MAINTENANCE Read all of Section B and this section before attempting any procedure Pay particular attention to all Notes Cautions and Warnings ...

Page 13: ...r an autho rized Branch or the Service Parts Department When ordering parts or requesting information for your vehicle provide the vehicle model serial number and manufac ture date code SERIAL NUMBER LOCATION Three serial number and manufacture date code labels are on the vehicle One is placed on the steering column Ref Fig 1 the second is located on the frame mem ber under the front splash shield...

Page 14: ...ey is turned to the neutral N position Never use ropes or chains to tow vehicle s Tow bars are available from the E Z GO Service Parts Depart ment Tow bars are not intended for highway use Before tow ing place the direction selector in neutral N and make sure that the Run Tow switch in TOW Do not ride on a vehicle being towed Tow bars are designed to tow only one vehicle at a maximum speed of 12 m...

Page 15: ...and a clean cloth Normal cleaning of vinyl seats and plastic or rubber trim requires the use of a mild soap solution applied with a sponge or soft brush and wiped with a damp cloth Removal of oil tar asphalt shoe polish etc requires the use of a commercially available vinyl rubber cleaner The painted surfaces of the vehicle provide attractive appearance and durable protection Frequent washing with...

Page 16: ...e are used in the vehicle Grade 5 hardware can be identified by the three marks on the hexagonal head and grade 8 hardware is identi fied by 6 marks on the head Metric hardware is marked on the head with 8 8 or 10 9 Unmarked hardware is Grade 2 CAPACITIES AND REPLACE MENT PARTS Fig 7 Torque Specifications and Bolt Grades FLUID QUANTITY Rear Axle Lubricant Mobile 424 25 oz 739 ml Fig 5 Capacities I...

Page 17: ...ndition Batteries state of charge condition loose terminals corro sion hold down hardware CL CL CL CL 17 Batteries check electrolyte level fill if required C A C A C A C A 18 Brakes smooth operation of pedal stopping distance Brakes aggressive stop test does brake hold on a hill Accelerator smooth operation Wiring loose connections broken or missing insulation Charger Receptacle clean connections ...

Page 18: ...A 6 Repair and Service Manual Notes GENERAL INFORMATION ROUTINE MAINTENANCE Read all of this manual to become thoroughly familiar with this vehicle Pay particular attention to all Notes Cautions and Warnings ...

Page 19: ...TENANCE B 1 BEFORE SERVICING THE VEHICLE B 1 Additional Warnings B 2 BATTERY REMOVAL AND INSTALLATION B 3 LIFTING THE VEHICLE B 5 LIST OF ILLUSTRATIONS Fig 1 Attach Accessory Wires to Battery Pack B 2 Fig 2 Batteries Charger Receptacle Controller B 3 Fig 3 Battery Removal B 4 Fig 4 Battery Placement Orientation B 4 Fig 5 Battery Hold Down B 5 Fig 6 Battery Connections B 5 Fig 7 Lifting Points B 6 ...

Page 20: ...Page B ii Repair and Service Manual Notes SAFETY Read all of Section B and this section before attempting any procedure Pay particular attention to all Notes Cautions and Warnings ...

Page 21: ...et or body in a location that could expose them to injury should an unforeseen situation occur Always use the appropriate tools listed in the tool list and wear approved safety equipment MODIFICATIONS TO VEHICLE Do not modify the vehicle in any manner that will change the weight distribution of the vehicle Changes to the weight distribution or the cen ter of gravity may make the vehicle unstable o...

Page 22: ...or installing them spilled electrolyte can cause burns and damage The electrolyte in a storage battery is an acid solution which can cause severe burns to the skin and eyes Treat all electrolyte spills to the body and eyes with extended flushing with clear water Contact a physi cian immediately Always wear a safety shield or approved safety goggles when adding water or charging batteries Any elect...

Page 23: ...amount required by the accessory A DC to DC convert er is available through E Z GO Service Parts The Operational Performance Guarantee of 2 rounds per day shall be void if non factory accessories that use more than 1 Amp Hour of energy per round are installed on the vehicle Fig 2 Batteries Charger Receptacle Controller BATTERY REMOVAL INSTALLATION Tool List Qty Insulated Wrench 9 16 1 Socket 1 2 D...

Page 24: ...body and lift up and out of the vehicle Fig 3 Battery Removal 8 Check the area surrounding the battery tray for corro sion If any corrosion is found it should be immedi ately removed with a putty knife and a wire brush for metal surfaces or a plastic bristle brush for plastic surfaces The area should be washed with a solution of baking soda and water and dried thoroughly All metal surfaces that ha...

Page 25: ...ed Use extreme care since the vehi cle is extremely unstable during the lifting pro cess When lifting the vehicle position jack stands only in the areas indicated To raise the entire vehicle install the wheel chocks in front and behind each front wheel Center the jack under the bagwell place a piece of wood approxi mately 2 x 4 x 12 between the jack and the underside of the bagwell raise the vehic...

Page 26: ...ntion to all Notes Cautions and Warnings BTo raise only the front or rear of the vehicle place the wheel chocks in front and behind the rear wheels The jack may be left under the center front of the frame while the front end of the vehicle is on the jack stands Lower the vehicle by reversing the lifting sequence Fig 7 Lifting Points ...

Page 27: ...Page B 7 Repair and Service Manual Notes Read all of Section A and this section before attempting any procedure Pay particular attention to all Notes Cautions and Warnings SAFETY ...

Page 28: ...Page B 8 Repair and Service Manual Notes SAFETY Read all of Section A and this section before attempting any procedure Pay particular attention to all Notes Cautions and Warnings ...

Page 29: ...epair C 12 LIST OF ILLUSTRATIONS Fig 1 Body C 1 Fig 2 Christmas Tree Rivet Removal C 1 Fig 3 Front Bumper C 2 Fig 4 Rocker Panel Removal C 2 Fig 5 Floor Mat Fastener Removal C 3 Fig 6 Floor Mat C 3 Fig 7 Cowl and Instrument Panel Trim C 3 Fig 8 Instrument Panel and Cup Holder C 4 Fig 9 Front Splash Guard C 4 Fig 10 Rear Body Sweater Basket Rear Bumper Fender Liner C 5 Fig 11 2 2 Rear Facing Seat F...

Page 30: ...Page C ii Repair and Service Manual Notes BODY Read all of Section B and this section before attempting any procedure Pay particular attention to all Notes Cautions and Warnings ...

Page 31: ...ways be removed before any servicing that could gen erate sparks or repairs that require welding or cutting In general body component replacement can be accom plished with a minimum of specialized tools Most body components are held in place with conventional remov able hardware nuts bolts and screws Nylon or plastic ratchet type fasteners commonly called christmas tree rivets are used to secure i...

Page 32: ...re as required It is recommended that all locking nuts be replaced after 5 removals Fig 3 Front Bumper and Cowl Support Rocker Panels Ref Fig 4 Tool List Qty Torx bit T 45IP 1 Ratchet 1 Torque Wrench in lbs 1 1 Remove the lower rocker panel 1 by removing three torx screws 3 2 Remove the upper rocker panel 2 by removing the two remaining torx screw 3 Removal is the same for both sides of the vehicl...

Page 33: ...al of the sun top and windshield are located in the Weather Protection section of this manual Remove the upper and lower rocker panels and the floor mat as described in the previous sections 1 Remove four torx screws 11 securing the trim panel 12 to the instrument panel 13 and cowl 14 2 Locate the tab in the fender well area under the cowl The tab extends from the instrument panel through a slot i...

Page 34: ...o torx screws 18 located near the top of the instrument panel one on each side The instru ment panel can now be removed To prevent the possibility of injury or death the correct safety label must be on the instrument panel cup holder at all times Reassemble in reverse order Replace any worn or damaged hardware as required Front Splash Guard Ref Fig 9 Tool List Qty Notched Pry Bar 1 Remove upper an...

Page 35: ... of the sweater basket to the seat back supports 3 Slide the sweater basket assembly 27 off the seat back supports Installation of the sweater basket is in reverse order of its removal Replace any worn or damaged hard ware with new as required It is recommended that all locking nuts be replaced after 5 removals Seat Back Assembly Tool LIst Qty Torx Bit T 45IP 1 1 Remove four torx screws 26 that se...

Page 36: ...f of the struts 5 Disconnect the wires from the charging receptacle to the battery and unplug the wire to the main wiring har ness If vehicle is equipped with an on board battery charger skip this step 6 Remove two torx screws 33 securing each hinge plate 32 along the front edge of the rear body then remove both hinge plates 7 Remove two inner torx screws 34 from the back edge of seat opening in t...

Page 37: ...Facing Seat Foot Rest 2 2 Rear Facing Seat Foot Rest Tool LIst Qty Torx Bit T 45 IP 1 Socket 15 mm 1 Ratchet 1 Torque Wrench ft lbs 1 Wrench 15 mm 1 1 Remove four hex head bolts 10 that secure the seat bottom to the hip restraints 2 Lift the seat bottom 11 up and remove it from the vehicle Fig 12 Rear Facing Seat Bottom ITEM TORQUE SPECIFICATION 35 6 9 ft lbs 8 12 Nm 37 10 13 ft lbs 14 17 Nm SEAT ...

Page 38: ...e hex head bolt 20 and nut 21 from the lower leg of the driver side hip restraint Fig 14 Rear Facing Seat Hip Restraint 7 Remove the hex nuts 22 from the torx head bolts 23 that secure the driver side hip restraint to the seat back support 8 Hold or support the hip restraint before removing the torx head bolts 23 once these bolts are removed the hip restraint is free from the vehicle Fig 15 Upper ...

Page 39: ...liding it backwards and off of the two remaining bolts Fig 18 Foot Rest Removal 13 Remove four hex head bolts 31 and nuts 32 that secure the seat back support 33 to the frame slide the seat back support up until it clears the rear body Fig 19 Seat Back Support Installation is in the reverse order of removal Replace any worn or damaged hardware with new as required ITEM TORQUE SPECIFICATION 28 8 9 ...

Page 40: ...nt panel with trim the seat back sweater basket and rear body must be removed If the vehicle is equipped with a sun top and windshield or a 2 2 rear facing seat these must also be removed 1 Remove the two Torx screws 44 securing the front seat support frame 45 to the floorboard 48 2 Remove two Torx socket head cap screws 46 and washers 47 that secure the floorboard 48 to the vehicle frame Installa...

Page 41: ...d Pad for Buffer 1 Fine Cut Polish Pad for Buffer 1 Sandpaper 1200 Grit wet or dry 1 Sandpaper 1500 Grit wet or dry 1 Wet Sanding Block 1 Soft Clean Cotton Cloths 1 Clean the area to be repaired with clean clear water 2 Using 1200 grit sandpaper water sand the entire area of the scratch in a circular motion spraying with water as needed until the original scratch is no longer visi ble 3 Wipe the a...

Page 42: ...e body 1 Thoroughly clean the surface to be repaired with alco hol and dry 2 Mask the area to be painted common masking tape is adequate prior to repair and use aerosol type touch up paint 3 Apply spray touch up paint in light even overlapping strokes Multiple coats may be applied to provide ade quate coverage and finish Always remember to shake the can for a minimum of one minute to mix the paint...

Page 43: ...Page C 13 Repair and Service Manual Notes Read all of Section B and this section before attempting any procedure Pay particular attention to all Notes Cautions and Warnings BODY ...

Page 44: ...Page C 14 Repair and Service Manual Notes BODY Read all of Section B and this section before attempting any procedure Pay particular attention to all Notes Cautions and Warnings ...

Page 45: ...ECTION D SECTION TITLE PAGE NO WHEELS AND TIRES Page D i Repair and Service Manual WHEEL AND TIRE SERVICE D 1 Tire Repair D 1 Wheel Installation D 2 LIST OF ILLUSTRATIONS Fig 1 Tire Mounting Cross Sequence for Tightening D 2 ...

Page 46: ...Page D ii Repair and Service Manual Notes WHEELS AND TIRES Read all of Section B and this section before attempting any procedure Pay particular attention to all Notes Cautions and Warnings ...

Page 47: ...ENERAL SPECIFICATIONS section for recommended tire inflation pressure For outdoor appli cations with major use on grassy areas the following should be considered On hard turf it is desirable to have a slightly higher inflation pressure On very soft turf a lower pressure prevents tires from cutting into the turf For vehicles being used on paved or hard surfaces tire inflation pressure should be in ...

Page 48: ...ing lug nuts This will assure even seating of the wheel against the hub With the valve stem to the outside mount the wheel onto the hub Install lug nuts 1 finger tight make sure that the tapered end is against the wheel rim and tighten in a cross sequence pattern then tighten lug nuts to specified torque in 20 ft lbs 30 Nm increments following the same cross sequence pattern Fig 1 Tire Mounting Cr...

Page 49: ...Page D 3 Repair and Service Manual Notes Read all of Section B and this section before attempting any procedure Pay particular attention to all Notes Cautions and Warnings WHEELS AND TIRES ...

Page 50: ...Page D 4 Repair and Service Manual Notes WHEELS AND TIRES Read all of Section B and this section before attempting any procedure Pay particular attention to all Notes Cautions and Warnings ...

Page 51: ...OR Page E i Repair and Service Manual GENERAL E 1 Accelerator Pedal Assembly E 2 Solenoid Replacement E 3 Controller E 4 LIST OF ILLUSTRATIONS Fig 1 Electronic Speed Control E 1 Fig 2 Christmas Tree Rivet Removal E 1 Fig 3 Pedal Cover E 2 Fig 4 Accelerator Pedal E 3 Fig 5 Controller E 4 ...

Page 52: ...ge E ii Repair and Service Manual Notes ELECTRONIC SPEED CONTROL AC MOTOR Read all of Section B and this section before attempting any procedure Pay particular attention to all Notes Cautions and Warnings ...

Page 53: ...ied torques are shown in the table in Section A To prevent possible injury or death from bat tery explosion batteries should always be removed before any servicing that could gen erate sparks or repairs that require welding or cutting The recommended method for removing christmas tree rivets is to slide a notched pry bar under the head of the rivet and press downward on the bar to pull the rivet f...

Page 54: ...lower rocker panels and the floormat refer to page C2 for removal of rocker panels and floormat 1 Remove four christmas tree rivets securing pedal cover to floorboard 2 Remove pedal cover 3 Remove three torx screws 2 securing accelerator pedal assembly 1 to the floorboard Ref Fig 4 4 Disconnect the wires from the rotary position sensor 5 and the throttle enable switch 12 5 Remove the two Torx scre...

Page 55: ...ry terminal using an insulated wrench 2 Remove two Torx head screws 4 and the christmas tree rivet 2 securing the controller splash shield to the rear body raise the splash shield and place it off to one side out of the way 3 Disconnect the red wire from the upper terminal on the solenoid to the positive BL battery terminal and the yellow wire to the main wiring harness by remov ing the upper hex ...

Page 56: ...d hardware as required Fig 5 Controller Controller Ref Fig 5 Tool List Qty Ratchet 1 Extension 3 1 Extension 9 1 Socket 15 mm 1 Socket 10 mm 1 Torx Bit T 27 IP 1 Wrench 10 mm 1 Wrench 15 mm 1 Notched Pry Bar 1 Insulated Wrench 9 16 1 Pin Punch 1 Using an insulated wrench disconnect the bat tery cable at the negative BL battery ter minal ITEM TORQUE SPECIFICATION 7 44 62 in lbs 5 7 Nm Controller Re...

Page 57: ...the connector housing away from the controller 10 Disconnect the three wires 8 from the electric motor to terminals U V and W by removing the three control ler terminal screws 11 11 Disconnect the negative battery wire 3 from the B terminal by removing the terminal screw 11 12 Remove the front two hex head bolts 10 securing the controller assembly to the floorboard and loosen the rear hex head bol...

Page 58: ...ge E 6 Repair and Service Manual Notes ELECTRONIC SPEED CONTROL AC MOTOR Read all of Section B and this section before attempting any procedure Pay particular attention to all Notes Cautions and Warnings ...

Page 59: ...el F 6 Steering Column Assembly and Yoke F 7 Rod End Ball Joint F 7 Steering Box F 8 LIST OF ILLUSTRATIONS Fig 1 Front Suspension and Steering F 1 Fig 2 Tire Wear F 2 Fig 3 Wheel Alignment F 2 Fig 4 Tie Rod Jam Nut F 3 Fig 5 Hub Spindle Strut and A Arm Assemblies F 5 Fig 6 Clipboard Removal F 6 Fig 7 Loosen Steering Wheel F 6 Fig 8 Steering Wheel F 6 Fig 9 Lower Cross Bolt F 7 Fig 10 Steering Colu...

Page 60: ...Page F ii Repair and Service Manual Notes FRONT SUSPENSION AND STEERING Read all of Section B and this section before attempting any procedure Pay particular attention to all Notes Cautions and Warnings ...

Page 61: ...rting any repair procedure NEVER work on a vehicle that is supported by a jack alone MAINTENANCE Routine maintenance of the front suspension and steer ing consists of Periodic inspections for loose worn or damaged components Alignment checks Routine examination of the tires will provide an indica tion if an alignment is required Tire Wear Diagnosis It is important to evaluate wear patterns on tire...

Page 62: ...t lbs 1 Socket 18 mm 1 Ratchet 1 1 Lift the front of the vehicle and support on jack stands as instructed in the SAFETY section 2 Rotate each wheel and scribe a paint line around the circumference of the tire at the center of the tread pat tern 3 Lower vehicle with the tires in the straight ahead posi tion 4 Roll vehicle forward approximately five feet in order to allow the tires to take their nor...

Page 63: ... is recom mended that locking nuts be replaced after a maxi mum of 5 removals Spindle Assembly Ref Fig 5 Tool List Qty Wrench 16 mm 1 Socket 16 mm 1 Socket 18 mm Deep well 1 Ratchet 1 Torque Wrench ft lbs 1 Ball Joint Separator 1 Ball Peen Hammer 1 Remove the front wheel s as described in the Wheels and Tires section of this manual 1 Remove the hub assembly as described in the previ ous section 2 ...

Page 64: ... the spindle arm until it is flush with the end of the tie rod end 2 Using a ball joint separator as a lever apply pressure to the ball joint and tap the spindle arm sharply with the hammer to release the tie rod end from the spindle arm 3 Remove the nut and the tie rod end from the spindle arm 4 Remove hex nut 9 and hex head bolt 8 the spindle and hub assemblies 1 7 can then be removed as a singl...

Page 65: ...escribed in the Wheels and Tires section of this manual 1 Remove the hex head bolt 11 securing the a arm 13 to the strut 2 Remove bushings 14 16 from a arm being careful to retain sleeve 15 3 Inspect the sleeve 15 for wear or pitting replace if sleeve 15 shows signs of wear or pitting 4 Remove two hex head bolts 17 18 securing the a arm to the frame brackets Reassemble in reverse order replace wor...

Page 66: ... Clipboard Removal 3 Loosen the steering wheel retaining nut two or three turns Do not remove nut at this time 4 Apply upward pressure to the steering wheel by plac ing a plastic faced hammer against the steering wheel retaining nut Strike the plastic faced hammer sharply with a ball peen hammer Do not strike the steering wheel retaining nut or the end of the steering shaft directly with the ball ...

Page 67: ...ring section of this manual 2 Remove the lower cross bolt 8 from the yoke Fig 9 Lower Cross Bolt 3 Remove four torx head screws 9 securing steering column assembly to vehicle frame Fig 10 Steering Column Assembly Screws 4 Loosen the upper cross bolt 10 on the yoke and slide the yoke upward on the intermediate shaft to disen gage from the steering box pinion 5 Turn the steering column assembly CCW ...

Page 68: ...ator 1 Ball Peen Hammer 1 Inspect rod end or ball joint by grasping the end and checking for vertical motion If the rod moves up or down this is an indication that the ball joint is worn and requires replacement Raise and support the vehicle as described in the Safety section of this manual Remove the front wheels as described in the Wheels and Tires section of this manual 1 Loosen the nut securin...

Page 69: ...e yoke to the steering box pinion 6 Loosen the upper cross bolt securing the yoke to the intermediate shaft 7 Remove the yoke from the steering box pinion by slid ing it up the intermediate shaft 8 Remove three torx head screws 15 securing the steering box 16 to the vehicle frame 9 Remove steering box from the driver s side of the vehicle Reassemble in reverse order replace worn or dam aged hardwa...

Page 70: ...Page F 10 Repair and Service Manual Notes FRONT SUSPENSION AND STEERING Read all of Section B and this section before attempting any procedure Pay particular attention to all Notes Cautions and Warnings ...

Page 71: ... BRAKE Page G i Repair and Service Manual GENERAL G 1 Motor G 1 Motor Brake G 3 LIST OF ILLUSTRATIONS Fig 1 Motor G 1 Fig 2 Motor Connections G 2 Fig 3 Motor G 2 Fig 4 Motor Bolt Tightening Sequence G 2 Fig 5 Motor to Controller Connections G 2 Fig 6 Motor Brake G 3 ...

Page 72: ...Page G ii Repair and Service Manual Notes MOTOR MOTOR BRAKE Read all of Section B and this section before attempting any procedure Pay particular attention to all Notes Cautions and Warnings ...

Page 73: ...the negative battery BL cable from the battery 4 Drain the stored energy from the controller Place the Run Tow switch in the Run position turn the key switch to reverse wait for the reverse warning indica tor to become silent turn the key switch to the off posi tion and remove the key from the switch 5 Remove the two Torx head screws and the rear access cover from the bagwell area 6 Remove two Tor...

Page 74: ...g 77 Molykote r M 77 paste or Tribology TAS 100 EP 13 Carefully align the motor spline with the input shaft orient the motor with the wires near the top and install the six hex head bolts 2 and split lock washers 3 finger tight Tighten the hex head bolts 2 in a cross pattern to the specified torque Fig 4 Motor Bolt Tightening Sequence 14 Connect the wires from the main harness to the motor brake t...

Page 75: ...energy from the controller Place the Run Tow switch in the Run position turn the key switch to reverse wait for the reverse warning indica tor to become silent turn the key switch to the off posi tion and remove the key from the switch 5 Remove the two Torx head screws and the rear access cover from the bagwell area 6 Disconnect wire harness from motor brake 7 Remove three hex head bolts 32 from t...

Page 76: ...Page G 4 Repair and Service Manual Notes MOTOR MOTOR BRAKE Read all of Section B and this section before attempting any procedure Pay particular attention to all Notes Cautions and Warnings ...

Page 77: ...Y CHARGING H 7 TROUBLESHOOTING H 7 Hydrometer H 7 Using A Hydrometer H 8 LIST OF ILLUSTRATIONS Fig 1 Batteries and Charging Receptacle H 1 Fig 2 Correct Electrolyte Level H 2 Fig 3 Water Purity Table H 3 Fig 4 Automatic Watering Gun H 3 Fig 5 Preparing Acid Neutralizing Solution H 4 Fig 6 Battery Removal H 4 Fig 7 Battery Placement Orientation H 5 Fig 8 Battery Components H 5 Fig 9 Battery connect...

Page 78: ...Page H ii Repair and Service Manual Notes BATTERIES CHARGING Read all of Section B and this section before attempting any procedure Pay particular attention to all Notes Cautions and Warnings ...

Page 79: ...drogen gas is explosive Be sure that the key switch is off and all electrical accessories are turned off before starting work on the vehicle Never disconnect a circuit under load at a battery terminal Batteries are heavy Use prop er lifting techniques when moving them Always lift the battery with a commercially available battery lifting device Use care not to tip batteries when removing or install...

Page 80: ...rical energy The chemical reaction takes place faster in warm conditions and slower in cold conditions Temperature is important when conducting tests on a battery and test results must be corrected to compen sate for temperature differences As a battery ages it still performs adequately except that its capacity is diminished Capacity describes the time that a battery can continue to provide its de...

Page 81: ...distilled should be analyzed and if required filtration installed to permit the water to meet the requirements of the water purity table Fig 3 Water Purity Table Even if the water is colorless odorless tasteless and fit for drinking the water should be analyzed to see that it does not exceed the impurity levels specified in the table Automatic watering devices such as the one included in the Batte...

Page 82: ...y or damage to the battery The following text there are references to removing installing bolts etc Additional hardware nuts washers etc that is removed must always be installed in its original position unless otherwise specified Non specified torques are as shown in the table contained in Section A 1 Turn vehicle key to the off position and remove the key 2 Using an insulated wrench disconnect th...

Page 83: ...ld down and the battery strap guiding the J bolts between the batteries it may be necessary to tip the batteries slightly and into the slots in the battery tray Tighten the hex nuts on the J bolts making sure that the J bolts are securely hooked in the battery tray Tighten the J bolt hex nuts to 62 80 in lbs 7 9 Nm torque 11 Install the two pan head Torx screws through the ends of the battery stra...

Page 84: ...s it should be recharged If a battery is left in a discharged state sulfating takes place on and within the plates This condition is not reversible and will cause permanent damage to the battery In order to prevent damage the battery should be recharged A hydrometer can be used to determine the specific gravity and there fore the state of charge of a battery In winter conditions the battery must b...

Page 85: ...inter nal magnet contained within the charger plug The magnet is part of the interlock system that prevents the vehicle from being driven when the charger plug is inserted in the vehicle charging receptacle TROUBLESHOOTING In general troubleshooting will be done for two distinct reasons First a battery that performs poorly and is out side of the manufacturers specification should be identi fied in...

Page 86: ...g A Hydrometer 16 Draw electrolyte into the hydrometer several times to permit the thermometer to adjust to the electrolyte temperature and note the reading Examine the color of the electrolyte A brown or gray coloration indicates a problem with the battery and is a sign that the bat tery is nearing the end of its life 17 Draw the minimum quantity of electrolyte into the hydrometer to permit the f...

Page 87: ...GING Page H 9 Repair and Service Manual Read all of Section B and this section before attempting any procedure Pay particular attention to all Notes Cautions and Warnings B B Fig 12 Hydrometer Temperature Correction ...

Page 88: ...Page H 10 Repair and Service Manual Notes BATTERIES CHARGING Read all of Section B and this section before attempting any procedure Pay particular attention to all Notes Cautions and Warnings ...

Page 89: ...ge I i Repair and Service Manual CHARGER DESCRIPTION I 1 PORTABLE CHARGER INSTALLATION I 1 UNDERSTANDING THE CHARGER I 2 LED DISPLAY INFORMATION I 2 LED Operation Codes I 2 LED Fault Codes I 2 MAINTENANCE INSTRUCTIONS I 2 LIST OF ILLUSTRATIONS Fig 1 Charger Installation I 1 ...

Page 90: ...Page I ii Repair and Service Manual Notes BATTERY CHARGER Read all of Section B and this section before attempting any procedure Pay particular attention to all Notes Cautions and Warnings ...

Page 91: ... refer all repair work to qualified personnel Not for use by children Portable chargers are shipped with the vehicle Prior to vehicle or charger operation chargers must be removed and mounted on a platform or wall above the ground to permit maximum air flow around and under neath the charger For optimum performance and short est charge times place the charger in an area with adequate ventilation T...

Page 92: ... charged RED FLASH fault code LED Fault Code RED FLASH Light turns on briefly but does not flash after that check for valid AC voltage ONE RED FLASH One flash a pause and then again one flash and a pause Charge Enable Fault poor contact in the DC connector or dirty contacts or Battery Temperature Fault battery temperature is greater than 122 F 50 C or less than 14 F 10 C TWO RED FLASHES Two flashe...

Page 93: ...Page I 3 Repair and Service Manual Notes Read all of Section B and this section before attempting any procedure Pay particular attention to all Notes Cautions and Warnings BATTERY CHARGER ...

Page 94: ...Page I 4 Repair and Service Manual Notes BATTERY CHARGER Read all of Section B and this section before attempting any procedure Pay particular attention to all Notes Cautions and Warnings ...

Page 95: ...AGE NO BRAKES Page J i Repair and Service Manual GENERAL J 1 Brake Pedal Assembly J 1 LIST OF ILLUSTRATIONS Fig 1 Brake Pedal J 1 Fig 2 Christmas Tree Rivet Removal J 1 Fig 3 Pedal Cover J 2 Fig 4 Brake Pedal Return Spring J 2 Fig 5 Brake Pedal J 2 ...

Page 96: ...Page J ii Repair and Service Manual Notes BRAKES Read all of Section B and this section before attempting any procedure Pay particular attention to all Notes Cautions and Warnings ...

Page 97: ...ies should always be removed before any servicing that could gen erate sparks or repairs that require welding or cutting The recommended method for removing christmas tree rivets is to slide a notched pry bar under the head of the rivet and press downward on the bar to pull the rivet from the hole Fig 2 Christmas Tree Rivet Removal The brake pedal assembly is a modular unit that con tains the brak...

Page 98: ...ake pedal return spring 2 by removing the E ring 3 and the clevis pin 1 Fig 4 Brake Pedal Return Spring 6 Remove four socket head hex screws 6 securing the brake pedal assembly to the floorboard Ref Fig 5 7 Disconnect the wires from the rotary position sensor 8 and the brake enable switch 9 8 Remove the two Torx screws 6 from the rotary posi tion sensor 7 and remove sensor 9 Remove the two Torx sc...

Page 99: ...d and secure with four socket head hex screws 6 14 Install the clevis pin 1 through the brake pedal return spring arm 2 and secure with the E clip 3 15 Tighten the return spring retaining nut 12 to the posi tion marked 16 Install the pedal cover 21 using new christmas tree rivets 20 replace the floormat and rocker panels Replace any worn or damaged hardware with new as required ITEM TORQUE SPECIFI...

Page 100: ...Page J 4 Repair and Service Manual Notes BRAKES Read all of Section B and this section before attempting any procedure Pay particular attention to all Notes Cautions and Warnings ...

Page 101: ...f Charger Fuel Gauge Replacement K 15 LIST OF ILLUSTRATIONS Fig 1 Main Electrical Harness K 1 Fig 2 Instrument Panel Trim K 2 Fig 3 Controller K 2 Fig 4 Run Tow Switch K 2 Fig 5 Reverse Warning Indicator K 3 Fig 6 Solenoid Removal K 3 Fig 7 Motor Connections K 3 Fig 8 Harness routing Pedal Connections K 3 Fig 9 Cup Holder K 4 Fig 10 Front Splash Shield K 4 Fig 11 Charger Receptacle K 4 Fig 12 Cont...

Page 102: ...TABLE OF CONTENTS FOR SECTION K CONT SECTION TITLE PAGE NO ELECTRICAL COMPONENTS WIRING Page K ii Repair and Service Manual Fig 28 Trim Panel Hardware K 15 Fig 29 Fuel Gauge State of Charge Meter K 15 ...

Page 103: ... Bit 27 IP 1 Insulated Wrench 9 16 1 Using an insulated wrench disconnect the bat tery cable at the negative BL battery ter minal To access the main wiring harness for replacement it is necessary to remove the upper and lower rocker panels the floormat the pedal cover the front cowl the top por tion of the cup holder and the seat bottom See the Body Section in this manual for instructions on remov...

Page 104: ...orx head screws that secure the front edge of the rear body and seat support frame to the floorboard 14 Remove the two Torx head screws along back edge of the seat opening that secure the rear body to the seat support 15 Remove the four Torx head screws two on each side that secure the lower edge of the rear body to the floorboard 16 Remove the two Torx head screws from the bagwell that secure the...

Page 105: ... securing the sole noid 18 to the controller heat sink 25 Unplug the connectors from the motor brake 23 the motor temperature sensor 24 and the motor sensor 25 Fig 7 Motor Connections 26 Remove main wiring harness from the vehicle 27 Install new main wiring harness making sure that it fol lows the proper path a Starting in the middle of the vehicle route the for ward section of the harness under t...

Page 106: ...tors for the key switch and the optional fuel gauge state of charge meter through the opening 16 in the back of the instrument pane l Fig 10 Front Splash Shield j Connect the wire harness to the key switch k Route the two rear sections of the harness between the rear body and the battery pack mak ing sure that the longer wires 21 are routed to the passenger side l Plug the connector 20 for the cha...

Page 107: ...mperature sensor 32 and the motor sen sor 33 into the connectors on the motor and motor brake Fig 14 Motor Connections 18 Install the reverse warning indicator 11 onto the con troller splash shield using two Torx head screws 10 19 Press the fuse holder 12 into the hole on the control ler splash shield Fig 15 Reverse Warning Indicator Fuse 20 Install the Run Tow switch 7 by removing the upper nut 5...

Page 108: ...ivet securing the controller splash shield to the rear body raise splash shield and turn over to expose the switch and wires 3 Remove the seal and upper nut to allow the switch to be removed from the splash shield Check the Run Tow label if it has become difficult to read replace it with a new one available from service parts 4 Cut the wires from the existing run tow switch close to the switch 5 S...

Page 109: ...ller raise the splash shield and turn it over to expose the reverse warning indicator and wires 3 Remove the two torx head screws 5 securing the reverse warning indicator 4 to the splash shield 4 Cut the wires close to the reverse warning indicator 4 5 Strip insulation from the end of each wire using a butt splice connector and heat shrink tubing connect the wires from the replacement reverse warn...

Page 110: ...ATOR CHARGER RECEPTACLE TOW SWITCH REVERSE BUZZER BRAKE LIGHTS RESISTER SOLENOID COIL KEY SWITCH MOTOR SENSOR RESISTOR CONTROL Bi METAL SWITCH TEMP SENSOR A B A B HIGH BRK COIL CAN LOW 3 2 1 6 5 4 9 8 7 CAN INTERFACE FRONT VIEW OF CONNECTOR BRAKE BLK BLK YEL ORG ORG LT GRN BLK WHT GND BLK RED RED RED BLK BLK ORG ORG PURPLE WHT BLK PNK GRN BLK YEL RED RED RED RED RED BLK BLK YEL ORG ORG LT GRN ORG ...

Page 111: ...PLE RED YELLOW GRAY GRAY GRAY BRAKE LIGHT JUMPER RECEPTACLE WHITE BRAKE RELAY 86 IGNITION SWITCH POWER 48V BRAKE SIGNAL PWM GROUND BROWN GRAY BLACK BLACK BLACK BLACK BLACK RED ORANGE VHORN YELLOW BLACK RED BROWN S14 S2 30 87 85 YELLOW CAP IN LINE FUSE 3 B RED CAP IN LINE FUSE 1 B S11 BLACK CAP IN LINE FUSE 2 RED WHITE BLUE BLUE BLUE BLUE WHITE BLUE WHITE BLUE WHITE BLUE WHITE B A B A NEGATIVE BATT...

Page 112: ...g the Controller Replacing the Accessory Wiring Har ness Tool List Qty Notched Pry Bar 1 Torx Bit 27 IP 1 Ratchet 1 Torque Wrench in lbs 1 Insulated Wrench 9 16 1 Using an insulated wrench disconnect the bat tery cable at the negative battery terminal To access the accessory wiring harness for replace ment it is necessary to remove the upper and lower rocker panels the floormat the front cowl the ...

Page 113: ...es for the headlight switch and the fuel gauge state of charge meter through the open ing in the instrument panel and connect them to the headlight switch and fuel gauge c Route the wires for the horn down through the flap in the front splash shield on the driver s side of the vehicle d Route the wires and connector for the horn between the frame and the under side of the front splash shield and c...

Page 114: ...aking sure that all tabs are locked into position Head Light Bulb Replacement Make sure that the vehicle key switch is in the OFF position and the key has been removed 1 Turn the headlight bulb 3 clockwise and pull to remove 2 Disconnect the accessory harness from the light bulb 3 Connect the accessory harness to the light bulb 4 Align the bulb with the opening in the back of the headlight assembl...

Page 115: ...the cup holder 4 Remove the plastic cover from the steering column 5 Loosen the clamp that keeps the turn signal switch in place on the steering column Continue loosening the clamp until the end is free of the worm screw 6 Remove the turn signal switch assembly including the clamp 7 Inspect the black electrical tape on the steering col umn if worn through remove the old tape and replace it with ne...

Page 116: ...ew light bulb 4 Install the lens and secure in place with the two phil lips head screws Horn Button Replacement Make sure that the vehicle key switch is in the OFF position and the key has been removed To access the horn button switch for replacement the lower and upper rocker panel on the driver side must be removed as well as the top portion of the cup holder ref Section B 1 Remove the horn butt...

Page 117: ... Trim Panel Hardware 2 Pull the top of the trim panel 11 away from the instru ment panel and disconnect the harness 21 from the fuel gauge state of charge meter 20 3 Depress the tabs on the fuel gage state of charge meter 20 and push the unit out of the trim panel 11 Fig 29 Fuel Gage State of Charge Meter 4 Insert the new fuel gage state of charge meter 20 into the opening in the instrument panel ...

Page 118: ...Page K 16 Repair and Service Manual Notes ELECTRICAL COMPONENTS WIRING Read all of Section B and this section before attempting any procedure Pay particular attention to all Notes Cautions and Warnings ...

Page 119: ...ON L SECTION TITLE PAGE NO REAR SUSPENSION Page L i Repair and Service Manual GENERAL L 1 SHOCK ABSORBER L 1 REAR LEAF SPRING L 2 LIST OF ILLUSTRATIONS Fig 1 Rear Suspension L 1 Fig 2 Shock Absorber L 2 Fig 3 Rear Leaf Spring L 3 ...

Page 120: ...Page L ii Repair and Service Manual Notes REAR SUSPENSION Read all of Section B and this section before attempting any procedure Pay particular attention to all Notes Cautions and Warnings ...

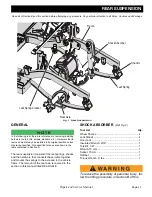
Page 121: ...e shown in the table contained in Section A The rear suspension consists of the leaf springs shocks and the hardware that connects these items together and mounts the springs to the axle and to the vehicle frame The removal of the rear axle is covered in the section in this manual titled REAR AXLE SHOCK ABSORBER Ref Fig 2 Tool List Qty Wheel Chocks 4 Jack Stands 4 Floor Jack 1 Insulated Wrench 9 1...

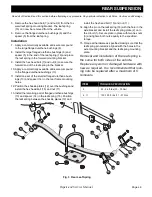
Page 122: ...he shock 3 is oriented as shown 7 Install the hex head bolt 5 and washer 4 through the lower end of the shock 3 into the mounting bracket on the axle Removal and installation of the shock is the same for both sides of the vehicle Replace any worn or damaged hardware with new as required REAR LEAF SPRING Ref Fig 3 Tool List Qty Wheel Chocks 4 Jack Stands 4 Floor Jack 1 Wrench 15 mm 1 Insulated Wren...

Page 123: ...ings 13 and spacer 14 in the rear frame mounting holes 12 Position the shackle plates 12 over the bushings and install the hex head bolt 15 and nut 11 13 Install the remaining pair of flanged urethane bushings 13 and spacer 14 in the leaf spring 16 Position the leaf spring between the shackle plates 12 and install the hex head bolt 15 and nut 11 14 Align the pin on the leaf spring 16 with the hole...

Page 124: ...Page L 4 Repair and Service Manual Notes REAR SUSPENSION Read all of Section B and this section before attempting any procedure Pay particular attention to all Notes Cautions and Warnings ...

Page 125: ... the Lubricant M 1 Fill Procedure For Axles Fitted With Fill Plugs M 2 REAR AXLE DISASSEMBLY M 2 Rear Hub M 2 Axle Shaft Bearing and Seal Removal and Disassembly M 3 LIST OF ILLUSTRATIONS Fig 1 Rear Axle M 1 Fig 2 Hub M 2 Fig 3 Outer Snap Ring M 3 Fig 4 Remove Axle Shaft M 3 Fig 5 Press Bearing from Shaft M 3 Fig 6 Oil Seal Removal M 3 Fig 7 Seal Installation M 4 ...

Page 126: ...Page M ii Repair and Service Manual Notes REAR SUSPENSION Read all of Section B and this section before attempting any procedure Pay particular attention to all Notes Cautions and Warnings ...

Page 127: ...tion B of this manual 1 Remove the driver side rear wheel as noted in section D of this manual 2 Remove the cotter pin from the castle nut 3 With the socket and torque wrench apply pressure in a clockwise motion If the axle hub moves at 60 ft lbs or less replace the differential The normal range is 80 120 ft lbs of torque If the torque required to move the axle shaft is less than 80 ft lbs but gre...

Page 128: ...section 11 Thread flexible tubing into the axle tube past the seal and into the gear area 12 Connect the flexible tubing to the fluid pump 13 Fill with 25 oz of Mobile 424 lubricant slowly 14 Install the axle as shown in the next section 15 Install the rear hub as shown in the next section 16 Install the rear wheel as shown in the Tire and Wheel section of this manual Fill Procedure For Axles Fitt...

Page 129: ... 2 onto the axle 7 Tighten castle nut 2 to specified torque If cotter pin 1 can not pass through the hole in the axle shaft con tinue to tighten the nut until the hole in the shaft aligns with an opening in the nut to allow the cotter pin will pass through Once the cotter pin 1 is through the nut and shaft split the legs and bend in opposite directions Axle Shaft Bearing and Seal Removal and Disas...

Page 130: ... Seal Removal 6 Install the new oil seal using the seal installer E Z GO P N 18739 G1 to drive the seal into its correct posi tion Fig 8 Seal Installation 7 Install the inner snap ring To prevent damage to the oil seal lightly coat the axle shaft with bearing grease and support the shaft during installation 8 Carefully insert the axle shaft and bearing through the oil seal Rotate the shaft until t...

Page 131: ...Page M 5 Repair and Service Manual Notes Read all of Section B and this section before attempting any procedure Pay particular attention to all Notes Cautions and Warnings REAR AXLE ...

Page 132: ...REAR AXLE Page M 6 Repair and Service Manual Read all of Section B and this section before attempting any procedure Pay particular attention to all Notes Cautions and Warnings B B ...

Page 133: ...LE PAGE NO WEATHER PROTECTION Page N i Repair and Service Manual TOP AND WINDSHIELD N 1 WINDSHIELD N 2 GOLF CAR TOP N 2 2 2 TOP N 4 LIST OF ILLUSTRATIONS Fig 1 Top and Windshield N 1 Fig 2 Windshield N 2 Fig 3 Golf Car Top N 3 Fig 4 2 2 Top N 4 ...

Page 134: ...Page N ii Repair and Service Manual Notes WEATHER PROTECTION Read all of Section B and this section before attempting any procedure Pay particular attention to all Notes Cautions and Warnings ...

Page 135: ...ater and a clean cloth Minor scratches in the windshield may be removed using a commercial plastic polish or Plexus plastic cleaner Trailering Personal injury to occupants of other highway vehicles may occur if vehicle and contents are not adequately secured to the trailer Do not ride on a vehicle being trailered Remove the windshield before trailering Maximum towing speed for a vehicle with a top...

Page 136: ...d remove it before working with the top Removal 1 Remove six flanged hex nuts 1 and the hex bolts 2 securing the top to the struts 2 Lift the top off of the struts and set it aside 3 Remove the access cover 5 by sliding a flat screw driver under the edge of it and prying it away from the instrument panel repeat for the other side 4 Remove the two hex head bolts 6 from each side that secure the fro...

Page 137: ...ger tight only 4 Place the top onto the struts and install six hex head bolts 2 down through the top and struts place the nuts 1 on finger tight 5 Make sure that the grommets 7 on the front strut are in place 6 Tighten all fasteners to the proper torque 7 Replace the access covers 5 in the instrument panel DO NOT over tighten fasteners Exceeding the specified torque value will crush the strut tube...

Page 138: ...1 Ratchet Extension 1 Wrench 15 mm 1 Torque Wrench Inch Pound 1 Flat Screwdriver 1 If vehicle is equipped with a windshield remove it before working with the top Removal 1 Remove four hex nuts 10 and the hex bolts 8 securing the rear of the top 3 to the struts 5 6 2 Remove two hex nuts 10 and hex bolts 13 with spacers 12 securing the top 3 at the front to the strut 4 Fig 4 2 2 Top 6 3 5 4 4 3 5 6 ...

Page 139: ...osition the front strut 4 with the bend angled to the rear of the vehicle slide the strut through the grom mets and into position Looking through the access holes align the holes in the strut with the holes in the frame and insert the hex head bolts 11 Do not tighten hardware 3 Position the rear struts 5 6 so that they are bent to the outside of the vehicle and the top legs point to the rear of th...

Page 140: ...Page N 6 Repair and Service Manual Notes WEATHER PROTECTION Read all of Section B and this section before attempting any procedure Pay particular attention to all Notes Cautions and Warnings ...

Page 141: ... MENUS O 1 Diagnostics Report O 1 Battery and Warranty O 3 Error Messages O 4 Warning Messages O 4 Setting Top Speed and Performance Profiles O 4 Course Energy Consumption O 4 ERROR AND WARNING TABLE O 5 DIGITAL VOLT OHM METER O 12 TROUBLESHOOTING O 12 ACCESSORY HARNESS O 12 POWER SUPPLY O 13 LIST OF ILLUSTRATIONS Fig 1 Hand Held Diagnostic Unit O 1 Fig 2 DVOM O 7 ...

Page 142: ...age O ii Repair and Service Manual Notes TROUBLESHOOTING AND DIAGNOSTICS Read all of Section B and this section before attempting any procedure Pay particular attention to all Notes Cautions and Warnings ...

Page 143: ... or 5 are pressed The length of the bar also changes depending on how many items are in a menu When the bar is positioned at the top arrow the beginning of the menu has been reached if the bar has reached the arrow at the bottom of the screen there are no more menu choices available To access the different diagnostic functions use the five control buttons to scroll through the menus Buttons 1 and ...

Page 144: ...ys the speed in RPMs revolutions per minute that is being requested of the motor by the pedal position 9 MOTOR ACTUAL SPEED displayed as ACTSPEED the next line displays the actual motor speed in RPMs 10 MOTOR CURRENT displayed as AC CURRENT the next line displays the AC current in Amps 11 MOTOR TEMPERATURE displayed as MOTOR TEMP the next line displays the internal motor tem perature in C 12 FORWA...

Page 145: ...f charge the battery pack state of charge shown below is 85 2 TOTAL AMP HOURS displayed as TOTAL AH this is the total Amp Hours used for the life of the car 3 TOTAL MINUTES displayed as TOTAL this is the total running time of the vehicle the next line displays the hours 4 TOTAL ROUNDS displayed as EST TOTAL RNDS the next line displays the number of rounds as calcu lated based on 42 minutes running...

Page 146: ...d setting on the hand held unit COURSE ENERGY CONSUMPTION read only 1 Start and Stop the Record Function display as START STOP or CLEAR 2 Scroll down to START and press the enter key button 3 to begin recording the energy consump tion 3 Drive vehicle around the course as it would be driven during a round of golf 4 To STOP the recording make sure that STOP is highlighted and press the enter key but...

Page 147: ...this controller the con troller is suspect See ACTION 2 1 Replace Motor 2 Replace Controller 12576 DC Bus Timeout 1 DC Bus voltage has not reached 24 volts within 10 sec onds after key switch start 1 Check battery voltage across all 4 batter ies voltage should read 42 VDC minimum if O K proceed to step 2 2 Check voltage across solenoid contacts if more than 3 VDC but less than 24 VDC pro ceed to s...

Page 148: ...ess than 24 VDC pro ceed to step 3 if it does not fall in this range follow ACTION 3 4 Verify power resistor ohm reading is between 0 2 and 0 5 ohms 5 Remove resistor control module connec tion to controller B terminal If error status changes follow ACTION 1 1 Tighten or replace loose or high resistance power wire connections 2 Replace power resistor 3 Replace solenoid 4 Replace resistor control m...

Page 149: ... replace shorted component 2 Replace controller 25104 Direction Error 1 Occurs only when the reverse and forward signals are simultaneously selected normally a short condition in either the key switch or wiring 1 Remove key switch with switch in FWD and check A C and A D either A C or A D when tested should read less than 0 1 ohms NOT BOTH 2 Repeat step 1 with switch in REV if step 1 or 2 fail see...

Page 150: ...ce the controller 25108 Brake Sensor Error Brake position sensor input is out of range there are three conditions which can cause this error 1 Low sensor voltage less than 0 35 volts 2 High sensor voltage greater than 4 8 volts 3 Sensor voltage greater than 0 85 volts when brake switch closes 1 Verify that the 5 volt out put range is 5 0 1 volts 2 Turn key switch to N and check that the accelerato...

Page 151: ...er B terminal If error status changes follow ACTION 1 1 Tighten or replace loose or high resistance power wire connections 2 Replace power resistor 3 Replace solenoid 4 Replace resistor control module 5 If error continues replace the controller Warning BDI Calibration 1 The DC Bus measurement system is not calibrated no diagnostic steps to perform 1 Replace the controller Warning Motor Temp High 1...

Page 152: ...d indicates that max torque current reduction is in affect 1 Refer to trouble shooting steps for the motor and controller temperature warning conditions Warning Cur Meas Cal 1 The controller s AC current measurement system is not calibrated No diagnostic steps 1 Replace controller Warning Speed Sensor 1 Sensor or wire failure 1 Check pedal functions in diagnostic real time 1 Replace pedal sensor W...

Page 153: ...Current in brake circuit is greater than 100 mAmps with brake energized Controller limits drive torque current to zero in this condition 1 Normally occurs with a panic stop Release brake pedal 2 Check brake switch for closed position if open see ACTION 1 3 Check wiring for open brake circuit if open see ACTION 2 1 Replace brake switch 2 Replace wiring 3 Replace controller Warning BDI Low Battery p...

Page 154: ...he connectors and the headlight If power is not present but the other headlight functions a wiring problem is indicated between the two head lights In some cases where battery voltage is expected the easiest way to test the circuit is to set the DVOM to DC volts and place the negative probe of the DVOM to the negative battery terminal Move the positive probe to each wire termination starting at th...

Page 155: ...ith one of the same gauge and color and wired between the correct components and wire tied to the harness bundle The faulty wire should be cut back close to the harness and the ends protected with vinyl electrical tape Check Battery Condition Check for adequate battery volts nominal 12 VDC by setting DVOM to 30 VDC range and place the red probe on the battery post with the green wire attached Plac...

Page 156: ...age O 14 Repair and Service Manual Notes TROUBLESHOOTING AND DIAGNOSTICS Read all of Section B and this section before attempting any procedure Pay particular attention to all Notes Cautions and Warnings ...

Page 157: ...ual GROUNDING REQUIREMENTS P 1 GROUND SYSTEMS P 1 LIGHTINIG PROTECTION REQUIREMENTS P 1 EQUIPMENT FAULT AND PERSONAL SAFETY SYSTEM P 1 GROUND NETWORK REQUIREMENTS P 1 EXTERNAL GROUNDING REQUIREMENTS P 2 MATERIALS P 2 EARTH ELCETRODE SYSTEM P 2 LIGHTNING PROTECTION SYSTEM P 2 EQUIPMENT FAULT AND PERSONAL SAFETY SYSTEM P 3 ...

Page 158: ...e P ii Repair and Service Manual Notes LIGHTNING PROTECTION AND GROUNDING Read all of Section B and this section before attempting any procedure Pay particular attention to all Notes Cautions and Warnings ...

Page 159: ...s cannot be obtained due to high soil resistivity rock formations or other abnormal conditions alternate methods for reducing the resistance to earth must be considered Chemical Treatments No salt coke or other chemicals may be used to treat the soil in order to obtain the required ground resistance readings Approved methods of enhancement are bentonite clay or the GEM product for ground enhanceme...

Page 160: ...elow grade and be at least 24 away from the struc ture All bends in the conductor shall have a minimum radius of 8 and be no less than 90 degrees Ground Mats In areas where electrodes cannot be driven a ground mat consisting of a 6 solid copper or a copper cop per clad steel mesh utilizing a 12 x 12 cross pattern may be used All inter connections in the mesh shall be brazed or silver soldered Grou...

Page 161: ...ll pull boxes junction boxes and power panels In existing facilities where an existing conduit is not large enough to accommodate an additional ground conductor or where a conduit section is insulated from other conduit sections an external ground conductor may be installed to main tain continuity All mounting hardware and connectors shall be UL approved All DC chargers are to be grounded to the g...

Page 162: ...ge P 4 Repair and Service Manual Notes LIGHTNING PROTECTION AND GROUNDING Read all of Section B and this section before attempting any procedure Pay particular attention to all Notes Cautions and Warnings ...

Page 163: ...HICLE SPECIFICATIONS Q 1 RXV ELECTRIC FREEDOM VEHICLE SPECIFICATIONS Q 2 RXV ELECTRIC SHUTTLE 2 2 VEHICLE SPECIFICATIONS Q 3 LIST OF ILLUSTRATIONS Fig 1 Fleet Freedom Vehicle Dimensions Q 4 Fig 2 Shuttle 2 2 Vehicle Dimensions Q 5 Fig 3 Vehicle Incline Specifications and Turning Diameter Q 6 Fig 4 Powerwise QE 48V Charger Q 7 ...

Page 164: ...Page Q ii Repair and Service Manual Notes SPECIFICATIONS Read all of Section B and this section before attempting any procedure Pay particular attention to all Notes Cautions and Warnings ...

Page 165: ...der pencil holder SEATING Foam cushion with vinyl cover and hip restraints hand holds SEATING CAPAPCITY Operator 1 passenger TOTAL LOAD CAPACITY 800 lbs 360 kg including operator passenger accessories cargo SPEED 14 mph 23 kph in forward on flat ground CHASSIS Welded tubular steel powder coated DuraShield BODY Flexible Impact Resistant Injection Molded TPO Thermoplastic Polyolefin with Base Coat C...

Page 166: ...oam cushion with vinyl cover and hip restraints hand holds SEATING CAPAPCITY Operator 1 passenger TOTAL LOAD CAPACITY 800 lbs 360 kg including operator passenger accessories cargo SPEED 19 mph 31 kph in forward on flat ground CHASSIS Welded tubular steel powder coated DuraShield BODY Flexible Impact Resistant Injection Molded TPO Thermoplastic Polyolefin with Base Coat Clear Coat STANDARD COLORS I...

Page 167: ...oam cushion with vinyl cover and hip restraints hand holds SEATING CAPAPCITY Operator 3 passenger TOTAL LOAD CAPACITY 700 lbs 318 kg including operator passenger accessories cargo SPEED 14 mph 23 kph in forward on flat ground CHASSIS Welded tubular steel powder coated DuraShield BODY Flexible Impact Resistant Injection Molded TPO Thermoplastic Polyolefin with Base Coat Clear Coat STANDARD COLORS I...

Page 168: ...ting any procedure Pay particular attention to all Notes Cautions and Warnings B Fig 1 Fleet Freedom Vehicle Dimensions 65 7 167 cm 94 5 240 cm 35 5 90 cm 38 97 cm 45 7 116 cm 68 50 174 cm 47 119 cm 65 7 167 cm 94 5 240 cm 35 5 90 cm 38 97 cm 45 7 116 cm 68 50 174 cm 47 119 cm ...

Page 169: ... Section B and this section before attempting any procedure Pay particular attention to all Notes Cautions and Warnings B B Fig 2 Shuttle 2 2 Vehicle Dimensions 65 7 167 cm 105 5 268 cm 35 5 90 cm 38 97 cm 45 7 116 cm 74 188 cm 47 119 cm ...

Page 170: ...section before attempting any procedure Pay particular attention to all Notes Cautions and Warnings B Fig 3 Vehicle Incline Specifications and Turning Diameter RECOMMENDED MAX RAMP 25 GRADE OR 14 MAX RECOMMENDED MAX SIDE TILT 25 GRADE OR 14 MAX 1 9 2 5 8 m ...

Page 171: ...pting any procedure Pay particular attention to all Notes Cautions and Warnings B B Fig 4 Powerwise QE 48V Charger 3 5 9cm 4 5 11 4cm 10 5 26 7cm 7 25 18 5cm Ø 25 65cm 7 75 19 7cm 5 0 12 7cm 3 19 8 1cm 1 5 3 9cm 5 1 27cm 1 378 3 5cm Ø 50 1 27cm Ø 24 61cm 6 0 15 4cm 4 0 10 15cm ...

Page 172: ...Page Q 8 Notes SPECIFICATIONS Read all of Section B and this section before attempting any procedure Pay particular attention to all Notes Cautions and Warnings ...

Page 173: ...ly fail to perform properly as the result of normal use age wear or abuse It is virtually impossible to anticipate all possible compo nent failures or the manner in which each component may fail Be aware that a vehicle requiring repair indicates that the vehicle is no longer functioning as designed and there fore should be considered potentially hazardous Use extreme care when working on any vehic...

Page 174: ...al may not be reproduced in whole or in part without the express permission of E Z GO Division of Textron Inc Technical Communications Department E Z GO Division of Textron Inc 1451 Marvin Griffin Road Augusta Georgia 30906 3852 USA ...

Reviews: