Page B-4
SAFETY
Repair and Service Manual
Read all of Section A and this section before attempting any procedure. Pay particular attention to all Notes, Cautions and Warnings.
B
The following text, there are references to removing/installing
bolts, etc. Additional hardware (nuts, washers, etc.) that is
removed must always be installed in its original position unless
otherwise specified. Non-specified torques are as shown in the
table contained in Section ’A’.
1. Turn vehicle key to the off position and remove the
key.
2. Using an insulated wrench, disconnect the main nega-
tive (-) battery cable, BL-.
3. Using an insulated wrench, disconnect the main posi-
tive (+) battery cable, BL+.
4. Using an insulated wrench, disconnect and remove all
other wires connected to the batteries.
5. Remove the two pan head Torx screws, (one on each
side) from the battery strap.
6. Remove the battery hold down and the battery strap
by loosening all three hex nuts until they are at the
end of the J-bolt and unhooking the J-bolts from the
battery tray. When removing the J-bolts from between
the batteries it may help to tilt the battery to the out-
side of the car to release the pressure on the J-bolt.
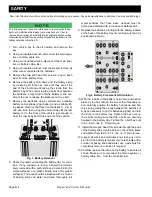
7. Remove the batteries using commercially available
battery carrier straps (2 per battery) and a portable lift-
ing device. Remove the three front batteries (1, 2, & 3)
one at a time; then using the carrier straps tilt the last
battery (4) to the front of the vehicle just enough to
clear the rear body and lift up and out of the vehicle.
Fig. 3 Battery Removal
8. Check the area surrounding the battery tray for corro-
sion. If any corrosion is found, it should be immedi-
ately removed with a putty knife and a wire brush (for
metal surfaces) or a plastic bristle brush (for plastic
surfaces). The area should be washed with a solution
of baking soda and water and dried thoroughly. All
metal surfaces that have been cleaned must be
primed and painted with a corrosion resistant paint.
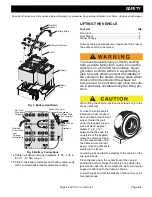
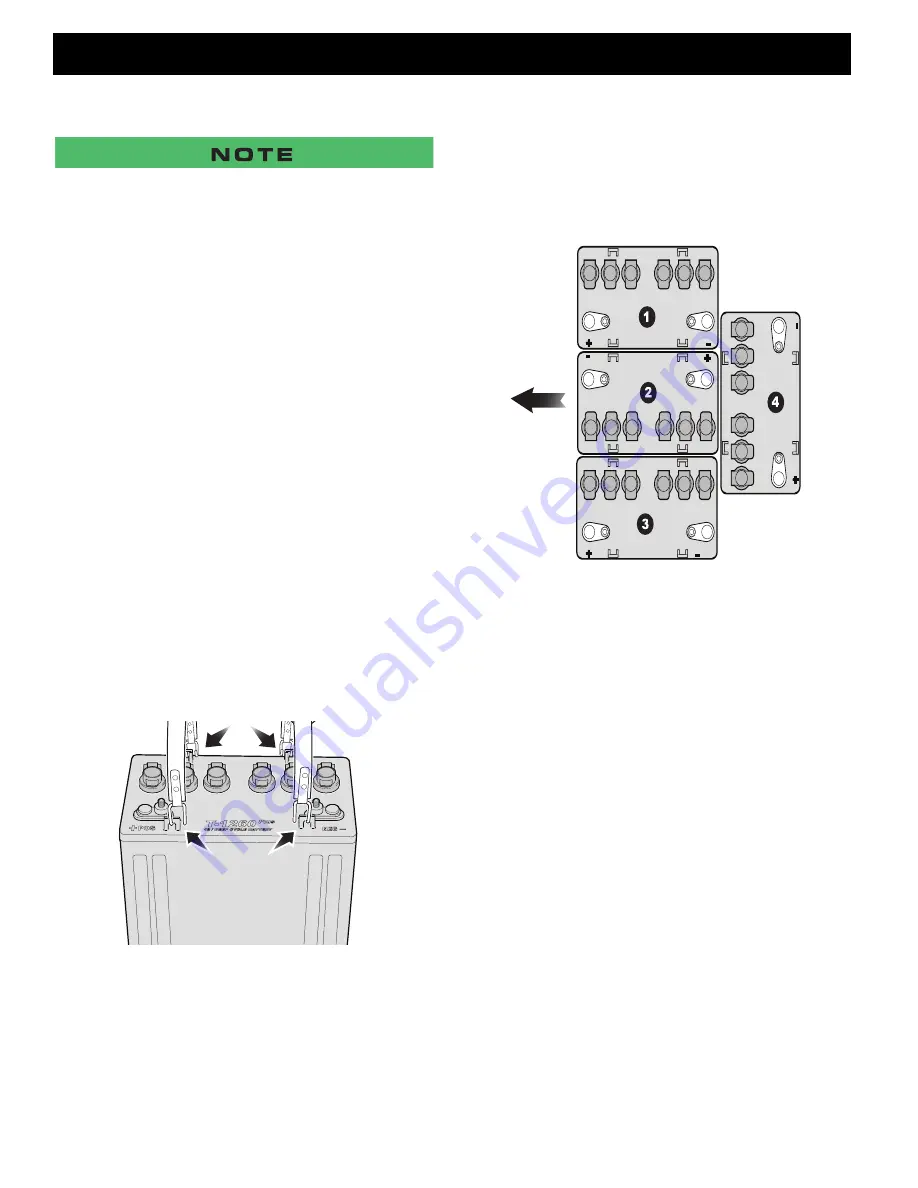
9. Replace the batteries, starting with the battery located
at the back of the battery tray (4), making sure that it is
positioned as shown
.
Fig. 4 Battery Placement & Orientation
10. With the J-bolts in the battery hold down and held in
place by the hex nuts on the end of the threaded por-
tion; carefully position the battery hold down and bat-
tery strap, guiding the J-bolts between the batteries (it
may be necessary to tip the batteries slightly) and into
the slots in the battery tray. Tighten the hex nuts on
the J-bolts making sure that the J-bolts are securely
hooked in the battery tray. Tighten the J-bolt hex nuts
to 62 - 80 in. lbs. (7 - 9 Nm) torque.
11. Install the two pan head Torx screws through the ends
of the battery strap into the holes on the vehicle frame
and tighten them to 80 - 97 in. lbs. (9 - 11 Nm) torque.
12. Inspect all wires and terminals and clean any corro-
sion from the battery terminals or wire terminals with a
solution of baking soda and water, use a wire brush to
completely remove corrosion if required.
13. Carefully replace the wires on the battery terminals as
shown. Make sure to reconnect the main negative (-)
battery cable, BL-, from the controller last.
FRONT

