ELECTRONIC SPEED CONTROL (AC MOTOR)
Page E-3
Repair and Service Manual
Read all of Section B and this section before attempting any procedure. Pay particular attention to all Notes, Cautions and Warnings.
B
B
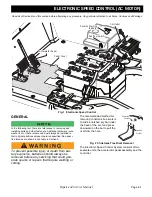
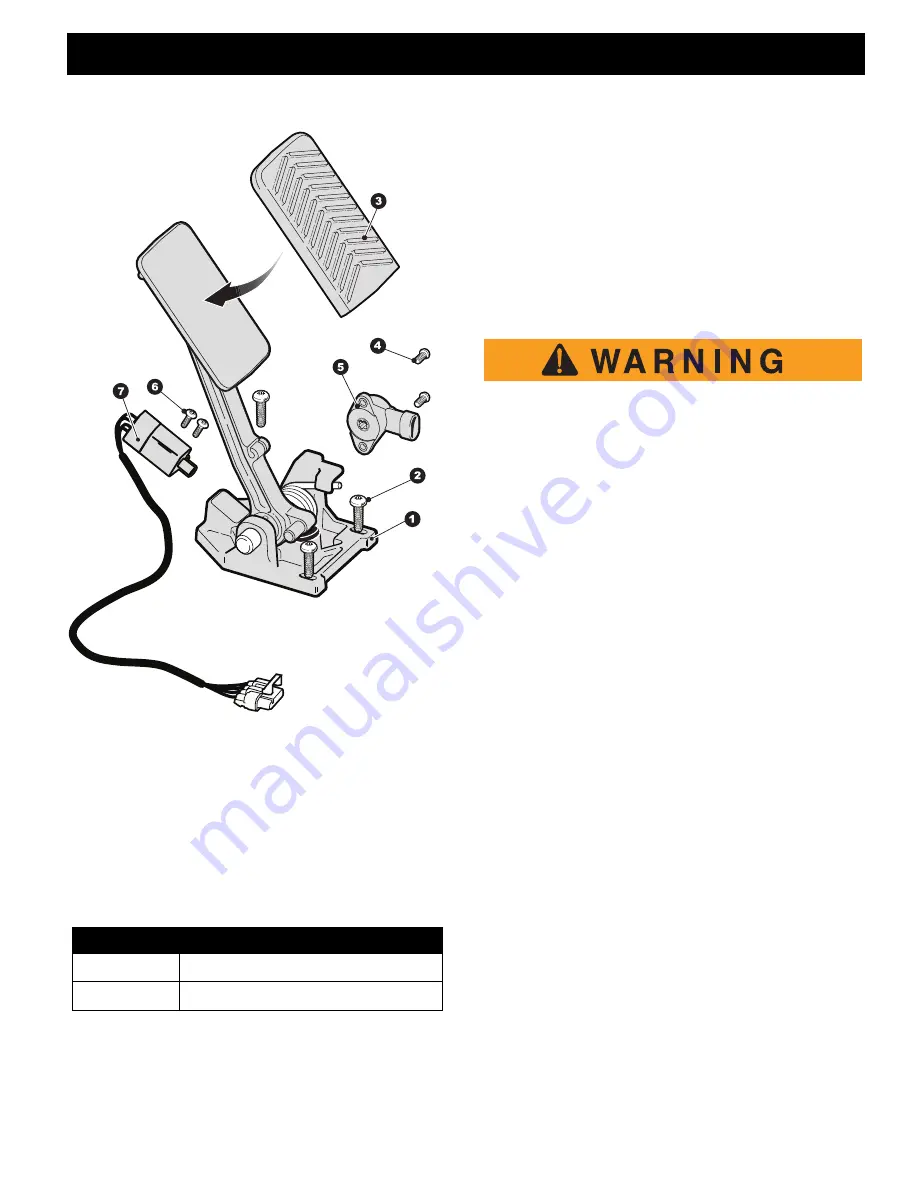
Fig. 4 Accelerator Pedal
9. Reconnect electrical harness to rotary position sensor
(5) and to the throttle enable switch connector (7).
10. Place pedal assembly in position on the floorboard
and secure with three Torx screws (2).
11. Install the pedal cover, using new christmas tree riv-
ets, replace the floormat and rocker panels.
Replace any worn or damaged hardware with new as
required
.
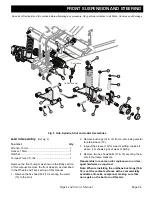
Solenoid Replacement
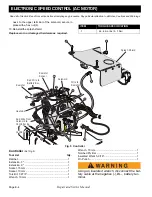
(Ref Fig. 5)
Notched Pry Bar ..........................................................1
Ratchet ........................................................................1
Torque Wrench, in. lbs. ................................................1
Torx Bit, T-27 IP ...........................................................1
Wire Cutters.................................................................1
Wire Stripper ................................................................1
Wire Terminal Crimping Tool........................................1
Insulated Wrench, 9/16"...............................................1
Slim Wrench, 10 mm ...................................................1
Using an insulated wrench, disconnect the bat-
tery cable at the negative (-), BL-, battery ter-
minal.
The Solenoid is located on the passenger side of the
vehicle under the seat and the Controller Splash Shield.
The Solenoid is hard-wired into the main electrical wiring
harness.
1. Disconnect the battery cable at the negative (-), BL-,
battery terminal using an insulated wrench.
2. Remove two Torx head screws (4) and the christmas
tree rivet (2) securing the controller splash shield to
the rear body, raise the splash shield and place it off to
one side out of the way.
3. Disconnect the red wire from the upper terminal on the
solenoid to the positive (+), BL+, battery terminal and
the yellow wire to the main wiring harness by remov-
ing the upper hex nut (6).
4. Disconnect the red wire from the lower terminal on the
solenoid to B+ on the controller by removing the lower
hex nut (6).
5. Remove two hex head bolts (7) securing the solenoid
to the controller heat sink.
6. Cut and strip the insulation from the end of
one
black
wire from the solenoid to the wire harness; using a
butt splice connector and heat shrink tubing splice the
replacement solenoid wire to the wire harness, repeat
for the remaining wire.
7. Secure the new solenoid to the controller heat sink
with the two hex head bolts (7).
Orient the solenoid
with the wires on top as shown.
8. Connect the red wire from the controller B+ to the
lower terminal of the solenoid and the white wire to the
resistor, secure in place using a hex nut (6).
9. Connect the red wire from the positive (+), BL+, bat-
tery terminal and the yellow wire from the wiring har-
ITEM
TORQUE SPECIFICATION
4, 6
12- 15 in. lbs (1.3 - 1.7 Nm)
2
18 - 26 in. lbs (2 - 3 Nm)


