background image


Page 6 


Adjusting the front wheel. 

If the steering of your trolley gets knocked out of alignment, it can usually be 
corrected using the front wheel adjustment nut.  Tracking / poor steering can 
also be affected by the way you load your bag.  This is why an anti-twisting 
“cart bag” often provides a better driving experience.  

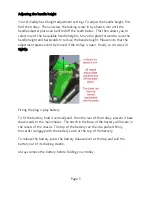
Lift the cam-lock lever 2 to release it.  Rotate the front wheel adjustment nut 
clockwise to make the trolley go more to the right and anticlockwise to get it 
to track more to the left.  When you are happy that it is tracking correctly, 
push back the cam-lock lever 2 to fix it back in position.  The cam-lock needs 
to grip very firmly to prevent subsequent movement. 

Removing the main wheels. 

You might occasionally want to take off the main wheels either for cleaning 
purposes or to squeeze your trolley into a tighter space. 

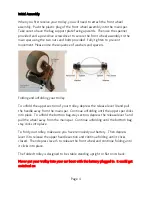
Press button 6 to allow you to release and pull off the wheel.  Replace the 
wheel by sliding the wheel into the clutch, align the wheel so that it starts to 
engage properly and then push until you hear the engagement click 

The upper and lower bag stays 

The upper and lower bag stays are designed to accommodate a wide range of 
golf-bag shapes and sizes.  Ideally, you will be using a “Cart-Bag” with 
symmetrically balanced pockets and an anti-twist base. 

To lock the base of your bag in place, stretch the bungee strap 3 over the 
bottom of the bag.  This strap is not adjustable because most bag bases have 
the same dimensions. 

To hold the top of your bag in place, stretch the upper bungee straps 12 and 
clip in place as shown. 


Summary of Contents for EZi-5 Digital

Page 1: ...EZiCaddy EZi5 User Manual ...

Page 2: ...Wheel Release Lever on Right Hand side of trolley 6 Quick Release Lever for wheel 7 Rear Wheel 8 Motor 9 Battery 10 Unfolding Release Lever and Battery Release Lever Battery Catch 11 Lower Main Spar 12 Upper Bungee Strap 13 Upper Bag Stay 14 Height Adjustment Screw 15 Folding Release Lever 16 Upper Spar 17 Handle Controls and Display 18 USB Port ...

Page 3: ... new trolley and welcome your feedback and comments Your new cart has also been designed for easy minimum maintenance Please read these instructions carefully and your new EZiCaddy trolley should give you many years of faithful service Finding your trolley Serial Number The serial number for your EZi5 trolley can be found on the underside of the main spar The same number is on the box you received...

Page 4: ...ley depress the release lever 10 and pull the handle away from the main spar Continue unfolding until the upper spar clicks into place To unfold the bottom bag stay section depress the release lever 5 and pull the wheel away from the main spar Continue unfolding until the bottom bag stay clicks into place To fold your trolley make sure you have removed your battery Then depress lever 15 to release...

Page 5: ...e note that the adjustment plate cannot be moved if the trolley is open Finally re do screw 14 tightly Fitting the plug n play battery To fit the battery hold it vertically and from the rear of the trolley present it base downwards to the main chassis The notch in the base of the battery will locate in the recess of the chassis The top of the battery can then be pushed firmly forwards to engage wi...

Page 6: ...t Removing the main wheels You might occasionally want to take off the main wheels either for cleaning purposes or to squeeze your trolley into a tighter space Press button 6 to allow you to release and pull off the wheel Replace the wheel by sliding the wheel into the clutch align the wheel so that it starts to engage properly and then push until you hear the engagement click The upper and lower ...

Page 7: ...efore connecting or disconnecting the battery Do not open the charger casing there are no serviceable components inside Always check that the charger casing and cables are in a good condition 1 Connect your battery to your charger when you first receive it and thereafter as soon as possible after use 2 Plug in and switch on at the mains supply The red light will come on 3 After several hours accor...

Page 8: ...void exceeding 18 holes on one charge to maximise battery life If you regularly want to play more than 18 holes please buy another battery Always remember to charge your battery after use even if you have only played a few holes and then leave it on charge until your next game ...

Page 9: ...n on the power Rotate the control knob clockwise to increase the power You will see the Power reading increase and your EZi5 should start moving and speed up Your actual speed is shown top right Rotate the control knob anti clockwise to reduce the power Your EZi5 should slow down accordingly Depress and release the control knob on the handle to turn off the power ...

Page 10: ...ti clockwise You will see the flashing power setting reduce Your trolley will always forget its power setting and revert to zero if you disconnect the battery If the Power reading on your EZi5 is a steady 1 or above it will be trying to move and will be consuming battery power So don t inadvertently drain your battery by leaving it in that condition up against an obstacle Distance Readings There a...

Page 11: ...Page 11 ...

Page 12: ... zero turn off the power to your EZiCaddy by pressing Control knob and then when the display is already showing Approach press and hold the Left Hand button for 3 seconds To measure how far your approach will be zero the Approach reading as you go past the nearest Fairway Distance Marker make a mental note of the marker distance reading Continue walking to your ball and subtract or add the Approac...

Page 13: ...the control knob for at least 3 seconds until the letters ADF light up in the display and then release it Rotate the control knob clockwise to increase the distance in increments of 5 you want the cart to travel by itself Then press the control knob to start off your cart Your EZi5 will then travel for the distance you have chosen and stop When you return to your EZi5 it will still remember the sp...

Page 14: ...iCaddy by pressing the control knob Press and hold down both Left Hand and Right Hand buttons simultaneously for three seconds and the first feature that you can change Time will flash slowly Press the control knob to select Time Rotate the control knob to select the first digit you want Press the control knob to save and move on to the next digit Repeat steps 4 and 5 until you have the correct ti...

Page 15: ...2 Press and hold down both Left Hand and Right Hand buttons simultaneously for three seconds and the Time will flash slowly 3 Press the right hand button and you will see a flashing COMP 4 Press the control knob to select ON or OFF 5 To save and exit press and hold down both Left Hand and Right Hand buttons simultaneously until the flashing stops 6 If Competition mode has been selected it will dis...

Page 16: ...dy without your knowledge It is therefore VERY important that you choose a PIN that you are not going to forget 2 Turn off the power to your EZiCaddy 3 Press and hold down both Left Hand and Right Hand buttons simultaneously for three seconds and the first feature that you can change Time will flash slowly 4 Press the right hand button and the next feature you can change COMP will flash 5 Press th...

Page 17: ... and two for the remaining numbers If you get the PIN wrong the screen will revert to the first digit and you will not be able to use your EZiCaddy until you enter the correct PIN There are no limits to the number of attempts at getting the PIN right To Disable the PIN 1 Turn off the power to your EZiCaddy 2 Press and hold down both Left Hand and Right Hand buttons simultaneously for three seconds...

Page 18: ...d hold down both Left Hand and Right Hand buttons simultaneously for three seconds and the first feature that you can change Time will flash slowly 4 Press the right hand button and the next feature you can change COMP will flash 5 Press the right hand button again and the next feature you can change PIN will flash 6 Press the right hand button again and the final feature you can change Yards Metr...

Page 19: ...nds when on Drive to zero Drive and zero Approach Rotate when moving to increase or decrease the power Hold for 3 seconds to zero elapsed time Hold for 3 seconds when on Approach to zero Approach Doesn t affect Drive Hold for 3 seconds when your EZiCaddy is stationary to invoke ADF Rotate to select your desired distance Change Clock Toggle Competition mode Toggle PIN ON OFF Select IMPERIAL or METR...

Page 20: ...us via Unit 4L Sparrow Way Freephone 0800 849 1345 Lakesview International Business Park International 44 1227 714600 Canterbury Kent CT3 4JH eMail ezi ezicaddy com United Kingdom www ezicaddy com EZi5 Manual v 1 06 A5 booklet ...

Reviews:

Related manuals for EZi-5 Digital