


23
3
การปิดใช้งานโหมดการเพิ่มตัวตรวจจับ
กดหนึ่งครั้งที่ปุ่มการตั้งค่า เพื่อปิดใช้งานโหมดการเพิ่มตัวตรวจจับหลังจากเพิ่มตัวตรวจจับทั้งหมดแล้ว
โหมดการเพิ่มตัวตรวจจับจะถูกปิดใช้งานหากไม่มีการใช้งานเป็นเวลา 3 นาที
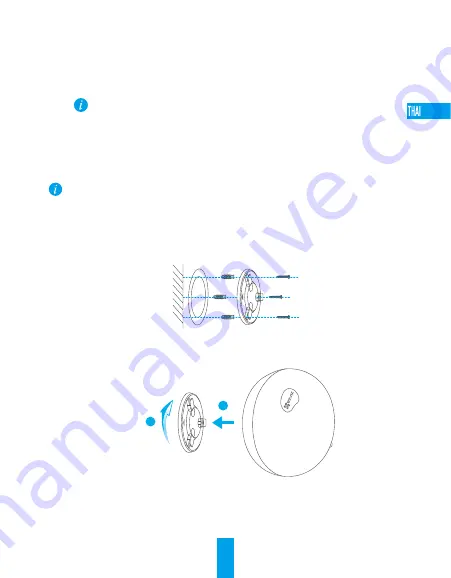
การติดตั้ง (ตัวเลือกเสริม)
สามารถติดตั้งอุปกรณ์บนผนังได้
• ตรวจสอบให้แน่ใจว่าผนังแข็งแรงพอที่จะรับน�้าหนักได้ถึงสามเท่าของน�้าหนักอุปกรณ์
• พื้นผิวส�าหรับการติดตั้งจะต้องสะอาดและเรียบ
1. วางแผ่นแม่แบบเจาะลงบนพื้นผิวที่คุณต้องการติดตั้งอุปกรณ์
2. (ส�าหรับผนังซีเมนต์เท่านั้น)
เจาะรูสกรูตามแผ่นแม่แบบและใส่พุ๊กสามตัว
3. ใช้สกรูโลหะสามตัวเพื่อยึดฐานอุปกรณ์ตามแผ่นแม่แบบ
4. ติดตั้งอุปกรณ์บนฐาน แล้วหมุน 15° เพื่อยึดให้แน่น
1
2
5. ต่อสายไฟเข้ากับอุปกรณ์ หากอุปกรณ์เชื่อมต่อกับเครือข่าย Wi-Fi อยู่แล้วก่อนหน้านี้ อุปกรณ์ก็จะเชื่อมต่อกับเครือข่าย
Wi-Fi เดิมโดยอัตโนมัติ
Summary of Contents for A1S
Page 1: ...www ezvizlife com...
Page 2: ......
Page 11: ...7 SIM LED SIM 1 2 3 3 Wi Fi LED Wi Fi 10 SIM EZVIZ...
Page 12: ...8 1 1 SIM SIM 1 2 3 SIM SIM 10 SIM 2 2 2 LED SIM...
Page 14: ...10 1 LAN 2 QR EZVIZ SIM IPC ACCESS 3 1 1 2 50cm 32...
Page 15: ...11 3 1 3 3 1 2 3 3 3 4 15 1 2 5 Wi Fi Wi Fi...
Page 16: ...12 x1 x1 x1 USB x1 x1 x1 x1 x1 x1 www ezvizlife com...
Page 23: ...19 SIM 3 Wi Fi Wi Fi 10 EZVIZ...
Page 24: ...20 1 1 1 2 3 10 2 2 2 SIM...
Page 26: ...22 1 LAN 2 EZVIZ SIM IPC ACCESS 3 1 2 50 32...
Page 27: ...23 3 3 1 2 3 4 15 1 2 5 Wi Fi Wi Fi...
Page 28: ...24 x1 x1 x1 USB x1 x1 x1 x1 x1 x1 www ezvizlife com th...
Page 35: ...31 SIM LED SIM 3 Wi Fi LED Wi Fi 10 SIM EZVIZ...
Page 36: ...32 1 1 SIM SIM 1 2 3 SIM SIM 10 SIM 2 2 2 LED SIM...
Page 38: ...34 1 LAN 2 QR EZVIZ SIM IPC ACCESS 3 1 2 50 32...
Page 39: ...35 3 3 1 2 3 4 15 1 2 5 Wi Fi Wi Fi...
Page 40: ...36 x1 x1 x1 USB x1 x1 x1 x1 x1 x1 www ezvizlife com...
Page 47: ...UD13020B A...


