English |
7
www.ffgroup-tools.com
CBC 242C PLUS - CBC 252C PLUS
f
The straps must be tensioned correctly, in order
to balance the weight and distribute it across both
shoulders.
f
The cutting equipment must be in parallel with the
ground and can be adjusted by the shoulder straps.
FUELING THE BRUSH CUTTER
The brush cutter is equipped with 2-stroke engine;
therefore, oil mixture of petrol 95 RON and 2-stroke
oil, must always being used. It is very important to pay
attention with the fuel mixture that you use, since
accurate mixture of oil and fuel must be obtained.
Small quantities of oil and fuel mixture with small in
-
accuracies, can affect the ratio of mixture, which may
lead to engine overheat and serious damages in the
engine. Mixture with fuel of higher Octane is only rec
-
ommended to be used, when working continuously at
high revs.
TWO STROKE OIL
Especially formulated 2-stroke oil for air cooled
2-stroke engines must be used. Do not use
2-stroke oil intended for water cooled engines
use. Never use poor quality of oil and 4-stroke
engine oil.
Mixing ratio
For best results and performance, the mixing ratio
is 1:40 (2.5%) with oil class JASO FB or ISO EGB, for
-
mulated for air cooled 2-stroke engines.
2-stroke oil, liter 2,5% (1:33)
Petrol
liter
4
0,10lt (100ml)
8
0,20lt (200ml)
Always use clean container for fuel before mixing
the fuel. Mix and shake the fuel mixture thorough
-
ly, before filling the machine’s fuel tank. Do not
use fuel mixture stored for more than a month.
The fuel tank of the machine must be emptied
before storage.
STARTING THE BRUSH CUTTER
Check the condition of the brush cutter before
use, for damages. If you observe any damage on
the brush cutter guard or on the cutting equip
-
ment, do not use the brush cutter. The brush cut
-
ter must never be used without a guard or with a
damaged guard.
Before starting the brush cutter, follow the below
steps (for cool engine):
f
Place the brush cutter on the ground.
f
Fill the fuel tank with fuel mixture and the oil tank
with chain oil.
f
Place the main switch (Photo. 1.6) to the ON position.
f
Press the air purge (Photo. 1.23) approximately 6
times and check that it is filled with fuel.
f
Pull the Choke lever (Photo. 1.13).
f
Hold the body of the brush cutter with your left hand
on the ground then hold the starter grip with your
right hand and pull the cord slowly, until you feel
some resistance.
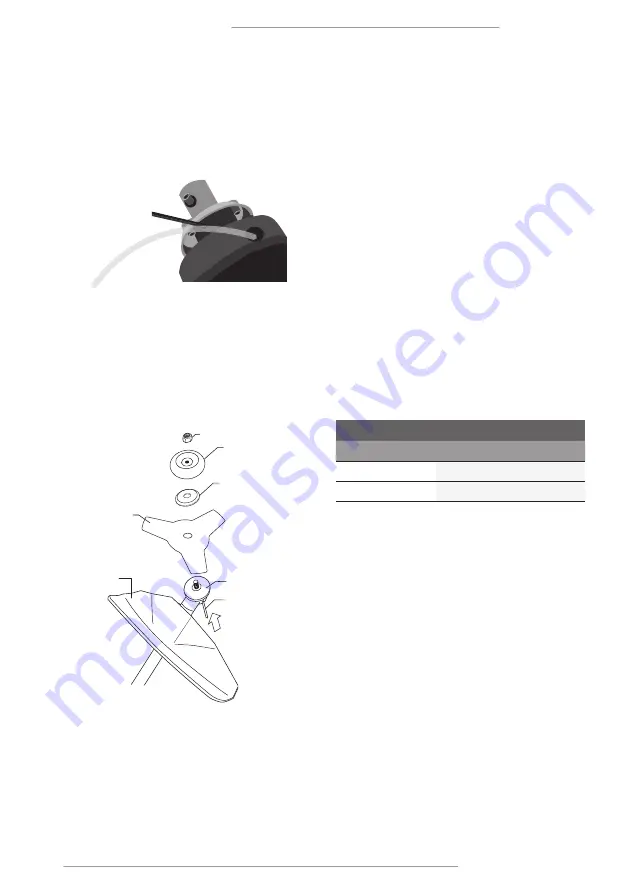
Fitting the trimmer head
f
Make sure that the extension of the trimmer guard is
mounted on the trimmer guard (Fig. 3).
f
Fit the drive disc (Β) on the output shaft.
f
Align the hole of the drive disc with the correspond
-
ing hole of the gear housing.
f
Insert a locking pin (C) in the hole to lock the shaft.
f
Screw the trimmer head anticlockwise.
f
Follow the opposite steps in order to dismantle the
trimmer head.
Fitting the grass blade
f
Remove the extension of the trimmer guard (Fig. 4).
f
Fit the drive disc (B) on the output shaft.
f
Align the hole of the drive shaft with the correspond
-
ing hole in the gear housing.
f
Insert a locking pin (C) in the hole to lock the shaft.
f
Fit the blade (D) and support flange (F) on the output
shaft.
f
Fit the support cup (E).
f
Fit the nut and tighten anticlockwise.
Adjusting and balancing the brush cutter
f
At the front of the harness there is a quick release
easily accessed joint (located at the breast of the
user), which can be used in case of danger that re
-
quires freeing yourself from the machine (Fig. 1).
f
Another quick release joint is located at the hook
which is holding the brush cutter, at the right side of
the harness.
f
The harness must be adjusted in such a way, in order
to ensure the best working position.
Fig. 3
Fig. 4
G
F
D
B
C
A
E


