| English
10
CSC 3.6V EASY
x3 mm 6.0 8.0 10.0
x4 No.
1
2
3
4
x4
S
0
1
2
3
x4 No.
4
6
8 10
x1
Μ
8
x1 1/4" hexagon magnetic bit holder
BASIC CORDLESS SCREWDRIVER
OPERATIONS
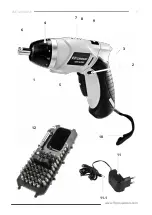
BATTERY CHARGING
i.
Insert the transformer's jack plug
(11.1)
into the charger connection socket
(3)
ii. Plug the charger
(11)
to the power.
Note:
over the course of the full charging
cycle (approximately 5 hours), the battery
charge level indicator lights
(7)
will pro-
gressively illuminate red through to green,
indicating low to full charge accordingly.
Before or during use, press the battery
level test button
(8)
to assess the charge
level of the screwdriver's battery. The bat-
tery charge level LED indicator lights
(7)
illuminate red (battery urgently requires
re-charging), through red/amber(medium
charge), to green (fully charged). Lithium-ion
cells prefer small charges often. Lithium-ion
technology is lightweight and compact due
to increased capacity in comparison to other
battery chemistries.
Lithium-ion cells have no 'memory effect'
and a long cycle life with outstanding dis-
charge performance. Lithium-ion cells suffer
from a loss in capacity or thermal runaway if
over charged and will degrade if allowed to
enter deep discharge, however all of these
situations are negated due to the complex
circuitry incorporated within this product.
Charging must be carried out in an envi-
ronment with an ambient air temperature
between 5°C to 45°C with the transformer
supplied. To prevent overheating, do not
cover the transformer.
Attention:
If the cable is damaged or the
non-self-resetting protective device is ac-
tivated due to short circuit/overload the
transformer shall be scrapped. A replace-
ment of identical specification, design and
application shall be obtained.
FORWARD/REVERSE SELECTOR
To activate the screwdriver, press trigger
(5)
.
To change direction of rotation of the bit
holder, i.e. clockwise or anticlockwise:
i.
Stop the screwdriver and push switch
(2)
. When the direction switch is
pushed to the left, the bit holder will
rotate clockwise. When the switch is
pushed to the right, the bit holder will
rotate anticlockwise. Before opera
-
tion, check that the switch is set in the
required position. Do not change the
direction of rotation until the bit holder
comes to a complete stop.
ii.
When the screwdriver is not in use
move the direction switch to the neu-
tral position (the middle setting) to lock
the trigger out.
INSTALLING BITS
Insert the appropriate bit, suitable for the in-
tended application, into the female hex. bit
holder
(6)
.
Note:
Will accept 6.35mm (1/4")
hex. bits only. To prevent slip or damage to
the screw head, match the screwdriver bit
to the head size and pattern. Screwdriver
bits are a consumable item. Replace a worn
screwdriver bit to avoid damaging the screw
head or slipping out when driving.
ADJUSTING THE HANDLE POSITION
In addition to the general pistol grip func-
tion, the screwdriver also incorporates a
twist grip facility that doubles its use as a
general in line screwdriver, useful for screw-
driving in areas with awkward access. To
change the handle position, press the han-
dle release button
(9)
and twist the handle
through 180° until it clicks into position.
MAINTENANCE
There are no replacement or maintainable
parts to this product.
Summary of Contents for CSC 3.6V EASY
Page 3: ...3 www ffgroup tools com CSC 3 6V EASY 7 8 9 3 5 10 2 1 4 12 11 11 1 6...
Page 25: ...www ffgroup tools com 25 CSC 3 6V EASY f f f FI RCD f f f f f f f f f f...
Page 26: ...26 CSC 3 6V EASY f f f f f f f f SERVICE f f f f f...
Page 30: ...30 CSC 3 6V EASY 5 C 45 C 5 i 2 i 6 6 35mm 1 4...
Page 56: ...56 CSC 3 6V EASY f F f f f f f f f f f f f f...
Page 57: ...www ffgroup tools com 57 CSC 3 6V EASY f f f f f f f f f f p p p f f f...
Page 58: ...58 CSC 3 6V EASY f f f f f f 1 a b 2 a b c C02 d 50 C e f 5 C 45 C g 10 C 30 C h 5 C i II...
Page 61: ...www ffgroup tools com 61 CSC 3 6V EASY 7 5 C 45 C 5 i 2 ii 6 6 35 1 4 9 180...
Page 70: ...70 CSC 3 6V EASY...


