| English
16
HPW 130 EASY
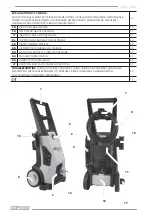
6. Wheel
7. High-pressure hose hook
8.
High-pressure hose
9.
Trigger gun
10. Trigger gun hook
11. Rear case
12. Detergent tank
13.
Lance with adjustable spray nozzle
14. Water inlet
15. Release trigger gun button
16. Rotary lance
17.
Trigger gun protector
ASSEMBLY
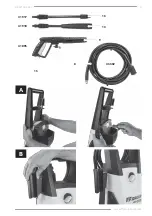
A. Slide the handle into position with two screws.
B. Slide the trigger gun holder into position.
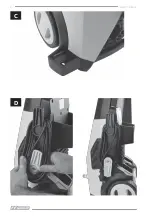
C. Installing the trigger gun protection.
D. Locate to storage the power cable.
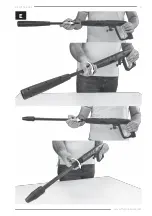
E. Assembling lance.
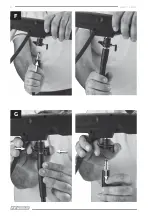
F. Connect the high pressure hose to the trigger gun.
G. Disconnect the pressure hose.
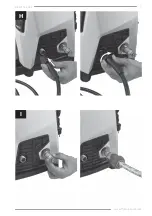
H.
Connect the high-pressure hose to the water
outlet of the machine.
I. Connect the garden hose to the water inlet.
ATTENTION! ALWAYS USE A WATER FILTER.
Connect the water supply.
ATTENTION! Impurities in the water can dam-
age the high-pressure pump and the accessories
USE WITH ALTERNATIVE WATER SOURCES
The power washer is self-priming and enables wa-
ter to be drawn in from containers or natural wa-
ter sources. It is IMPORTANT that the water filter
is in clean condition when inserting it at the water
inlet, and that only clean water is drawn in.
OPEN TANKS/CONTAINERS AND NATURAL WA-
TER SOURCES
Use the Self Priming accessory kit comprising:
Inlet strainer with non return valve
3m reinforced supply hose
Universal coupling to the pressure washer
This enables the pressure washer to draw water up
to 0,5 m above the water level in the source in ap-
proximately 15 seconds.
Fully immerse the 3m hose into the water to dis-
place the air in the hose. Connect the 3m hose to
the power washer and make sure that the inlet
strainer remains under water.
With the spray gun removed, switch the power
washer on and operate it until water flows uniform
-
ly out of the high-pressure hose. If no water is com
-
ing out of the high-pressure hose after 25 seconds,
switch the power washer off and check all connec
-
tions. As soon as water flows out of the high-pres
-
sure hose, switch the power washer off and con
-
nect the gunand lance to begin with the work.
It is important that hose and couplings are of good
quality and are tightly connected, and that the seals
are undamaged and properly inserted. Loose con
-
nections can impede the priming.
OPERATION
ATTENTION! Dry running of more than 2 minutes
leads to damage of the high-pressure pump. If
the appliance does not build up pressure within
2 minutes, switch the appliance off and proceed
in accordance with the instructions in Chapter
“Troubleshooting”.
HIGH PRESSURE OPERATION
CAUTION!
Keep a distance of at least 30 cm when
using the jet for cleaning painted surfaces to
avoid damage.
CAUTION!
Make sure the ON/OFF switch is set
to “OFF/O” and insert the plug into a properly in
-
stalled socket.
ATTENTION!
The washer must be used on a se-
cure and stable surface in a standing, upright po-
sition.
Connect the product to power and water supply as
described.
Open the water supply.
Hold the trigger gun with both hands.
Direct the nozzle away from you towards the sur-
face to be cleaned.
Note: Make sure that the release trigger gun button
(15)
is on the position unlock so the trigger can be
pressed.
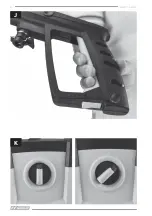
Unlock the trigger and press it until a constant
amount of water flows through the nozzle, to al
-
low air trapped in the hose to escape
(J)
.
Release the trigger.
Turn the switch “ON/OFF” on the position “ON/I”
(K)
.
Hold the trigger gun with both hands. Direct the
water jet to the object to be cleaned and press
the trigger.
Release the lever of the trigger gun; the device will
switch off again and stop the water jet. High pres
-
sure remains in the system.
WARNING!
Beware of kickback when pressing the
trigger!
Note: During longer breaks (more than 5 minutes),
also turn the appliance off using the “ON/OFF” switch.
OPERATION WITH DETERGENT
Only use cleaning agents suitable specifically for
high pressure washers. We recommend that you
use detergent sparingly for the sake of the environ
-
ment. Observe the recommended dilution on the
detergent label.
Detergent can only be added when the device is op-
erated in low pressure mode.
DANGER! When using detergents, the material data
safety sheet issued by the detergent manufactur-
er must be adhered, especially the instructions re-
garding personal protective equipment.
Remove the cap of the clean detergent bottle.
Gently pull the on board detergent tank out of its
storage position.
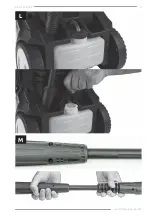
Fill the tank with detergent designed specifically
for use with pressure washers
(L)
.
Assemble the lance with adjustable spray nozzle on
the trigger gun and rotate the nozzle on the posi-
tion for use with detergent
(M)
.
Summary of Contents for HPW 130 EASY
Page 3: ...3 www ffgroup tools com HPW 130 EASY A B 15 16 13 9 8 41 917 41 918 41 895 43 602...
Page 4: ...4 HPW 130 EASY D C...
Page 5: ...5 www ffgroup tools com HPW 130 EASY E...
Page 6: ...6 HPW 130 EASY G F...
Page 7: ...7 www ffgroup tools com HPW 130 EASY H I...
Page 8: ...8 HPW 130 EASY J K...
Page 9: ...9 www ffgroup tools com HPW 130 EASY L M...
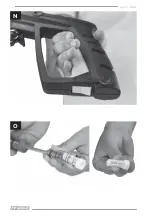
Page 10: ...10 HPW 130 EASY N O...
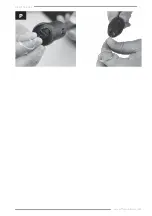
Page 11: ...11 www ffgroup tools com HPW 130 EASY P...
Page 46: ...46 HPW 130 EASY f f 30 cm f f f f f f f f f f f f f f f f f f f f f f f f f f...
Page 48: ...48 HPW 130 EASY B C D E F G H I FF GROUP 3 m 0 5 m 15 3 25 2 2 30 OFF O 15 J ON I K 5 L M...
Page 49: ...49 www ffgroup tools com HPW 130 EASY f f f f f N FF GROUP f f O f f f P...
Page 61: ...61 www ffgroup tools com HPW 130 EASY 5 Service FF GROUP Service FF GROUP Service Center...
Page 70: ...70 HPW 130 EASY 15 min 15 min FF GROUP FF GROUP TSS Total Stop System FF GROUP...
Page 71: ...71 www ffgroup tools com HPW 130 EASY 1 2 13mm 7 m 5 FF GROUP...
Page 75: ......

