12 of 24
Before ligh�ng the appliance
Ligh�ng
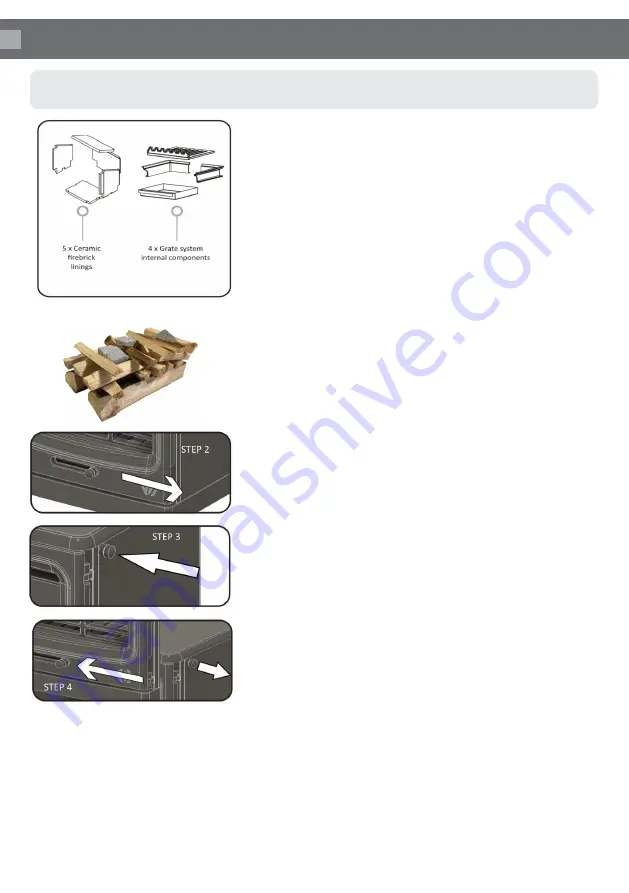
Before ligh�ng the appliance for the first �me, please ensure all firebrick linings
and other internal components are in posi�on and that all packaging has been
removed.
When ligh�ng your appliance for the first �me, it should not be stoked excessively
as the materials must be given �me to adapt to the effects of heat. Your appliance
has been painted with specialist High Temperature paint and oven cured during
the manufacturing process. However upon ini�al ligh�ng of the appliance, further
curing may occur and a slight smell may be evident. We recommend that windows
and doors are le� open during this �me, which will allow the smell to dissipate.
Ligh�ng the appliance with Wood
Quality Firelighters should be used when ligh�ng the stove. (Never use methylated
spirit, petrol or other flammable liquids). Ligh�ng your stove with firelighters will
be more reliable and easier than using paper.
Step 1.
Place two small dry split logs (¼ split) on the fire bed. Kindling stacked as
in the picture which allows combus�on air to flow freely and will aid igni�on. On
top of the kindling two or more non toxic firelighters.
Step 2. Open the front air control (Primary air), fully to the le�, using the glove
provided. The ter�ary air control should be fully open, pushed in fully. The fire can
then be lit.
Step 3. Allow the fire to burn un�l all the pieces of wood are alight and burning.
The side air intake (Secondary air) can be used if addi�onal air is needed. Slide the
control in to increase the air and pull out to decrease the secondary air. More
larger pieces of fuel can now be added. Be careful not to add so much fuel that it
is in danger of overflowing the fuel bar or touching the glass.
Step 4. Once the fire is established, both air controls can be reduced in order to
maintain a steady burn rate dependent on your fuel type. If burning wood the
primary air control should be shut fully once the fire has established and the
ter�ary air control le� fully open.
REMEMBER:
You should never run the appliance with the door open.
STEP 1
OPERATION


