Replacing the NVRAM Battery
ARX-2000 Hardware Installation Guide
A - 9
2. Check the status of the battery in the primary (active) switch by
issuing the
show chassis nvr
command. The following example
output from the show chassis nvr command shows an NVR battery
status of
Good
:
prtlndA#
show
chassis
nvr
NVR:
NVR
Battery
ECC
State
NVR
Size
(MB)
‐‐‐‐‐‐‐‐‐‐‐ ‐‐‐‐‐‐‐‐‐‐‐‐‐‐‐‐‐‐‐‐‐‐ ‐‐‐‐‐‐‐‐‐‐‐‐‐
Good
No
Error
1024
Battery
Charger:
Power
Sensor
Status
‐‐‐‐‐‐‐‐‐‐‐‐‐‐‐‐ ‐‐‐‐‐‐‐‐‐‐‐‐‐‐‐ ‐‐‐‐‐‐‐‐‐‐‐‐‐‐‐‐‐‐‐‐‐‐
Charging
Current
0
mA
Normal
(
<1200
mA)
Pack
Voltage
0
mV
Normal
(
<17200
mV)
Cell
Voltage
0
mV
Normal
(
<4300
mV)
3. Ensure that the secondary switch is powered off.
4. Remove the front bezel. If necessary, see the instructions
Removing
and Re-Installing the Front Bezel, on page A-4.
Replacing the Battery
Once you determine that you must replace a failed battery, use the following
instructions to accomplish the task.
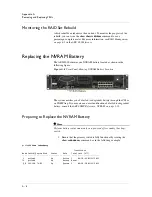
1. Loosen the thumb screws on either side of NVRAM battery tray.
Turn both screws counter clockwise. They will not fall out.
2. Slide the entire tray out of the unit by grasping the top and bottom
of the casing as shown in the following figure.
Figure A.7
Replacing the NVRAM Battery
3. Insert the replacement NVRAM battery tray into the slot.
4. Tighten both thumb screws clockwise to secure the replacement
battery tray.
5. Turn on the switch.
Summary of Contents for ARX-2000
Page 1: ...ARX 2000 Hardware Installation Guide 810 0062 00 ...
Page 2: ......
Page 6: ...vi ...
Page 7: ...Table of Contents ...
Page 8: ......
Page 11: ......
Page 12: ...Table of Contents xii ...
Page 14: ......
Page 22: ......
Page 28: ...Chapter 2 Unpacking and Installing the Switch 2 8 ...
Page 30: ......
Page 48: ...Chapter 3 Connecting the Switch to the Network 3 20 ...
Page 49: ...4 Maintenance Powering Down the ARX 2000 LED Indicators POST Diagnostics ...
Page 50: ......
Page 60: ......
Page 72: ...Appendix A Removing and Replacing FRUs A 14 ...
Page 73: ...B Installing the Rail Kit Installing the Rail Kit ...
Page 74: ......
Page 76: ...Appendix B Installing the Rail Kit B 4 ...
Page 77: ...Index ...
Page 78: ......
Page 80: ...Index Index 4 ...


