background image


Rev. 02-20 

Page 4/9 

Alu Shower chair with tilt 2024 – User manual


Mainframe  


Put the main frame upside down on the floor. You will see four holes at the ends of vertical 
frame tubes.  


Wheels 


Insert the wheels assembly tube into each end of the frame. 


There are 2 holes (A &  B) drilled in  both  the frame and in  each  wheel 
assembly tube (as shown in the picture). 


Adjust  the  wheels  vertical  tube  to  the  position,  where  one  of  its  holes 
would match one of the holes in the frame. Thanks to this solution it is 
possible to set the seat height of the chair in 3 different heights.  


When the required position is reached, insert the fixing bolt through all 
the  holes  and  tie  it  with  the  nut  from  the  opposite  side  of  the  tube. 
Always adjust all 4 wheels to the same height. 


Check if all wheels are locked correctly by pulling them upwards. They 
should not be able to slide out or shake.  
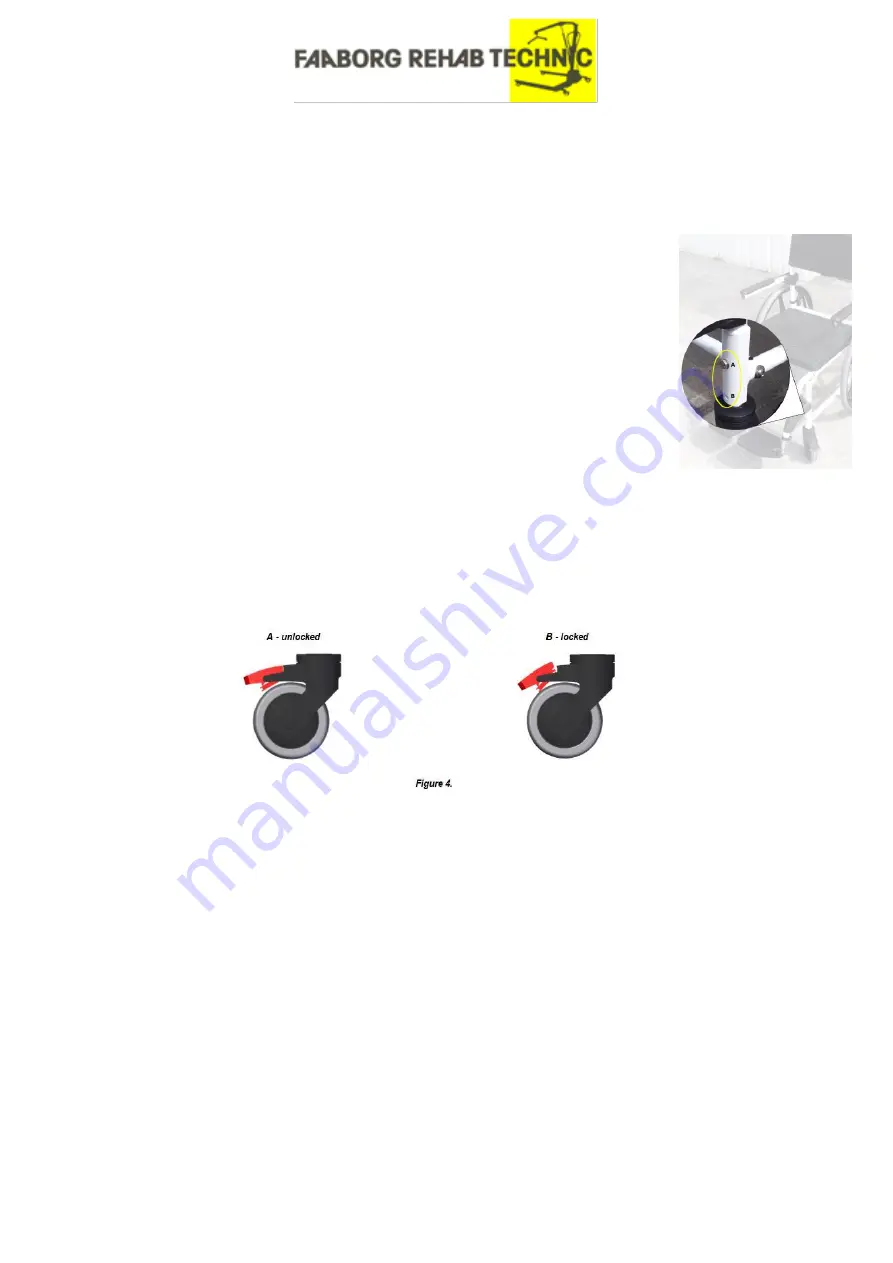
 

Brakes  


Now turn the main frame around to the correct position so it is now on its wheels.  


Before further assembly lock all wheel brakes in order for the device not to move. 


To engage the brakes step down with your toes on the pedals attached to the rear part of each 
wheel  until  they are locked (B). To  disengage the brakes pull up the pedals  with  your toes 
until they unlock (A).  


Never leave the chair without engaging the brakes, when someone is sitting in it. 
Always engage the brakes when entering or leaving the chair. 
Always engage the brakes when you do not plan to move the chair. 


Backrest 


Now slide the back frame tubes ending in to the 2 assembly holes located in the rear top part 
of the main frame 


Tighten the bolts on both sides of the frame, so the back is stable and rigid. 


 Headrest 


Put the vertical bar of the headrest into the clamp located at the top middle of the back. 


Tighten the bolt located at the clamp when headrest is adjusted to the required height so the 
vertical bar will not move up or down.  


Summary of Contents for 2024

Page 1: ...Rev 02 20 Page 1 9 Alu Shower chair with tilt 2024 User manual Alu shower chair with tilt Item no 2024 User Manual Faaborg Rehab Technic Smedemestervej 9 5600 Faaborg www faaborg rehab dk ...

Page 2: ...ondition If defects or errors are detected you must immediately contact the dealer Follow the information on the product label Only use the product for the described purpose Avoid making constructive changes on the device unless you have the manufacturer s written acceptance for such modifications During different adjustments which are possible on the device the user must be careful not to squeeze...

Page 3: ...back frame with armrests 1 detachable headrest 2 detachable footrests 4 detachable wheel assemblies consisting of wheel brake and vertical assembly tube 4 bolts and nuts for wheel assembly 1 defecation bucket 1 PU cover for the middle hole of the seat 1 user manual Assembly description As shown on the picture above the device can be assembled in quite an instinctive way We recommend you to follow ...

Page 4: ...able to slide out or shake Brakes Now turn the main frame around to the correct position so it is now on its wheels Before further assembly lock all wheel brakes in order for the device not to move To engage the brakes step down with your toes on the pedals attached to the rear part of each wheel until they are locked B To disengage the brakes pull up the pedals with your toes until they unlock A ...

Page 5: ... there is someone in it Always put users feet on foot plates when moving the chair Armrest Armrests can be easily lifted by pulling them up To move them back in to a low position simply push them down This function helps to transfer the user in and out of the chair and it helps to bath the user Never leave chair unattended with armrests lifted when there is someone in it Tilt adjustment function T...

Page 6: ...at above steps for the other side of the chair Press the quick release button located in the middle of the big wheel Insert the wheel into the housing on the assembly plate Release the button see the second picture Always check if the wheels are attached correctly by trying to pull them out To take away the wheels press the quick release button and pull the wheel out of its housing After assemblin...

Page 7: ...much maintenance Despite the solid construction and the use of resistant materials the product is subject to wear It is therefore recommended to check the product at regular intervals be a professional service Warning When using the chair in very calcareous water calcium binding might occur at and around the wheel bearings and other movable parts Under such circumstances it can be necessary to use...

Page 8: ...warranty period your combo gun becomes defective it will be repaired or replaced Repair and replacement must be performed by Faaborg Rehab Technic ApS service team To get the warranty your shower chair must be maintained as described in the guide If a problem occurs you must immediately inform Faaborg Rehab Technic ApS If parts of the shower chair needs replacement or need to be replaced within 24...

Page 9: ...l Service Schedule Service no 1 2 3 4 5 6 7 8 9 Wheels Brakes Footrests Frame Arm rests lacquer paint chrome Seat Upholstery Actuator height Actuator tilt Battery All collections Lubrication of moving parts Inspection by initials Inspection date Service stamp 1 2 3 4 5 6 7 8 9 10 ...

Reviews: