background image


Rev. 02-20 

Page 6/9 

Alu Shower chair with tilt 2024 – User manual


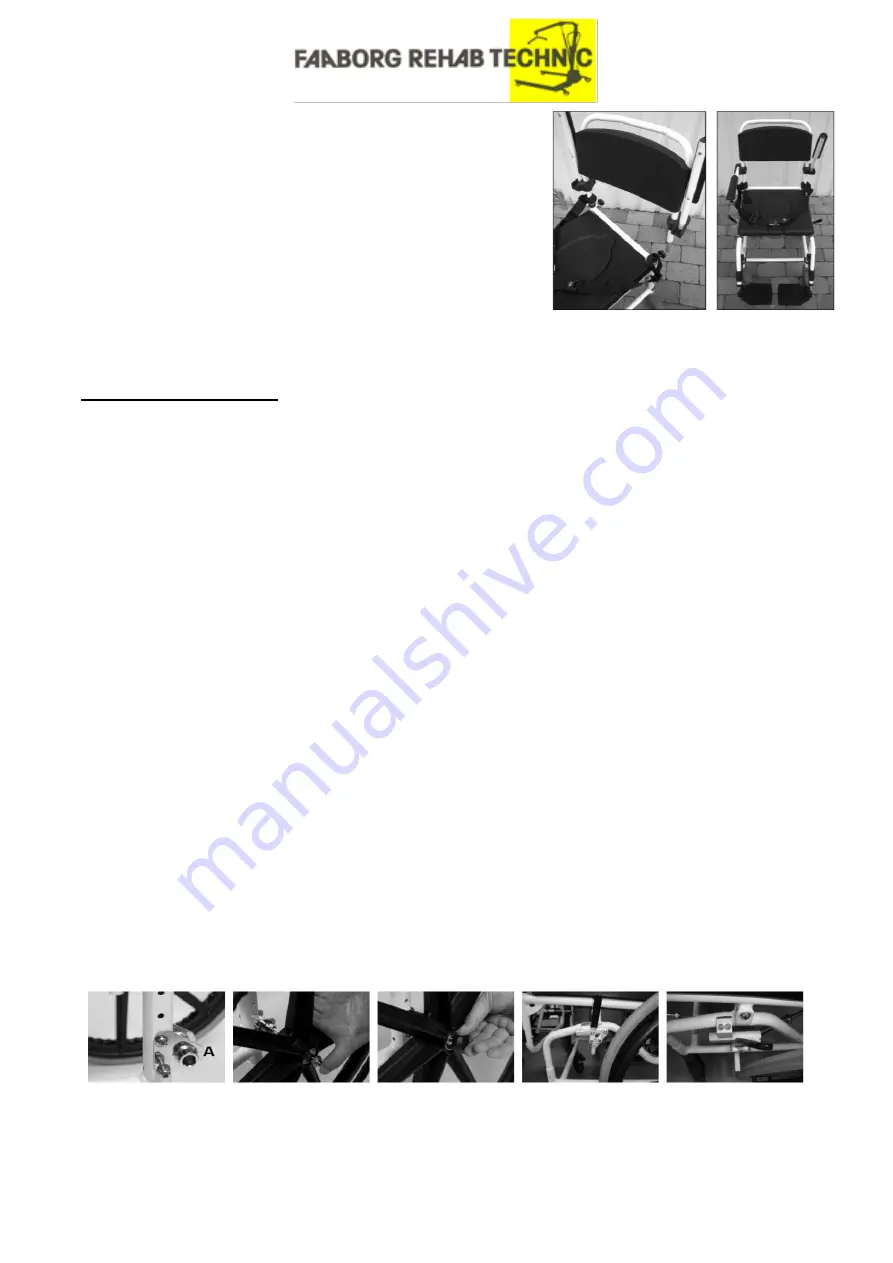
Accessories – Safety belt 


It is possible to mount a safety belt on the chair. It is important 
that the safety belt has loops at the end.  
The  loops  should  be  placed  at  the  backrest  by  lifting  the 
backrest  like the picture  to  the side. Be aware that the belt  is 
turned  the  right  way  before  the  backrest  is  put  back  into 
position like in the second picture. 
 

Mounting 24” rear wheels (extra equipment) 

It  is  possible  to  replace  the  rear  5”  small  wheels  with  24” 
bigger wheels with pushrods for self-propelling. Assembly of this kind of wheels requires mounting 
of  typical  wheelchair  brakes.  It  is  all  included  in  the  accessory  kit  together  with  fixing  bolts, 
assembly clamps and plates. 

Replacement description: 


Disassemble  the  2  rear  standard  wheels  in  the  opposite  way  to  the  previous  assembly 
instruction. 


Fit the 24” wheels to the rear vertical side-frame tube (as shown in the first picture below). 


There  are  holes  drilled  in  the  tube  that  allow  the  chair  to  be  adjusted  in  different  heights. 
Choose  2  holes  and  adjust  the  assembly  plate  so  the  fixing  holes  are  in  line  with  the  tube 
holes.  


Insert 2 fixing bolts through all the holes. Apply washer and nut. Tie the fixing bolts, so the 
assembly plate is very stable. 


Repeat above steps for the other side of the chair. 


Press the quick release button located in the middle of the big wheel. Insert the wheel into the 
housing on the assembly plate. Release the button (see the second picture). 


Always check if the wheels are attached correctly by trying to pull them out.  


To take away the wheels press the quick release button and pull the wheel out of its housing.  


After  assembling  the  big  wheels  it  might  be  necessary  to  readjust  the  height  of  the  small 
wheels at the front. The main bottom frame always has to be in position parallel to the floor.  


For the 24” wheels it is necessary to mount regular wheelchairs parking brakes as the wheels 
are not equipped with their own brakes.  


The brake assembly consists of a mounting clamp. Brake mechanism and 2 fixing bolts.  


Insert the sliding profile of the brake in to the smaller cut out of the mounting clamp. 


Put the mounting clamp on the horizontal side frame tube as it is shown in the 4

th

 picture.  


Move the sliding profile to find the optimum position of the brake, so it is quite easy to apply 
the brake when necessary, but the friction between tire and the friction rod is strong enough 
to efficiently hold the wheelchair in a stationary position. 


Tie the fixing bolts, so the brake is stable and fixed 


Repeat those steps for the other side of the chair.  


To apply the brakes simply push the brake lever towards the front of the chair. To release the 
brakes pull the lever towards the back of the chair. 


Summary of Contents for 2024

Page 1: ...Rev 02 20 Page 1 9 Alu Shower chair with tilt 2024 User manual Alu shower chair with tilt Item no 2024 User Manual Faaborg Rehab Technic Smedemestervej 9 5600 Faaborg www faaborg rehab dk ...

Page 2: ...ondition If defects or errors are detected you must immediately contact the dealer Follow the information on the product label Only use the product for the described purpose Avoid making constructive changes on the device unless you have the manufacturer s written acceptance for such modifications During different adjustments which are possible on the device the user must be careful not to squeeze...

Page 3: ...back frame with armrests 1 detachable headrest 2 detachable footrests 4 detachable wheel assemblies consisting of wheel brake and vertical assembly tube 4 bolts and nuts for wheel assembly 1 defecation bucket 1 PU cover for the middle hole of the seat 1 user manual Assembly description As shown on the picture above the device can be assembled in quite an instinctive way We recommend you to follow ...

Page 4: ...able to slide out or shake Brakes Now turn the main frame around to the correct position so it is now on its wheels Before further assembly lock all wheel brakes in order for the device not to move To engage the brakes step down with your toes on the pedals attached to the rear part of each wheel until they are locked B To disengage the brakes pull up the pedals with your toes until they unlock A ...

Page 5: ... there is someone in it Always put users feet on foot plates when moving the chair Armrest Armrests can be easily lifted by pulling them up To move them back in to a low position simply push them down This function helps to transfer the user in and out of the chair and it helps to bath the user Never leave chair unattended with armrests lifted when there is someone in it Tilt adjustment function T...

Page 6: ...at above steps for the other side of the chair Press the quick release button located in the middle of the big wheel Insert the wheel into the housing on the assembly plate Release the button see the second picture Always check if the wheels are attached correctly by trying to pull them out To take away the wheels press the quick release button and pull the wheel out of its housing After assemblin...

Page 7: ...much maintenance Despite the solid construction and the use of resistant materials the product is subject to wear It is therefore recommended to check the product at regular intervals be a professional service Warning When using the chair in very calcareous water calcium binding might occur at and around the wheel bearings and other movable parts Under such circumstances it can be necessary to use...

Page 8: ...warranty period your combo gun becomes defective it will be repaired or replaced Repair and replacement must be performed by Faaborg Rehab Technic ApS service team To get the warranty your shower chair must be maintained as described in the guide If a problem occurs you must immediately inform Faaborg Rehab Technic ApS If parts of the shower chair needs replacement or need to be replaced within 24...

Page 9: ...l Service Schedule Service no 1 2 3 4 5 6 7 8 9 Wheels Brakes Footrests Frame Arm rests lacquer paint chrome Seat Upholstery Actuator height Actuator tilt Battery All collections Lubrication of moving parts Inspection by initials Inspection date Service stamp 1 2 3 4 5 6 7 8 9 10 ...

Reviews: