© 2015 Click&Go, Faaborg Rehab Technic ApS
Smedemestervej 9 |5600 Faaborg | Denmark | T: +45 710205553 | E: office@faaborg-rehab.dk| W: www.faaborg-rehab.dk
10/15
5.6
Attaching and taking off the push propulsion
The push propulsion is attached to the frame of the wheelchair. It is important that this
attachment is carried out in the right way. When the push propulsion is not properly secured,
it will not function properly and it may be dangerous.
5.6.1
Attaching the push propulsion
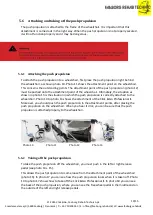
To attach the push propulsion to a wheelchair, first place the push propulsion right behind
the wheelchair, as shown photo 10. Photo 11 shows the attachment point on the wheelchair.
This concerns the outstanding points. The attachment point of the push propulsion (photo 12)
must be pushed onto the attachment point of the wheelchair. Ultimately, the situation as
shown in photo 13 is the situation in which the push propulsion is correctly attached to the
wheelchair. Photo 10 to photo 13 shows the attachment of the Click & Go Professional II.
Moreover, you should push the push propulsion in the attachment points, after placing the
push propulsion on the wheelchair. When you hear it click, you can be sure that the push
propulsion is attached properly to the wheelchair.
5.6.2
Taking off the push propulsion
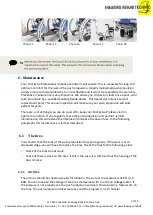
To take the push propulsion off the wheelchair, you must push in the left or right release
pedal (see photo 14 + 15).
This allows the push propulsion to come loose from the attachment point of the wheelchair
(photo 16). In photo 17 you can see how the push propulsion looks when it is taken off. Photo
14 to photo 17 shows how to take off the Click & Go Professional II. In photo 18 you can see
the back of the push propulsion, where you can see the freewheel pedal in the middle and on
the outside of the left and right release pedals.
Photo 10
Photo 11
Photo 12
Photo 13
Summary of Contents for Click & Go Professional II
Page 1: ...User Manual Click Go ...


