background image


INSTRUCTION BOOKL: PELLET STOVE FOR LOCAL AIR HEATING  .                    


DESIGN       INNOVATION       SUSTAINABILITY       FUNCTIONALITY       HIGH PERFORMANCE  


37/80 

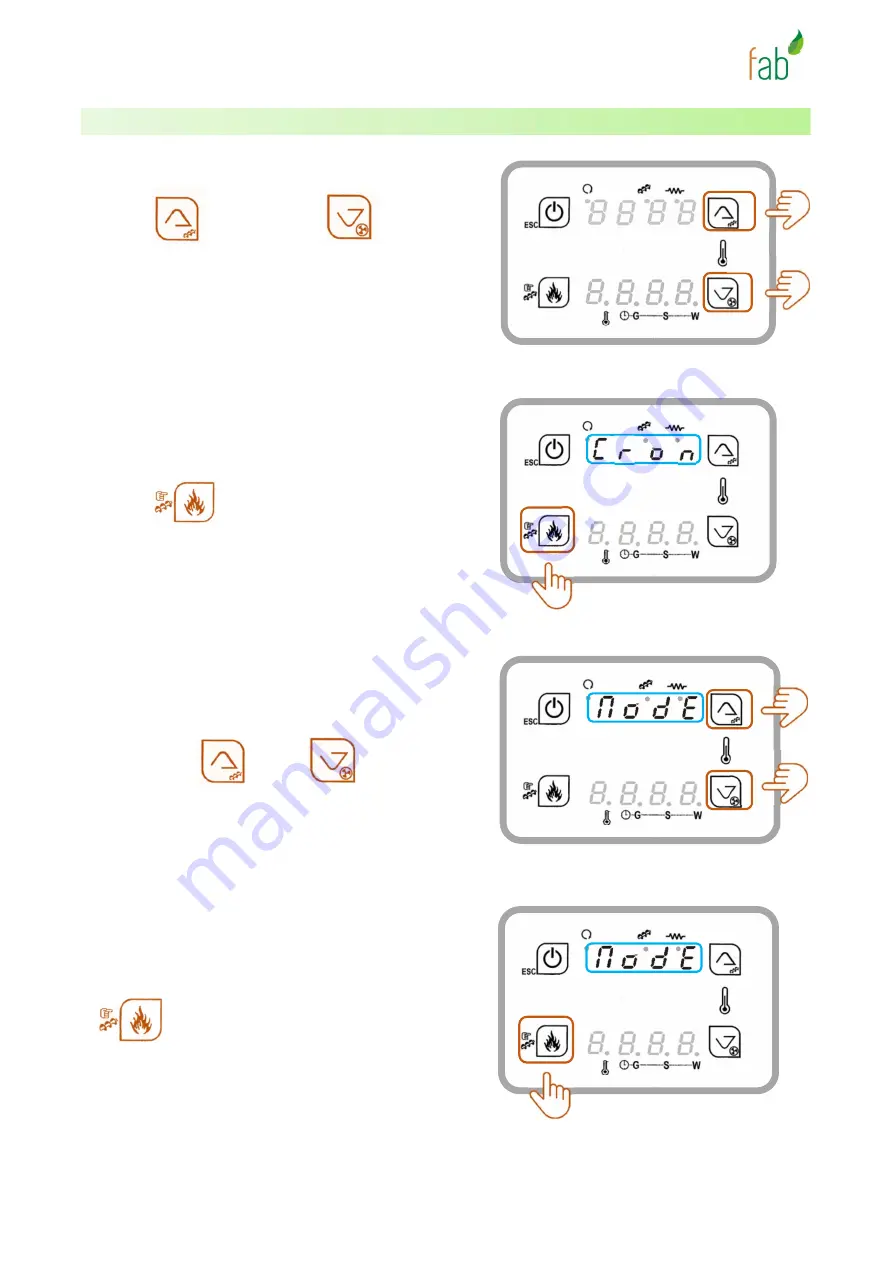
Look for the Cron function, by clicking on the 

P2 

and 

P4 

buttons 

alternately. 


As soon as the message Cron appears in the 
D1  area  of  the  touchscreen,  click  the  P3 

button 


to access the function. 


After  accessing  the  Cron  function,  look  for 
the  ModE  message  (visible  in  the  D1  area) 

using the P2 

 and P4 

  buttons. 


As soon as the ModE message appears in D1 
area  of  the  screen,  click  the  P3  button 

 to access this menu. 

ModE Menu - Programme Selection (continued)


P2 

P4 

D1 

P3 

D1 

P3 

D1 

P2 

P4 

Summary of Contents for MARIE

Page 1: ...INNOVATION SUSTAINABILITY FUNCTIONALITY HIGH PERFORMANCE 1 80 INSTRUCTION BOOK PELLET STOVE LOCAL HEATING 9 2kW MARIE ISAAC For more information please visit our website www ecofab pt You can also fi...

Page 2: ...this document you will find advices and instructions for use installation and maintenance of your pellet stove for local heating intended for adults Keep the stove out of reach of children and young p...

Page 3: ...S TO AVOID 17 SUPPLY MODE 18 DEVICE OPERATION 19 GENERAL RECOMMENDATIONS 19 RECOMMENDATIONS BEFORE FIRST USE 20 CONTROL PANEL DESCRIPTION 21 BUTTONS P1 P2 P3 AND P4 22 INFORMATION ZONES IN THE TOUCH S...

Page 4: ...ERRORS 55 HOW DO I ELIMINATE ERRORS 55 ALERT MESSAGES 59 SECURITY 60 CONTROL PANEL BLOCKED 60 CLEANING AND MAINTENANCE 61 GENERAL RECOMMENDATIONS 61 PERIODICITY 61 DAILY CLEANING MAINTENANCE 62 EXTER...

Page 5: ...s must comply with the appliance s electrical diagram Children must not be allowed access to the appliance Foreign objects must not be introduced into the appliance as this could result in accidents a...

Page 6: ...Do not tilt the machine excessively to prevent it from tipping over Do not use the stove as an appliance for cooking food The appliance must not be used as an incinerator wood pellets being the only...

Page 7: ...Flow to thermal power Nominal Reduced 6 79 5 36 g s g s Recommended draw to thermal power Nominal Reduced 12 10 Pa Pa The pellet stoves of the fab brand respect all standards and regulations NP EN 147...

Page 8: ...to the appropriate collection facilities e g collection centres for electrical and electronic equipment or by returning it to the retailer when purchasing an equivalent new appliance Under penalty of...

Page 9: ...Gas Probe R1 Ignition Resistance S2 Door Micro V1 Exhaust Fan E1 IEC Fact Sheet S3 Pellet biosensor V1 1 Exhaust Fan Encoder W1 FLAT Cable Materials and Components continued The fab stoves are compose...

Page 10: ...MARIE is a pellet stove fuel in the form of certified wood pellets In the upper part of the stove there is a pellet tank max capacity 15 kg and a controller where the user can manage the heating The h...

Page 11: ...safety sensor Back Section ISAAC is a pellet stove fuel in the form of certified wood pellets In the upper part of the stove there is a pellet tank max capacity 15 kg and a controller where the user...

Page 12: ...s the combustion air intake Do not obstruct the pipe The appliance needs air in order to burn well Air Intake The appliance needs air for combustion Do not obstruct the pipe The smoke outlet is 80 mm...

Page 13: ...ERFORMANCE 13 80 Stove removable parts 1 Burner 2 Left ash guide 3 Right ash guide 4 Ash tray 5 Left upper cover of the exchanger 6 Right upper cover of the exchanger 7 Left lower cover of the exchang...

Page 14: ...INSTRUCTION BOOKL PELLET STOVE FOR LOCAL AIR HEATING DESIGN INNOVATION SUSTAINABILITY FUNCTIONALITY HIGH PERFORMANCE 14 80 80 210 200 General Dimensions MARIE 545 983 542 574 mm...

Page 15: ...INSTRUCTION BOOKL PELLET STOVE FOR LOCAL AIR HEATING DESIGN INNOVATION SUSTAINABILITY FUNCTIONALITY HIGH PERFORMANCE 15 80 983 General Dimensions ISAAC 542 574 80 210 200 545 983 574 542 mm...

Page 16: ...thout the need for additives And through this manufacturing process the pellet is given a cylindrical shape The pellet is considered a clean fuel because its combustion has a low emission of greenhous...

Page 17: ...nd Actions to Avoid You should only fill the tank with one type of fuel Avoid using pellets with different characteristics This may lead to an increase and or decrease in the performance of the applia...

Page 18: ...INABILITY FUNCTIONALITY HIGH PERFORMANCE 18 80 To fuel the stove 1 Open the pellet tank door 2 Pour the pellets into the tank until it is full 3 Close the pellets tank door CAUTIONS Never put your han...

Page 19: ...t Even in the use of low values Irradiation from the glass can be intense Make sure that it is not oriented toward a location with heat sensitive materials To prevent the risk of fire and or detonatio...

Page 20: ...ng the appliance for the first time it is important to ensure that the pellets are loaded on the burner Pre Charge the stove following the instructions described in LoAd Function page 29 5 TH STARTING...

Page 21: ...el is fitted on top of the appliance in the form of a touch screen The control panel allows you to program and view the behaviour of the stove throughout the entire firing process from switching it on...

Page 22: ...eding time P3 Modify the combustion power Save confirm data Loading of pellets LoAd function P4 Decrease data Fan speed correction P3 P4 Access to User Menu 2 Buttons P1 P2 P3 and P4 P1 P3 P2 P4 The f...

Page 23: ...eration Errors Function Menu Programme Parameter value D2 Power Parameter code D3 Recipe D4 Temperature Parameter code Information Zones in the Touch Screen D1 D2 D3 and D4 D2 D1 D3 D4 In zones D1 D2...

Page 24: ...rogramming of the stove is active The programme Gior G is selected L6 The automatic on off programming of the stove is active The programme Sett S is selected L7 The automatic on off programming of th...

Page 25: ...s deposited on the burner as indicated in Daily Cleaning Maintenance page 62 CAUTION We strongly recommend that the ash removal is only with the appliance switched off Never remove the ash when the st...

Page 26: ...2 ON3 ON4 ON5 The auger starts working and fil the burner with pellets and the flame comes on 15 17 min The ignition phase ends as soon as the firing stabilises And in the D1 D2 D4 zones of the touch...

Page 27: ...es into two user menus User menu 1 gives access to the simplest management and consultation functionalities User menu 2 gives access to the most complex programming functions Information Consultation...

Page 28: ...presented by the number 6 In this way the stove discharges a large quantity of pellets Automatic power represented by the letter A In this way the stove manages pellet consumption automatically accord...

Page 29: ...side we have the example of the selection of 25 C as the reference temperature to reach Function LoAd A Pre loading of pellets It is important to ensure that the pellets load on the burner To do this...

Page 30: ...e pellets stop falling then stop the system by pressing the P3 button Finally switch off the stove completely and remove the pellets that have fallen onto the burner If you want to pre load wait until...

Page 31: ...menu 2 To access the user menu 2 press the P3 and P4 buttons simultaneously until you hear a pi sound One of the functions described above will appear in D1 area of the touch screen In the image on t...

Page 32: ...to access the function When you access the function the hours and minutes will be visible in D1 area while the day of the week will be showed in D4 area By clicking the P3 button three times in succes...

Page 33: ...Once you find the desired value stop and click the P3 button to confirm the choice and move on to changing the minutes Changing the Minutes By clicking the P3 button the minutes value will flash To c...

Page 34: ...alidate your choice Representation of the days of the week Message Description Mo Monday tu Tuesday UE Wednesday tH Thursday Fr Friday SA Saturday SU Sunday Exit the oroL function Once all changes hav...

Page 35: ...ing to the days and times ModE where the programming carried out in ProG is activated and deactivated 1st Access User Menu 2 2nd Access Cron 3rd Access ModE and select what you want OFF Gior Sett or F...

Page 36: ...ammed with a different schedule Sett Schedule for every day of the week from Monday to Sunday The salamander starts and stops automatically at the same time every day of the week FiSE The programme is...

Page 37: ...ely As soon as the message Cron appears in the D1 area of the touchscreen click the P3 button to access the function After accessing the Cron function look for the ModE message visible in the D1 area...

Page 38: ...programme you want to select by clicking the P2 and P4 buttons As soon as the programme you want appears in the D1 zone of the screen click the P3 button to save and validate the selection In the ima...
Page 39: ...d by an upper dash l on the control panel Each schedule is represented by the value 1 2 and 3 respectively Schedule Representation Start Stop 1 1 I 1 I 2 2 I 2 I 3 3 I 3 I In the images on the side we...

Page 40: ...or each day of the week individually On the control panel the days are represented by the following message Message Description Mo Monday tu Tuesday UE Wednesday tH Thursday Fr Friday SA Saturday SU S...

Page 41: ...above the letter W the L7 led light must be on FiSE If you have chosen FiSe in the ModE menu in the ProG menu you can set 3 timetables for the period of days Monday to Friday and 3 schedules for the...

Page 42: ...By clicking on the P2 and P4 buttons alternately look for the ProG menu As soon as the message ProG appears in the D1 area of the screen click the P3 button to access the menu go to 3 Programming page...

Page 43: ...clicking on the P2 and P4 buttons As soon as the message Cron appears in the D1 area of the touchscreen click the P3 button to access the function After accessing the Chrono function search for the P...

Page 44: ...s to choose from The timetables are organised according to the days of the week First comes starting and then stopping combustion Sett Weekly programme Note that clicking on buttons P2 and P4 alternat...

Page 45: ...hours and minutes D2 area the schedule 1 2 or 3 D3 area lower trace l start upper trace l combustion stop D4 area day or set of days of the week that you are programming In the images on the side we h...

Page 46: ...n rectify it by following the corresponding instructions Note If in zone D1 of the display there are four dashes press the P1 button for 3 seconds to show up the numbers 00 00 The system does not allo...

Page 47: ...me Setup continued Changing the Hours Click the P3 button the hour value starts flashing To change the hour value click P2 and P4 buttons Once you find the desired value stop and click the P3 button t...

Page 48: ...then rectify it by following the corresponding instructions Programming the stop time Click P3 button twice in succession Note that at the first press the hour value flashes and at the second press t...

Page 49: ...he letter S the L6 led light must be on L7 S If you have chosen the FiSE programming above the letter W the L7 led light must be on ProG Menu Programme Setup continued Changing the Minutes By clicking...

Page 50: ...80 Practical example between Tuesday and Wednesday Programming Tuesday Wednesday START 20h 30min 23h 59min STOP 00h 00min 06h 30min In this way the salamander will start on Tuesday at 20h 30min 8 30p...

Page 51: ...osen power 1 2 3 4 5 or 6 the system always uses the reference power until the desired room temperature is reached Practical example Room temperature 20 C User defined Power in use 3 Target temperatur...

Page 52: ...cording to the room temperature to be reached Practical example Room temperature 20 C User defined Power in use A Target temperature 25 C In order to reach the target temperature set by the user the s...

Page 53: ...ent temperature reaches values higher than those set by the user the system goes into standby mode stopping combustion and then turning itself OFF The message Stby appears in the D1 area of the touchs...

Page 54: ...ton until a bip sound is heard This will start the extinguishing process 10 15 min The OFF message appears on the D1 area of the touchscreen throughout the process Once the process is finished the tim...

Page 55: ...rops the stove goes into extinguishing mode If during operation the temperature of the smoke gas reaches a value below the set limit the stove goes into extinguishing mode 1 Check that the removable a...

Page 56: ...tly detect the fan signal and the system goes into shutdown mode 1 Let it cool down and turn on again 2 If the error persists consult technical support ER08 Failure of the speed control of the smoke g...

Page 57: ...tank and check whether the auger is jammed The auger may be jammed due to foreign objects entering the pellet tank e g screws nails 2 The pellets have reached the burner but have not ignited The pelle...

Page 58: ...fety the system blocked the stove and went into shutdown mode OFF 1 Fill the pellet tank following the instructions on page 18 2 Turn the appliance back on ERR44 Open Door If the safety door was open...

Page 59: ...safety door is open If you do not close the door within 60 seconds the system will lock the stove and terminate firing rFiL Lack of fuel in the pellet tank If you do not fill the pellet tank within 60...

Page 60: ...e your safety Exhaust fan encoder Shuts down the appliance if there is any malfunction in the fume gas extraction fan Recommendations Do not touch the equipment when it is running in order to avoid bu...

Page 61: ...ANING AND MAINTENANCE IMPORTANT During normal operation the stove carries out automatic cleaning cycles PClr in order to clean the ash accumulated on the burner However this cleaning is not enough to...

Page 62: ...ith water or with a product suitable for glass 2 Dry thoroughly so that the fumes do not stick to the glass Note Be careful not to oxidise the metal parts of the appliance or peel off the door sealing...

Page 63: ...shes resulting from combustion into the rubbish bin 3 Return burner in place Note When replacing the burner pay attention to the alignment of the hole as shown in the pictures to the side A B Cleaning...

Page 64: ...f the firing chamber 1 Burner 2 Left ash guide 3 Right ash guide 4 Encrypted ash tray 5 Left upper cover of the exchanger 6 Right upper cover of the exchanger 7 Left lower cover of the exchanger 8 Rig...

Page 65: ...continued How to remove removable parts from the firing chamber Step 1 Remove the burner To remove this component pull it towards you and upwards This will disengage it from the heating element tube...

Page 66: ...er covers which are secured by wing nuts To remove the covers unscrew the wing nuts and push upwards pulling on the existing handle This will disengage the cover from the supporting bolt and pull the...

Page 67: ...th the appliance switched off and only after it has cooled down CAUTION Cleaning and maintenance must only be carried out with the appliance switched off and only after it has cooled down T Cover Zona...

Page 68: ...ean ash reservoir 4 Clean the exchanger 5 Clean the volute 6 Clean glass and check condition of door gasket fibre glass cord Replace if necessary 7 Clean the smoke outlet pipes and check the connectio...

Page 69: ...the pipe TO ENSURE CORRECT INSTALLATION OF THE STOVE PLEASE FOLLOW THE INSTRUCTIONS PROVIDED Local Check that the appliance is complete and in good condition Any defects detected should be reported to...

Page 70: ...radiation can be intense so minimum safety distances from surrounding objects must be respected Ensure that materials exposed to this radiation can withstand high temperatures The base that supports t...

Page 71: ...distance to be maintained from flammable materials mm Back Wall 900 Side Wall 500 Front 700 Top 1 000 Floor Non flammable CAUTION Irradiation can be intense A minimum distance of 1 000 mm must be mai...

Page 72: ...e gas exhaust pipe installation The stove has height adjustable supports in the base which allow easy adjustment on uneven floors CAUTION Do not tilt the appliance excessively to prevent it from tippi...

Page 73: ...BOOKL PELLET STOVE FOR LOCAL AIR HEATING DESIGN INNOVATION SUSTAINABILITY FUNCTIONALITY HIGH PERFORMANCE 73 80 Option B Option A Fume gas exhaust pipe installation continued M n 2 000 mm M x 900 mm M...

Page 74: ...ion C Fume gas exhaust pipe installation continued 80 mm M n 1 000 mm M x 2 000 mm 100 mm M n 4 000 mm CAUTION The mains socket must be earthed Power Supply The wall socket must be easily accessible a...

Page 75: ...in the tank but the auger tube is empty Preload following the instructions in the LoAd function page 29 Any fault requiring the replacement of electrical electronic components should only be carried...

Page 76: ...xhaust gases Ambient fan or exhaust fan defective Replace Power supply failure Check that there is an electronic power supply in the house The pellets reached the burner but did not ignite Pellets too...

Page 77: ...f the temperature probes to the board Check connections Probe short circuited Replace The control panel is illegible Control panel damaged Replace Cables incorrectly connected Check the electrical cab...

Page 78: ...cover Routine assistance and consumable items Parts or components subject to natural wear and tear or normal use as well as damage to the machine from such wear and tear Example of some of the compon...

Page 79: ...od Pellets Length 30 mm Diameter 6 mm Calorific power 16 5 MJ kg Q 19 MJ kg Humidity Rate 10 Ash residue 0 7 The technical data are the result of tests carried out in an accredited laboratory CATIM Ce...

Page 80: ...R LOCAL AIR HEATING DESIGN INNOVATION SUSTAINABILITY FUNCTIONALITY HIGH PERFORMANCE 80 80 FELINO AMBIENTE UNIPESSOAL LDA Rua da Bela 4445 344 Ermesinde Portugal Tel 351 229 699 830 E mail info ecofab...

Reviews: