background image

Zwei kurze Zurrgurten (24) auf beiden Seiten des

Kofferraumdeckels einhaken. Achten Sie darauf, dass
die Zurrgurten richtig in die Klemmschnallen eingeführt sind.

Zwei kurze Zurrgurten (24) an der unteren Kante

der Heckklappe (Bus, Kombi, usw.) oder des Koffer-
raumdeckels (Stufenheck) einhaken. Achten Sie darauf
dass die Zurrgurten richtig in die Klemmschnallen ein-
geführt sind.

Für eine zusätzliche Sicherheit den Stahlhaken (25)

am Gurtband (24) befestigen und dann mit der Karosserie
im Bereich Abschlepploch unter der Stossstange fest
verankern.

Hinweis:

Die Haken nie an Kunststoffteilen (z.B. Stoss-

stange usw.) befestigen.

Jetzt können Sie alle Zurrgurten gleichmässig und

satt festziehen. Als zusätzliche Sicherung gegen selb-
ständiges Lösen des Trägers durch Vibrationen sind alle
Gurtenden fest zu verknoten.
Wenn Sie die Gurten kürzen, sind die Enden schräg
abzuschneiden und mit einem Feuerzeug wieder zu
verschmelzen. 

Hinweis:

Bei gekürzten Gurtenden be-

steht keine Möglichket mehr, den Träger bei einem
anderen Autotyp zu montieren.

Wichtig:

Versuchen Sie den am Auto fest montierten

Träger unter angemessenem Kraftaufwand nach allen
Seiten zu bewegen. Eventuell sind die einzelnen Gurten
nachzuziehen.

Anbringen der Fahrräder

Das Gewicht der Fahrräder korrekt auf die Fahrrad-

trägerprofile (16) verteiler. Die Fahrräder mittels Fahr-
radrahmen-Halter (5) oder (26) oder (29) sowie Halteseile
(6) befestigen.
Je nach Rahmenkonstruktion und -form muss die
Grösse der Halteseile den jeweiligen Fahrrädern ange-
passt werden (Extrazubenör).
Das Vorder- und Hinterrad jedes Fahrrades sind mit
einem Sicherungsriemen (17) am Fahrradträgerprofil
(16) zu befestigen.

Wichtig: 

Jedes Fahrrad muss mindestens an drei ver-

schiedenen Stellen fixiert sein.

Achten Sie darauf, dass weder Metallteile der Fahrräder
oder Heck-Fahrradträger noch die Enden der Zurrgurten
und Sicherungsriemen die Karosserie berühren. Verkno-
ten Sie deshalb die Gurtenden immer.
Alle Teile der Fahrräder müssen gut festgezogen sein.
Kindersitze, Satteltaschen und alle abnehmbaren Teile
wie Trinkflasche, Beleuchtung, Luftpumpe usw. ent-
fernen.

Das Oeffnen und Schliessen der Heckklappe ist nicht bei

M

L

I

H

G

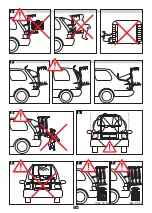
Hook the 2 short belts (24) onto both sides of the

boot lid. Make certain that the belts are correctly inserted
into their respective buckles.

Hook the other two short belts (24) onto the lower

edge of the rear door (minibus, station wagon, etc.), or to
the lower edge of the boot lid (rear cut-off part). Make
certain that the belts are correctly inserted into their
respective buckles.

For a safer fixing, it is possible to fix the steel hook

(25) to one of the anchor belt (24), and then hook it
under the bumper to the towing lug.
Attention: avoid fixing the hooks to parts made of synthe-
tic material (bumpers, etc.).

Now, tighten all the anchor belts well and uniformly.

In order to prevent the bicycle rack belts from slackening
due to vibration during transport, we recommend firmly
knotting their ends.
If the belts have to be shortened, cut the ends obliquely
and fuse them with a lighter.

Important: 

move the fitted bicycle rack in all directions,

applying a small amount of force. If necessary, tighten all
the belts.

Attention: 

once the belts have been shortened, the bicycle

rack cannot be fitted to cars of different kinds.

Fixing the bicycles

Uniformly distribute the weight of the bicycles on

the bicycle rack profiles (16). Fix the bicycles using the
frame support (5) or (26) or (29) and the fixing cables
(6). Depending on the structure and form of the frame,
the cable dimensions must be suitable for the bicycles
(special accessories).
The front and rear wheels must be fixed with a safety belt
(17) to the bicycle rack profile (16).

Attention: 

each bicycle must be fixed in at least three dif-

ferent places.

Make sure that neither the mechanical parts of the bicy-
cle, nor the ends of the anchor and safety belts come into
contact with the bodywork. For this reason, always tie the
ends of the belts. All the components of the bicycles
must be firmly fixed.
Remove all the mobile accessories such as children’s
seats, bags and removable parts such as flask, lights,
pumps, etc.

It is not possible to open and close the boot with all cars.

M

L

I

H

G

6

Inbetriebnahme und Bedienung

Setting up and use

D

GB

Summary of Contents for 6201800

Page 1: ...2 15 9 8 10 4 1 7 13 3 A 16 23 24 25 22 14 14 27 14 14 2 17 6 5 28 26 Abbildungen zum Text Illustrations corresponding to the text Illustrazioni corrispondenti al testo Ill D GB I F 30 BICI OK 2 B 22 mm MIN 55 mm MAX Ø ...

Page 2: ...E I L F M N D B C G H ustrations référencées dans le texte Tekeningen behorend bij de tekst Ilustraciones correspondientes al texto NL E BICI OK 2 Van ...

Page 3: ...dores superiores a la norma Radschinen mit zwei höhenverstellbaren Positionen A B Two positions adjustable rails A B Rotaie regolabili in due posizioni A B Rails réglables à deux positions A B Rails met twee posities A B Railes ajustables con dos posiciones A B BICI OK 2 2 Van BICI OK 3 3 Van BICI OK 2 3 Van D GB I F NL E D GB I F NL E D GB I F NL E Montage Sicherheitsgurt Mt 2 5 2 5 m Safety rack...

Page 4: ......

Page 5: ...5 9 8 10 4B 1B 7 13 3 A 16 23 24 25 22 14 14 27 14 14 2 17 5 6 28 29 26 30 Abbildungen zum Text Illustrations corresponding to the text Illustrazioni corrispondenti al testo Ill D GB I F BICI OK 3 B 22 mm MIN 55 mm MAX Ø ...

Page 6: ...E I L F M D B C G H N ustrations référencées dans le texte Tekeningen behorend bij de tekst Ilustraciones correspondientes al texto NL E BICI OK 3 Van ...

Page 7: ...és à la carrosserie Bewaar deze handleiding zorgvuldig Indien andere personen het fietsenrek gebruiken zorg dan altijd dat deze per sonen over deze handleiding beschikken Waarschuwing de bestuurder van het voer tuig is zowel verantwoordelijk als aansprake lijk voor een correcte montage en het onder houd van alle zich aan het voertuig bevinden de onderdelen van de uitrusting Conservar estar instruc...

Page 8: ......

Page 9: ... voitures cliquez dans Lijst Automodelle klik voor Lista de los modelos de los coches haga clic en www fabbri info FABBRI srl Via Ospitaletto 29 31 I 25040 Bornato Cazzago S M BS Italy Tel 39 0 30 7750800 r a Fax 39 0 30 7750219 e mail info fabbri info website www fabbri info 8505040 II 2005 D GB I F NL E ...

Page 10: ...rrispondenti al testo sono nel risvolto delle pagine di copertina Vous trouverez les illustrations concernant le texte sur les rabats de la couverture De bij deze tekst bahorende tekeningen vindt u op de omgevouwen pagina van de omslag Las ilustraciones correspondientes al texto se encuentran en las contratapas BEDIENUNGSANLEITUNG INSTRUCTIONS ISTRUZIONI PER L USO MODE D EMPLOI MONTAGEINSTRUCTIES ...

Page 11: ... dat de fietsen ontvreemd worden volstaat het om de anti diefstalknop op de laatste fiets te monteren Para proteger las bicicletas basta con cerrar la ultima la mas externa con el pomo antirrobo Um das Überstehen eines großen Fahrrades bei schmales Kleinfahrzeugen zu verhindern kann das Vorderrad abgenommen werden To avoid the prominence of a big bicycle mounted on small vehicles it is possible to...

Page 12: ...és à la carrosserie Bewaar deze handleiding zorgvuldig Indien andere personen het fietsenrek gebruiken zorg dan altijd dat deze per sonen over deze handleiding beschikken Waarschuwing de bestuurder van het voer tuig is zowel verantwoordelijk als aansprake lijk voor een correcte montage en het onder houd van alle zich aan het voertuig bevinden de onderdelen van de uitrusting Conservar estar instruc...

Page 13: ...ello bici posteriore con dado 6 6 6 6 13 3034421 Fibia in zama 6 6 6 6 14 4083888 Gomma protezione cofano posteriore 4 4 4 4 15 3043473 Rondella 6 5x18 Sp 2 mm 6 6 6 6 16 3032366 Profilo bici alu anodizzato 2 3 2 3 17 4078780 Cinghietta bloccaruota bici 33 cm 4 6 4 6 18 4078781 Protezione per cinghietta 4 6 4 6 19 4078782 Passante per cinghietta 4 6 4 6 20 3052615 Dado M6 autobloccante 4 6 4 6 21 ...

Page 14: ...P O Q R S T max 30 kg T max 45 kg 2 ...

Page 15: ...rten und der Schrauben kontrollieren und bei Bedarf nachziehen Die ersten Kontrollen für eine solide Träger befestigung sollten schon nach kurzer Einsatzdauer vor genommen werden Die Fahrräder mit den Fahrradrahmen Haltern und die Vorder und Hinterräder mit den Sicherungsriemen ein zeln fixieren Q P O Sicherheitsvorschriften D Danger Before fitting the bicycle rack always check the good condition ...

Page 16: ...hren jedoch nicht in einem Heizraum Die Verpackung ist aus recyclingfähigem Material her gestellt Bitte entsorgen Sie das Verpackungsmaterial ordnungsgemäss Vernichten Sie sämtliche Plastikbeutel diese können für Kinder zu einem gefährlichen Spielzeug werden S R The number plate and the lights must be very visi ble Prevent the anchor and safety belts from coming into contact with sharp parts Firml...

Page 17: ...k einhaken Achten Sie darauf dass die Zurrgurten richtig in die Klemmschnallen eingeführt sind F E D C B A Fit the fixing bracket 3 the central one 2 and the bicycle rack bracket 4 to the frame 1 Attention do not fully tighten the knurled nuts 12 yet because the bicycle rack must firstly be adapted the car s shape Slide the head of the screws into the sides of the bicycle rack profiles 16 and then...

Page 18: ...bnehmbaren Teile wie Trinkflasche Beleuchtung Luftpumpe usw ent fernen Das Oeffnen und Schliessen der Heckklappe ist nicht bei M L I H G Hook the 2 short belts 24 onto both sides of the boot lid Make certain that the belts are correctly inserted into their respective buckles Hook the other two short belts 24 onto the lower edge of the rear door minibus station wagon etc or to the lower edge of the...

Page 19: ...smittel Alle Schrauben und Scharnierteile einölen Aufbewahrung Bewahren Sie den Heck Fahrradträger an einem trocke nen und für Kinder unzugänglichen Ort auf jedoch nicht in einem Heizraum N Always pay great attention every time you open and close the car boot because the hooks or the bicycle rack could damage the bodywork Pay attention therefore that the bicycle rack does not hit against the car r...

Page 20: ...P O Q R S T max 30 kg T max 45 kg 8 ...

Page 21: ...iori con le cinghie di sicurezza Q P O Danger Avant de fixer le porte vélos arrière contrôler le bon état la solidité voire le degré de corrosion des char nières du hayon ou du couvercle du coffre de la voiture La plaque minéralogique et les feux arrière doivent rester visibles Utilisation conforme Ce porte vélos arrière est destiné exclusivement à l usage privé et conforme à ce mode d emploi Il e...

Page 22: ...pericoloso per i bambini S R La plaque minéralogique et les feux doivent rester visibles Evitez que les sangles d arrimage et de sécurité n entrent en contact avec des parties coupantes Fixez solidement leurs extrémités en les nouant Notez que le fonctionnement de l essuie glace arrière peut être gêné par ce porte vélos Prévoir de ne pas I utiliser ou év démonter le bras Répartition de la charge e...

Page 23: ...rrettamente nelle rispettive fibbie F E D C B A Montez l arceau de fixation 3 I arceau d appui 2 et l arceau de soutien 4 sur l armature de base 1 Conseil ne bloquez pas encore les écrous moletés 12 puisque vous devez encore ajuster le porte vélos à la forme de votre carrosserie Glissez les profilés 16 par leur glissière inférieure sur la tête des vis enfilez ensuite dans la glissière infé rieure ...

Page 24: ...raccia illu minazione pompa ecc Non per tutte le vetture è possibile aprire e chiudere il M L I H G Accrochez 2 sangles d arrimage courtes 24 de chaque côté du couvercle du coffre Veillez au sens correct d enfilage des sangles dans les boucles Accrochez 2 sangles d arrimage courtes 24 à l arête inférieure du hayon bus break ou du cou vercle du coffre berline Veillez au sens correct d en filage des...

Page 25: ...ia e fuori dalla portata dei bambini N coffre pour tous les modèles de voiture Faites très attention à chaque fois que vous ouvrez et que vous fermez le coffre de votre voiture car les crochets ou le porte vélos pourraient endommager la carrosserie Faites donc attention que le porte vélos n aille pas cogner contre le toit de la voiture ou contre les antennes Sur la route Avant chaque départ et à c...

Page 26: ...P O Q R S T max 30 kg T max 45 kg 14 ...

Page 27: ...jk strakker aan Bevestig de fietsen individueel met behulp van de frame steunen en de voor en achterwielen met behulp van de veiligheidsgordels Q P O Peligro Antes de instalar el porta bicicletas controlar siempre que se encuentre en buen estado su solidez y el grado de corrosión de las bisagras de la puerta posterior o del cofre del coche La placa y las luces posteriores deben estar siempre visib...

Page 28: ...c zakjes deze kunnen gevaarlijk speelgoed voor kinderen worden S R La placa y las luces deben estar siempre bien visi bles Nunca las correas de anclaje y de seguridad deben llegar a contacto con partes afiladas Fijar firmemente sus extre mos con nudos En el caso de coches con limpiaparabrisas en el cri stal trasero comprobar que su funcionalidad no se vea afectada En caso contrario conviene desmon...

Page 29: ...s etc o en el borde superior del cofre del portaequipajes parte posterior tronca controlar que las correas estén inserta das correctamente en las hebillas correspondientes F E D C B A De bovenste beugel 3 de middelste beugel 2 en de draagbeugel 4 aan het onderstel 1 bevestigen Let op de kartelmoeren 12 nog niet strak aandraaien omdat het fietsenrek eerst aan het voertuig aangepast moet worden Schu...

Page 30: ...pompen etc verwijde ren M L I H G A ambos lados del cofre del portaequipaje engan char las dos correas cortas 24 Controlar que las cor reas estén insertadas correctamente en las hebillas corre spondientes Enganchar las otras dos correas cortas 24 en el borde inferior de la puerta Station Wagon mini buses etc o en el borde inferior del cofre del portaequipajes parte posterior tronca controlar que l...

Page 31: ...lo al alcance de los niños N Het openen en sluiten van de achterklep is niet bij ieder type voertuig mogelijk De achterklep moet elke keer zeer zorgvuldig geopend en gesloten worden omdat de haken of het rek de carrosserie kunnen beschadigen Let u dus op dat het fietsenrek niet tegen het dak van het voertuig of tegen de antennes gedrukt wordt Onderweg Voorafgaand aan ieder vertrek en bij tussensto...

Page 32: ......
Reviews: