background image

3

ÍNDICE


INFORMAÇÕES DE SEGURANÇA....................................................................................................................................... 64 
CARACTERÍSTICAS ........................................................................................................................................................... 67 
INSTALAÇÃO....................................................................................................................................................................... 68 
UTILIZAÇÃO ........................................................................................................................................................................ 71 
LIMPEZA E MANUTENÇÃO.................................................................................................................................................. 72 

INNEHÅLL


SÄKERHETSINFORMATION ................................................................................................................................................ 74 
EGENSKAPER..................................................................................................................................................................... 77 
INSTALLATION.................................................................................................................................................................... 78 
ANVÄNDING........................................................................................................................................................................ 81 
NGÖRING OCH UNDERHÅL ................................................................................................................................................ 82 

PT 

SE 

Summary of Contents for 330.0513.623

Page 1: ...Libretto di Istruzioni Instructions Manual Manuel d Instructions Bedienungsanleitung Gebruiksaanwijzing Manual de instrucciones Manual de Instru es Bruksanvisning...

Page 2: ...24 CARACTERISTIQUES 27 INSTALLATION 28 UTILISATION 31 NETTOYAGE ET ENTRETIEN 32 INHALTSVERZEICHNIS SICHERHEITSINFORMATIONEN 34 CHARAKTERISTIKEN 37 MONTAGE 38 BEDIENUNG 41 REINIGUNG UND WARTUNG 42 INH...

Page 3: ...DICE INFORMA ES DE SEGURAN A 64 CARACTER STICAS 67 INSTALA O 68 UTILIZA O 71 LIMPEZA E MANUTEN O 72 INNEH LL S KERHETSINFORMATION 74 EGENSKAPER 77 INSTALLATION 78 ANV NDING 81 NG RING OCH UNDERH L 82...

Page 4: ...lati a un altezza inferiore vedere il paragrafo relativo alle dimensioni di lavoro e all installazione Se le istruzioni di installazione del piano cottura a gas specificano una distanza maggiore di qu...

Page 5: ...r lo scarico dei fumi importante attenersi scrupolosamente ai regolamenti stabiliti dalle autorit locali AVVERTENZA prima di installare la cappa rimuovere le pellicole di protezione Usare solo viti e...

Page 6: ...zzano gas o altri combustibili non applicabile ad apparecchi che scaricano unicamente l aria nel locale Il simbolo sul prodotto o sulla sua confezione indica che il prodotto non pu essere smaltito com...

Page 7: ...1 1 Camino Superiore 2 2 1 Camino Inferiore 9 1 Flangia riduzione 150 120 15 1 Raccordo Uscita Aria 19 1 Angolare Camino Rif Q t Componenti di Installazione 7 2 1 2 Staffe Fissaggio Camino Superiore...

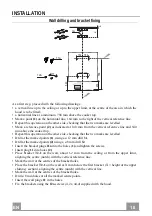
Page 8: ...m sopra il Piano di Cottura Ripetere questa operazione dalla parte opposta verificandone il livellamento Forare 12 mm i punti 1 segnati Forare 8 mm i punti 2 segnati Inserire i tasselli con staffa 11a...

Page 9: ...vite di sicurezza 12a Richiudere le Ante l Anta 12a Vr 11a Connessioni USCITA ARIA VERSIONE ASPIRANTE Per installazione in Versione Aspirante collegare la Cappa alla tubazione di uscita per mezzo di...

Page 10: ...i par Manutenzione e as sicurarsi che il connettore del Cavo di alimentazione sia corret tamente inserito nella presa dell Aspiratore Montaggio Camino Fissare l angolare 15 al corpo cappa con le viti...

Page 11: ...ci A fun zione attiva possibile cambiare la velocit di esercizio I rispettivi tasti T1 T2 o T3 o T4 Lampeggiano T4 Accende il motore alla terza velocit I Tasti T1 T4 sono accesi Premuto per 2 Secondi...

Page 12: ...nche in lavastoviglie e necessitano di essere lavati ogni 2 mesi circa di utilizzo o pi frequentemente per un uso particolarmente intenso Aprire i Comfort Panel tirandoli Togliere i Filtri uno alla vo...

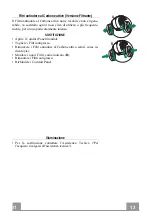
Page 13: ...per un uso particolarmente intenso SOSTITUZIONE Aprire i Comfort Panel tirandoli Togliere i Filtri antigrasso Rimuovere i Filtri antiodore al Carbone attivo saturi come in dicato A Montare i nuovi Fi...

Page 14: ...height please refer to the paragraphs on working dimensions and installation If the instructions for installation of the gas hob specify a greater distance this must be respected Check that the mains...

Page 15: ...to be adopted for fume discharging it is important to closely follow the regulations pro vided by the local authorities WARNING Before installing the Hood remove the protective films Use only screws a...

Page 16: ...ls not applicable to appliances that only discharge the air back into the room The symbol on the product or on its packaging indicates that this product may not be treated as household waste Instead i...

Page 17: ...2 1 1 Upper chimney 2 2 1 Lower chimney 9 1 Reduction flange 150 120 15 1 Air Outlet Connector 19 1 Chimney Element Ref Q ty Installation Components 7 2 1 2 Upper chimney fixing brackets 11 6 Plugs 1...

Page 18: ...his operation on the other side checking that the two marks are levelled Drill at the marked points 1 using a 12 mm drill bit Drill at the marked points 2 using a 8 mm drill bit Insert the bracket plu...

Page 19: ...r to level the hood body itself Fasten the safety screw 12a Close the doors the door again 12a Vr 11a Connections DUCTED VERSION AIR EXHAUST SYSTEM When installing the ducted version connect the hood...

Page 20: ...e that the connector of the feeding cable is correctly inserted in the socket placed on the side of the fan Fitting the Chimney Fix the corner element 15 to the hood canopy using the screws 12d 2 9 x...

Page 21: ...le to change the op erating speed when this function is enabled The respective buttons T1 T2 or T3 or T4 will flash T4 Turns the Motor on at speed three Buttons T1 T4 are on Press and hold for 2 secon...

Page 22: ...ently for particularly heavy usage and can be washed in a dishwasher Pull the comfort panels to open them Remove the filters one by one pushing them towards the back side of the hood unit and simultan...

Page 23: ...frequently with heavy usage REPLACING THE ACTIVATED CHARCOAL FILTER Open the comfort panels pulling them downwards Remove the metal grease filters Remove the saturated activated charcoal filter as sh...

Page 24: ...inf rieure voir le paragraphe concernant les dimensions de travail et l installation Si les instructions d installation du plan de cuisson gaz sp cifient une distance sup rieure celle indiqu e ci des...

Page 25: ...par les autorit s locales AVERTISSEMENT Avant d installer la hotte retirer les films de protection Utilisez exclusivement des vis et des petites fournitures du type adapt pour la hotte AVERTISSEMENT t...

Page 26: ...temps que des appareils utilisant du gaz ou d autres combustibles non applicable aux appareils qui vacuent l air uniquement dans la pi ce Le symbole marqu sur le produit ou sur son emballage indique...

Page 27: ...2 1 1 Conduit sup rieur 2 2 1 Conduit inf rieur 9 1 Buse de r duction 150 120 15 1 Raccord sortie air 19 1 l ment d angle conduit R f Q t Composants de l installation 7 2 1 2 Brides de fixation condu...

Page 28: ...tion de l autre c t et v rifier la mise niveau Percer les points marqu s 1 avec une m che de 12 mm Percer les points marqu s 2 avec une m che de 8 mm Mettre les chevilles avec le support 11a dans les...

Page 29: ...eau Visser les vis de s curit 12a Refermer les portes la porte 12a Vr 11a Branchements SORTIE AIR VERSION ASPIRANTE Pour l installation en version aspirante relier la hotte au tube de sortie au moyen...

Page 30: ...onnecteur du c ble d alimentation soit bien branch dans la prise du diffuseur Montage du conduit d vacuation Fixer l l ment d angle 15 au corps de la hotte au moyen des vis 12d 2 9 x 9 5 fournies avec...

Page 31: ...airage Lorsque la fonction est active vous pouvez varier la vitesse d exercice Les touches respectives T1 T2 ou T3 ou T4 clignotent T4 D marre le moteur en troisi me vitesse Les touches T1 T4 sont al...

Page 32: ...SE METALLIQUES AUTOPORTEURS Lavables au lave vaisselle ils doivent tre lav s environ tous les 2 mois d emploi ou plus fr quemment en cas d emploi par ticuli rement intense Tirer sur les panneaux confo...

Page 33: ...en cas d usage particuli rement intense REMPLACEMENT Tirer sur les panneaux confort pour les ouvrir Retirer les filtres graisse Enlever les filtres anti odeur au charbon actif satur s comme indiqu A...

Page 34: ...ge Modelle k nnen auch niedriger installiert werden siehe Absatz Installation Sollten die Installationsanweisungen des gasbetriebenen Kochfelds einen gr eren Abstand als oben angegeben vorsehen ist di...

Page 35: ...en Beh rden streng einzuhalten WARNUNG Bevor die Haube installiert wird die Schutzfolien abziehen Nur f r die Abzugshaube geeignete Schrauben und Kleinteile verwenden WARNUNG Die mangelnde Verwendung...

Page 36: ...Brennstoffe benutzen muss im Raum eine ausreichende Bel ftung vorhanden sein gilt nicht f r Ger te die nur Luft in den Raum ablassen Schutzschild bei Rissbildung ersetzen Das Symbol am Produkt oder a...

Page 37: ...ter 2 1 1 Oberer Kaminteil 2 2 1 Unterer Kaminteil 9 1 Reduzierflansch 150 120 15 1 Anschluss Luftauslass 19 1 B gel f r Kamin Bez Menge Installationskomponenten 7 2 1 2 Befestigungswinkel oberer Kami...

Page 38: ...und die Ausrichtung berpr fen Die gekennzeichneten Punkte 1 mit einem Bohrer 12 mm bohren Die gekennzeichneten Punkte 2 mit einem Bohrer 8 mm bohren Die D bel mit dem B gel 11a in die Bohrungen 1 ein...

Page 39: ...ichten Die Sicherungsschraube 12a einschrauben Die Klappen wieder verschlie en Die Klappe ff nen 12a Vr 11a Anschluss im Abluftbetrieb Bei Abluftbetrieb kann die Haube vom Installateur wahlweise mitte...

Page 40: ...nen Sie die Fettfilter s Abschnitt Wartung und versi chern Sie sich da die Kabelverbindung in die Steckdose des Gebl ses einwandfrei eingesteckt wird Montage des Kamins Den B gel 15 mit den mitgeliefe...

Page 41: ...Bei aktiver Funktion kann die Betriebsgeschwindigkeit ge ndert werden Die entsprechenden Tasten T1 T2 oder T3 oder T4 blinken T4 Schaltet den Motor bei der dritten Betriebsge schwindigkeit ein Die Ta...

Page 42: ...ssen nach 2 monatigem Betrieb bzw bei starkem Ein satz auch h ufiger gereinigt werden was im Geschirrsp ler m glich ist Das Absauge Paneel ffnen Bauen Sie die Filter einzeln aus Dr cken Sie die Filter...

Page 43: ...h ufiger ersetzt werden AUSWECHSELN Das Absauge paneel ffnen Die Fettfilter entfernen Die verbrauchten Aktivkohle Geruchsfilter wie angegeben ausbauen A Die neuen Filter wie angegeben einbauen B Die F...

Page 44: ...zie de paragraaf over de werkafmetingen en de installatie Als de installatievoorschriften van de gaskookplaat bepalen dat een grotere afstand in acht moet worden genomen dan hierboven is aangegeven d...

Page 45: ...door de lokale autoriteiten zijn bepaald nauwgezet worden opgevolgd WAARSCHUWING verwijder de beschermfolie alvorens de afzuigkap te installeren Gebruik alleen schroeven en kleine onderdelen die gesc...

Page 46: ...t apparaten op gas of andere brandstoffen wordt gebruikt niet van toepassing op apparaten die alleen lucht in de ruimte blazen Het symbool op het product of op de verpakking wijst erop dat dit product...

Page 47: ...1 Bovenste schouw 2 2 1 Onderste schouw 9 1 Verloopflens 150 120 15 1 Verbindingsstuk luchtuitlaat 19 1 Hoekelement schouw Ref Aantal Installatieonderdelen 7 2 1 2 Bevestigingsbeugels bovenste schouw...

Page 48: ...controleer de uitlijning Boor gaten van 12 mm op de plaats van de getekende punten 1 Boor gaten van 8 mm op de plaats van de getekende punten 2 Plaats de pluggen met de beugel 11a in de gaten 1 en dr...

Page 49: ...n Draai de veiligheidsschroef 12a aan Sluit de panelen het paneel weer Aansluitingen LUCHTUITLAAT AFZUIGVERSIE Bij installatie in afzuigversie moet u de wasemkap met de uitlaatleiding verbinden door m...

Page 50: ...zie par Onderhoud en verzeker u ervan dat de stekker van de voedingskabel goed in de contact doos van de afzuigkap is gestoken Montage van de schouw Bevestig het hoekelement 15 aan de afzuigkap met de...

Page 51: ...verlichting Bij ingeschakelde functie kan de bedrijfssnelheid worden gewijzigd De bijbehorende toetsen T1 T2 of T3 of T4 knipperen T4 Schakelt de motor op de derde snelheid in De toetsen T1 T4 branden...

Page 52: ...EN VETFILTERS De filters moeten eens in de 2 maanden of bij bijzonder inten sief gebruik vaker gereinigd worden en kunnen ook in de vaatwasmachine worden gewassen Trek het Comfort Panel open Verwijder...

Page 53: ...a ker bij zeer intensief gebruik VERVANGING Trek de Comfort Panels open Verwijder de vetfilters Verwijder de verzadigde geurfilters met actieve koolstof zoals aangegeven A Monteer de nieuwe filters zo...

Page 54: ...altura inferior v ase la secci n sobre dimensiones de trabajo e instalaci n Si en las instrucciones de montaje de la placa de cocci n a gas se indica una distancia mayor que la indicada anteriormente...

Page 55: ...s es importante cumplir escrupulosamente las normas establecidas por las autoridades locales ADVERTENCIA Retire la pel cula protectora antes de instalar la campana Utilice nicamente tornillos y herram...

Page 56: ...cen gas u otros combustibles no aplicable a los aparatos que s lo descargan aire en el local El s mbolo en el producto o en su embalaje indica que este producto no debe desecharse como residuo dom sti...

Page 57: ...menea superior 2 2 1 Chimenea inferior 9 1 Brida de reducci n 150 120 mm 15 1 Racor salida aire 19 1 Angular de la chimenea Ref Cant Componentes de instalaci n 7 2 1 2 Bridas de fijaci n chimenea supe...

Page 58: ...Repetir esta operaci n por la parte opuesta verificando su nivelaci n Perforar 12 mm los puntos 1 marcados Perforar 8 mm los puntos 2 marcados Introducir los tacos con bridas 11a en los orificios 1 y...

Page 59: ...el Cuerpo de la Campa na Atornillar el tornillo de seguridad 12a Cerrar las puertas la puerta 12a Vr 11a Conexiones SALIDA DEL AIRE VERSI N ASPIRANTE Para la instalaci n de la versi n aspirante conec...

Page 60: ...egurase de que el conector del Cable de acometida est colocado correctamente en el enchufe del Aspirador Montaje chimenea Fijar el angular 15 al cuerpo de la campana con los tornillos 12d 2 9 x 9 5 en...

Page 61: ...a funci n activa es posible cambiar la velocidad de ejercicio Las respectivas teclas T1 T2 o T3 o T4 parpadean T4 Enciende el motor a la tercera velocidad Las teclas T1 T4 est n encendidas Presionada...

Page 62: ...ICOS Se pueden lavar en el lavavajillas y requieren un lavado cada 2 meses aproximadamente o m s a menudo si su uso es muy in tenso Abrir los confort panel tirando de ellos Quitar los filtros uno a la...

Page 63: ...ACTIVO Abrir el Panel Aspirante tir ndo de l Quitar los filtros antigrasa met licos Quitar los filtros antiolor de carb n activo saturado de la ma nera indicada A Montar los nuevos filtros B Montar l...

Page 64: ...r o ser instalados a altura inferior consulte o par grafo sobre as dimens es de trabalho e a instala o Se nas instru es de instala o da placa de cozinha a g s estiver especificada uma dist ncia maior...

Page 65: ...ecess rio respeitar para evacuar o fumo importante seguir atentamente os regulamentos estabelecidos pelas autoridades locais ADVERT NCIA antes de instalar o exaustor retire as pel culas de prote o Uti...

Page 66: ...for utilizado simultaneamente com aparelhos que utilizem g s ou outros combust veis n o aplic vel a aparelhos que apenas descarregam ar no aposento O s mbolo colocado no produto ou na sua embalagem i...

Page 67: ...2 1 1 Chamin superior 2 2 1 Chamin inferior 9 1 Flange de redu o 150 120 15 1 Conex o de sa da de ar 19 1 Cantoeira da chamin Ref Qtd Componentes de instala o 7 2 1 2 Suportes para fixa o da chamin s...

Page 68: ...o lado oposto verificando a nivela o Com uma broca de 12 mm fure os pontos 1 marcados Com uma broca de 8 mm fure os pontos 2 marcados Introduza as buchas com suporte 11a nos furos 1 e aperte Introduza...

Page 69: ...Bell Aperte o parafuso de bloqueio 12a Feche as portas as porta 12a Vr 11a Liga es SA DA DO AR PARA A VERS O ASPIRANTE Para a instala o na Vers o Aspirante ligue o exaustor ao tubo de sa da utilizand...

Page 70: ...ando se de que o conector do cabo de alimenta o est correctamente instalado na tomada existente do lado do venti lador Montagem da chamin Fixe a cantoneira 15 ao corpo do exaustor com os parafusos 12d...

Page 71: ...zes Com esta fun o activada poss vel mudar a velocidade de servi o As respectivas teclas T1 T2 ou T3 ou T4 piscam T4 Liga o motor com velocidade III As teclas T1 T4 est o acesas Se for premida durante...

Page 72: ...Os filtros dever o ser limpos de 2 em 2 meses de funcionamento ou mais frequentemente em situa es de utiliza o extrema e podem ser lavados na m quina de lavar lou a Abra o painel Comfort puxando os D...

Page 73: ...dade SUBSTITUI O DO FILTRO DE CARV O ACTIVO Abra o painel Comfort puxando os Tire os filtros met licos antigordura Remova o filtro anti odor de carv o activo saturado conforme indicado A Monte o filtr...

Page 74: ...kten r 650 mm vissa modeller kan installeras p en l gre h jd se avsnittet g llande drift och installationsm tt Om installationsanvisningarna f r gasspish llen anger ett st rre avst nd n det ovan angi...

Page 75: ...kerhetsm ssiga tg rder som ska vidtas f r avledning av r k VARNING Ta bort skyddsfilmen innan du installerar k ksfl kten Anv nd endast skruvar och beslag som r l mpliga f r k ksfl kten VARNING Om det...

Page 76: ...ksfl kten anv nds samtidigt med andra apparater som anv nder gas eller andra br nslen g ller inte apparater som endast sl pper ut luft i lokalen Symbolen p apparaten eller emballaget anger att appara...

Page 77: ...1 Undre skorsten 9 1 Reduktionsfl ns 150 120 15 1 Anslutningsstycke f r luftutsl pp 19 1 Skorstensvinkel Ref Antal Installationskomponenter 7 2 1 2 Konsoler f r fasts ttning av vre skorsten 11 6 Expa...

Page 78: ...m ver kokh llen Upprepa detta moment fr n den motsatta delen kontrollera nivelleringen Borra 12 mm h l i de markerade punkterna 1 Borra 8 mm h l i de markerade punkterna 2 S tt i expansionspluggarna m...

Page 79: ...Vr Skruva fast s kerhetsskruvarna 12a St ng luckan luckorna 12a Vr 11a Anslutningar ANSLUTNING AV VERSION MED FR NLUFTKANAL Vid installation av versionen med fr nluftkanal anslut k ksfl kten till skor...

Page 80: ...mm emellan kontakterna Avl gsna fettfiltren se avsnitt Underh ll och se till att n t sladdens kontaktdon r r tt isatt i fl ktens uttag Montering av skorsten F st vinkeln 15 p k ksfl ktstommen med de m...

Page 81: ...Mo tor Belysning Med aktiv funktion r det m j ligt att ndra drifthastigheten De respektive knapparna T1 T2 eller T3 eller T4 blinkar T4 Sl r p motorn p den tredje hastigheten Knapparna T1 T4 r t nda T...

Page 82: ...filter RENG RING AV SJ LVB RANDE METALLFETTFILTER Dessa kan ven diskas i diskmaskin de ska diskas varannan m nad cirka eller oftare vid intensiv anv ndning ppna Comfortpanelerna genom att dra i dem Ta...

Page 83: ...ing BYTE AV LUKTFILTER MED AKTIVT KOL ppna Comfortpanelerna genom att dra i dem Ta bort metallfettfiltren Avl gsna de m ttade luktfiltren med aktivt kol som visas A Montera de nya filtren som visas B...

Page 84: ...991 0618 745_ver1 200330 D00006389_00...

Reviews: